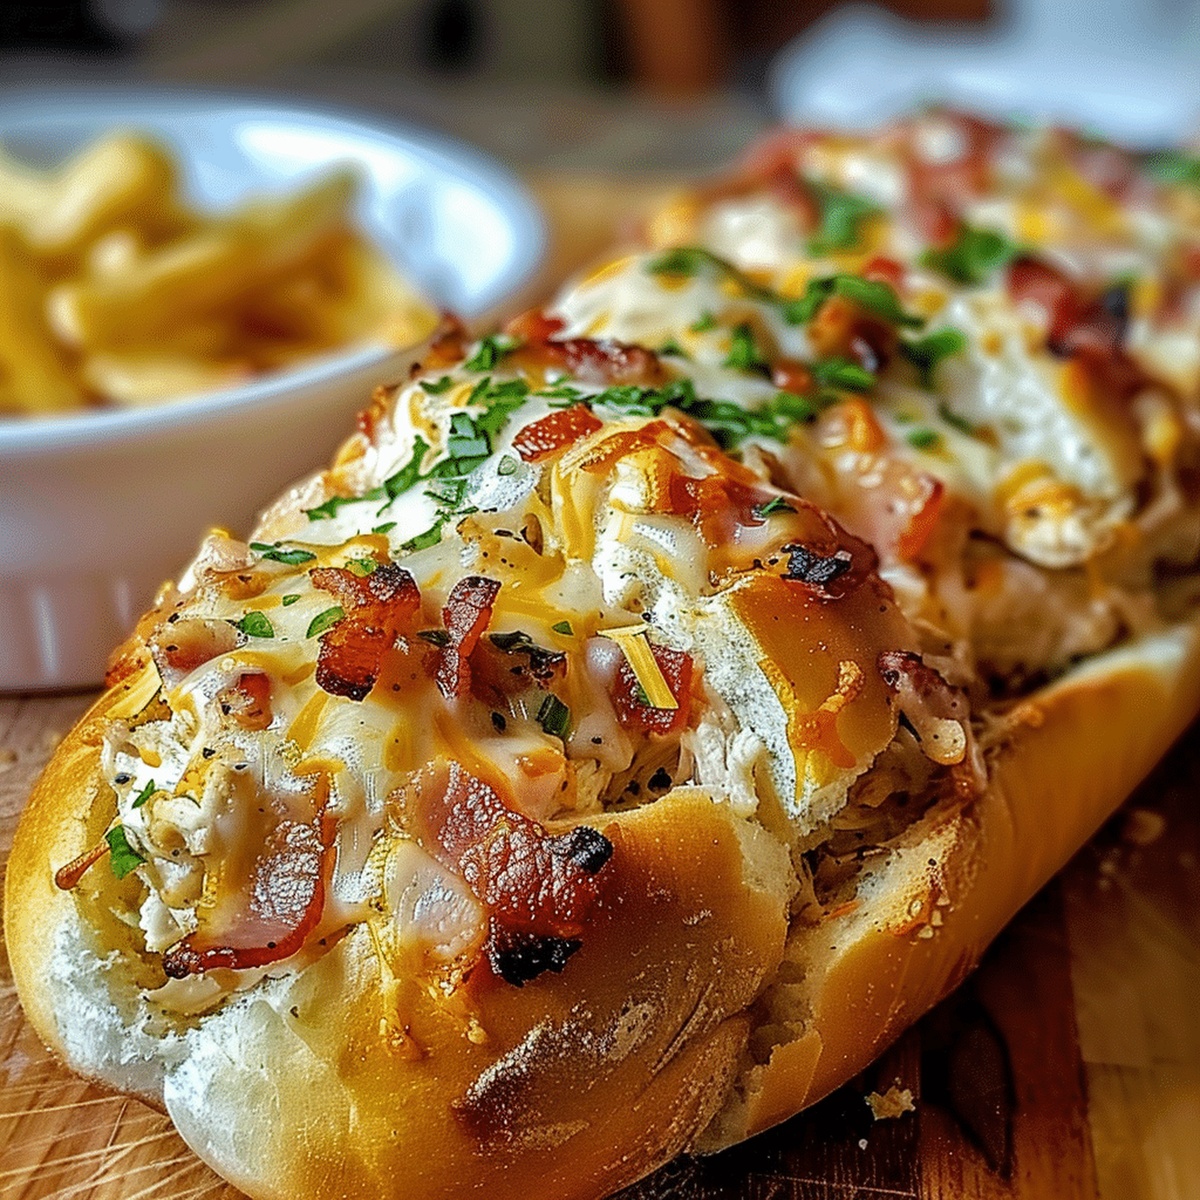
Gooey Cheesy Chicken Bacon Ranch Stuffed Bread Recipe
Comfort food reaches new heights with this mouthwatering cheesy chicken bacon ranch stuffed bread that promises to satisfy every craving.
Crispy bacon, tender chicken, and creamy ranch blend into a delectable filling that melts perfectly inside soft, golden bread.
Each bite delivers a symphony of flavors that dance across your palate with irresistible charm.
The combination of melted cheese, savory chicken, and smoky bacon creates an irresistible aroma that will draw everyone to the kitchen.
Simple ingredients transform into an extraordinary dish that feels like a warm culinary hug.
This crowd-pleasing recipe turns an ordinary meal into an extraordinary experience.
Prepare to impress and indulge in a dish that celebrates delicious simplicity.
Quick Recipe Overview

Chicken Bacon Ranch Bread Ingredients
For Bread Base:For Protein and Flavor Builders:For Moisture and Binding Elements:For Finishing and Enhancing:For Optional Enhancers:Tools for Assembling a Stuffed Bread Loaf
Steps to Make Chicken Bacon Ranch Stuffed Bread

Warm up your oven to a toasty 375°F. Grab a loaf and slice off its top, scooping out the center like you’re creating a delicious bread canoe. Save those bread chunks for another adventure or toss them.
In a mixing bowl, toss together shredded chicken, creamy ranch, melty cheese, crispy bacon bits, and zesty green onions. Mix until every ingredient is dancing together in perfect harmony.
Generously spoon your flavor-packed mixture into the bread boat, pressing gently to ensure every nook gets filled with deliciousness.
Melt some butter and sprinkle in garlic powder. Use a brush to paint the top and edges of your bread with thisal garlic butter.
Slide your creation into the oven and let it transform for 20-25 minutes. You’ll know it’s ready when the cheese turns into a molten masterpiece and the bread becomes a golden, crispy dream.
If you’re feeling fancy, sprinkle some fresh parsley on top. Slice into generous portions and watch everyone’s eyes light up with excitement.
Additions That Bring More Flavor Inside the Loaf
Best Ways to Serve Stuffed Bread Warm
Reheating and Storing This Stuffed Bread Right
FAQs
Yes, rotisserie chicken or leftover grilled chicken works perfectly. Just shred the chicken and mix it with other ingredients.
Ranch adds flavor, but you can substitute with sour cream or cream cheese if needed. The key is having a creamy base that binds ingredients.
Prepare the filling and stuff the bread earlier in the day, then refrigerate. Bake just before serving to maintain bread’s crispiness.
A sturdy French bread or sourdough loaf is ideal. Choose a bread that can hold the filling without falling apart and has a thick crust.
Print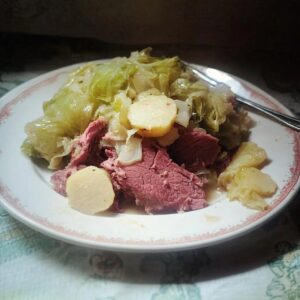
Crockpot Corned Beef And Cabbage Recipe
- Total Time: 8-10 hours 10 minutes
- Yield: 8 1x
Description
Hearty Crockpot Corned Beef and Cabbage brings Irish comfort straight to kitchen tables with minimal effort. Tender meat and garden-fresh vegetables slow-cook into a classic one-pot meal perfect for Saint Patrick’s Day celebrations.
Ingredients
Meat:
- 1 (3-4 lb) corned beef brisket, with spice packet
Vegetables and Herbs:
- 1 yellow onion, quartered
- 4 carrots, cut into chunks
- 3 Yukon gold or red potatoes, halved
- ½ head of cabbage, cut into wedges
- 3 garlic cloves, minced
- 2 bay leaves
Liquids and Seasonings:
- 4 cups beef broth (or water)
- 1 bottle (12 ounces) of beer (optional, for extra depth – Guinness works great!)
- 1 tablespoon Worcestershire sauce (optional, adds richness)
- 1 tablespoon brown sugar (balances flavors)
- 1 teaspoon black peppercorns
Instructions
- Arrange a foundation of aromatic vegetables by layering sliced onions, roughly chopped carrots, and halved potatoes across the bottom of the crockpot, creating a flavorful bed for the meat.
- Carefully position the corned beef brisket atop the vegetable base, ensuring the fatty side faces upward, and generously scatter the accompanying spice packet over the meat’s surface.
- Enhance the cooking liquid by combining robust beef broth, a splash of beer for depth, a dash of Worcestershire sauce for complexity, a touch of brown sugar for subtle sweetness, minced garlic for pungency, fragrant bay leaves, and whole black peppercorns.
- Secure the crockpot lid and allow the contents to simmer gently on low temperature for 8-10 hours, or alternatively on high for 5-6 hours, until the meat becomes incredibly tender and effortlessly separates with a gentle fork.
- During the final 1½ hours of cooking, delicately nestle fresh cabbage wedges on top of the simmering meat, allowing them to absorb the rich, aromatic braising liquid.
- After cooking, transfer the corned beef to a cutting board and let it rest momentarily, then slice against the grain into succulent portions, accompanied by the perfectly cooked vegetables and a generous ladle of the deeply flavored cooking broth.
Notes
- Customize the liquid by replacing beer with extra beef broth or apple juice for a non-alcoholic version that maintains rich flavor depth.
- Trim excess fat from the corned beef brisket before cooking to reduce greasiness and create a leaner final dish.
- Cut vegetables into larger, uniform chunks to prevent them from becoming mushy during the long, slow cooking process.
- Choose a flat-cut corned beef brisket instead of a point-cut for more even cooking and a more consistent texture throughout the meat.
- Prep Time: 10 minutes
- Cook Time: 8-10 hours
- Category: Dinner
- Method: Slow Cooking
- Cuisine: Irish
Nutrition
- Serving Size: 8
- Calories: 350
- Sugar: 2 g
- Sodium: 800 mg
- Fat: 20 g
- Saturated Fat: 8 g
- Unsaturated Fat: 10 g
- Trans Fat: 0 g
- Carbohydrates: 30 g
- Fiber: 4 g
- Protein: 25 g
- Cholesterol: 80 mg
John Nicholson
Lead Writer & Recipe Developer
Expertise
Recipe Testing and Development, Kitchen Hacks and Time-Saving Tips, Flavor Pairing and Ingredient Selection, Engaging Food Writing and Storytelling
Education
Johnson & Wales University
John Nicholson honed his skills at Johnson & Wales University, learning how to use fresh, local ingredients and down-to-earth techniques to make cooking simple and satisfying.
His recipes blend Southern comfort flavors with a modern touch, inviting everyone to cook with ease and confidence.
Living in Charleston, John takes cues from the city’s lively food scene, local markets, and seasonal produce. He’s all about making meals stress-free through easy tips, flavor pairings, and fun experiments in the kitchen