
Cheesy Mexican Lasagna Recipe Perfect for Taco Night
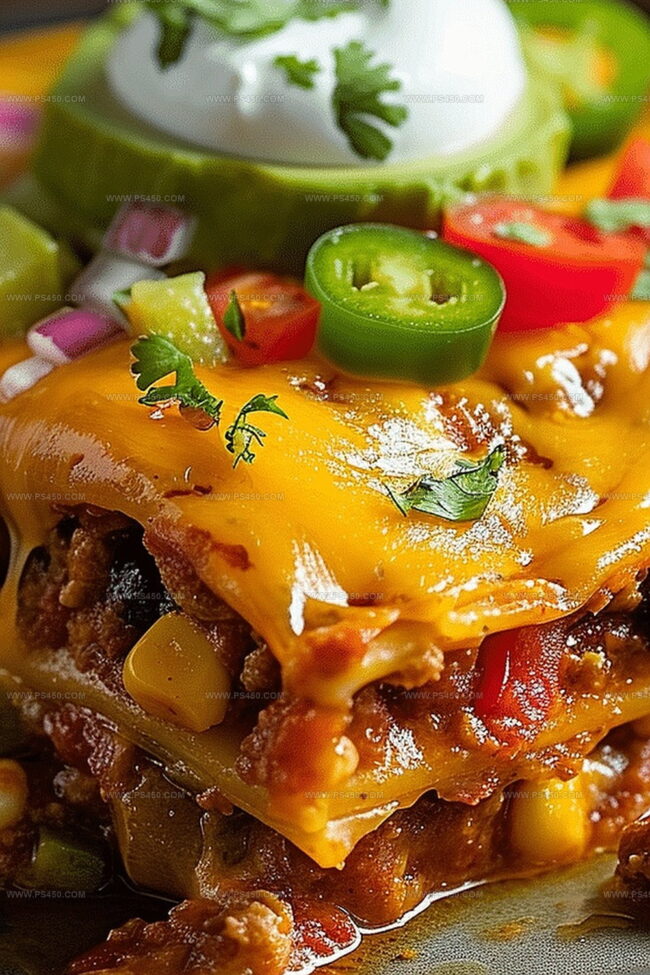
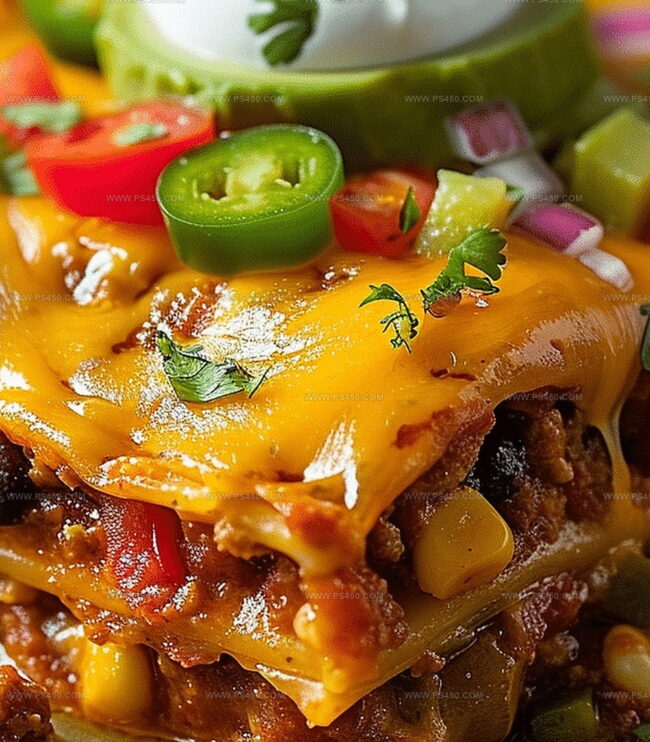
Layers of bold flavors dance across this irresistible cheesy Mexican lasagna that blends zesty spices with comforting pasta textures.
Melted cheese cascades between tortillas and seasoned ground beef, creating a mouthwatering fusion of Mexican and Italian culinary traditions.
Vibrant ingredients burst with color and richness, promising a meal that satisfies deep hunger pangs.
Each bite delivers a perfect balance of crispy edges and tender, sauce-soaked layers.
Spices like cumin and chili powder add depth and warmth to every forkful.
Weeknight dinners transform into a celebration of bold, hearty cuisine.
Serve this crowd-pleasing dish and watch everyone gather around the table with eager anticipation.
Quick Recipe Overview
What You’ll Need for Mexican Lasagna
For Protein and Flavor Base:For Moisture and Texture:For Assembly and Topping:Tools for Building Layers of Mexican Lasagna
How to Make Mexican Lasagna at Home
Brown ground meat in a sizzling skillet, crumbling it into delicious bite-sized pieces. Toss in onions and garlic, letting them dance and release their aromatic.
Stir in zesty taco seasoning, black beans, corn, salsa, and tomatoes. Let the mixture simmer and mingle, creating a flavor explosion that’ll make your taste buds sing.
Warm up the oven to 375F. Grab a baking dish and create delicious layers: start with a meat base, then layer tortillas like edible blankets. Spread meat mixture generously and shower each layer with a cheesy waterfall.
Cover with foil and slide into the oven. Bake for 20 minutes, then unveil and let the cheese transform into a golden, bubbly masterpiece for another 10-15 minutes.
Let the Mexican lasagna rest briefly, then slice into this flavor-packed creation. Sprinkle fresh cilantro on top and invite your favorite toppings to the party.
Tips to Enhance Your Mexican Lasagna Flavor
Serving Mexican Lasagna Like a Pro
Planning Ahead with Mexican Lasagna Leftovers
FAQs
Tortillas create a unique Mexican-inspired texture and absorb flavors better. They’re also easier to layer and provide a crispy edge when baked.
Absolutely! Replace ground meat with additional beans, plant-based meat alternatives, or extra vegetables like zucchini and bell peppers to maintain the protein content.
The spice level depends on your taco seasoning and salsa. Use mild ingredients for a kid-friendly version or add hot salsa and extra jalapeños for more heat.
Yes, Mexican Lasagna reheats wonderfully and stays fresh in the refrigerator for 3-4 days. You can even freeze portions for quick future meals.
Print
Keto Smoked Egg Salad Recipe
- Total Time: 3 hours 20 minutes
- Yield: 6 1x
Description
Keto smoked egg salad brings Mediterranean charm to classic comfort food, blending rich smoky flavors with creamy textures. Protein-packed ingredients create a low-carb delight you can savor without guilt, perfect for health-conscious meal planners seeking delicious alternatives.
Ingredients
Main Ingredients:
- 12 large eggs
- 2 cups (480 milliliters) mayonnaise
Seasonings:
- ½ teaspoon salt
- ½ teaspoon ground black pepper
- ½ teaspoon paprika
- ½ teaspoon mustard powder
- ¼ teaspoon garlic powder
- ¼ teaspoon onion powder
Liquid Ingredient:
- 2 tablespoons (30 milliliters) apple cider vinegar
Instructions
- Prepare the grill by setting the pellet grill to a precise temperature of 325F (163C), ensuring an even cooking environment for the eggs.
- Carefully position raw eggs directly on the grill grates, allowing them to cook uniformly for 15 minutes. Gently rotate the eggs to cook the opposite side for another 15 minutes, promoting consistent heat distribution.
- Immediately transfer the cooked eggs to an ice bath, submerging them completely to halt the cooking process and create a perfectly smooth exterior.
- Reduce the grill temperature to 180F (82C) for the smoking phase. Delicately peel the cooled eggs under gentle cold running water, ensuring no shell fragments remain.
- Lightly coat a wire rack with cooking spray to prevent sticking, then carefully arrange the peeled eggs on the rack.
- Place the rack in the smoker, allowing the eggs to absorb rich, aromatic smoke for 30-45 minutes, developing a complex flavor profile.
- Meanwhile, create the dressing by whisking mayonnaise, apple cider vinegar, salt, pepper, paprika, mustard powder, garlic powder, and onion powder in a mixing bowl until smooth and well-incorporated.
- Refrigerate the prepared dressing to keep it cool and allow the flavors to meld while the eggs complete their smoking process.
- After smoking, transfer the eggs to the refrigerator and chill for 30 minutes to enhance their texture and flavor.
- Roughly chop the cooled smoked eggs, maintaining a rustic, chunky consistency.
- Gently fold the chopped eggs into the chilled dressing, ensuring each piece is evenly coated without breaking the egg pieces.
- Return the egg salad to the refrigerator for an additional 30-45 minutes, allowing the flavors to fully develop and intensify before serving.
Notes
- Precise temperature control is crucial for perfectly smoked eggs, ensuring they don’t overcook or become rubbery.
- Using cold running water while peeling helps separate the egg shell more easily and prevents tearing the delicate egg whites.
- Chilling the egg salad allows the smoky flavors to intensify and the dressing to fully coat the eggs, creating a more harmonious taste profile.
- For a lighter version, swap traditional mayonnaise with Greek yogurt or avocado-based mayo to reduce calories while maintaining a creamy texture.
- Prep Time: 20 minutes
- Cook Time: 1 hour
- Category: Breakfast, Lunch, Snacks
- Method: Grilling
- Cuisine: American
Nutrition
- Serving Size: 6
- Calories: 380
- Sugar: 1 g
- Sodium: 400 mg
- Fat: 36 g
- Saturated Fat: 6 g
- Unsaturated Fat: 30 g
- Trans Fat: 0 g
- Carbohydrates: 2 g
- Fiber: 0 g
- Protein: 12 g
- Cholesterol: 370 mg
John Nicholson
Lead Writer & Recipe Developer
Expertise
Recipe Testing and Development, Kitchen Hacks and Time-Saving Tips, Flavor Pairing and Ingredient Selection, Engaging Food Writing and Storytelling
Education
Johnson & Wales University
John Nicholson honed his skills at Johnson & Wales University, learning how to use fresh, local ingredients and down-to-earth techniques to make cooking simple and satisfying.
His recipes blend Southern comfort flavors with a modern touch, inviting everyone to cook with ease and confidence.
Living in Charleston, John takes cues from the city’s lively food scene, local markets, and seasonal produce. He’s all about making meals stress-free through easy tips, flavor pairings, and fun experiments in the kitchen