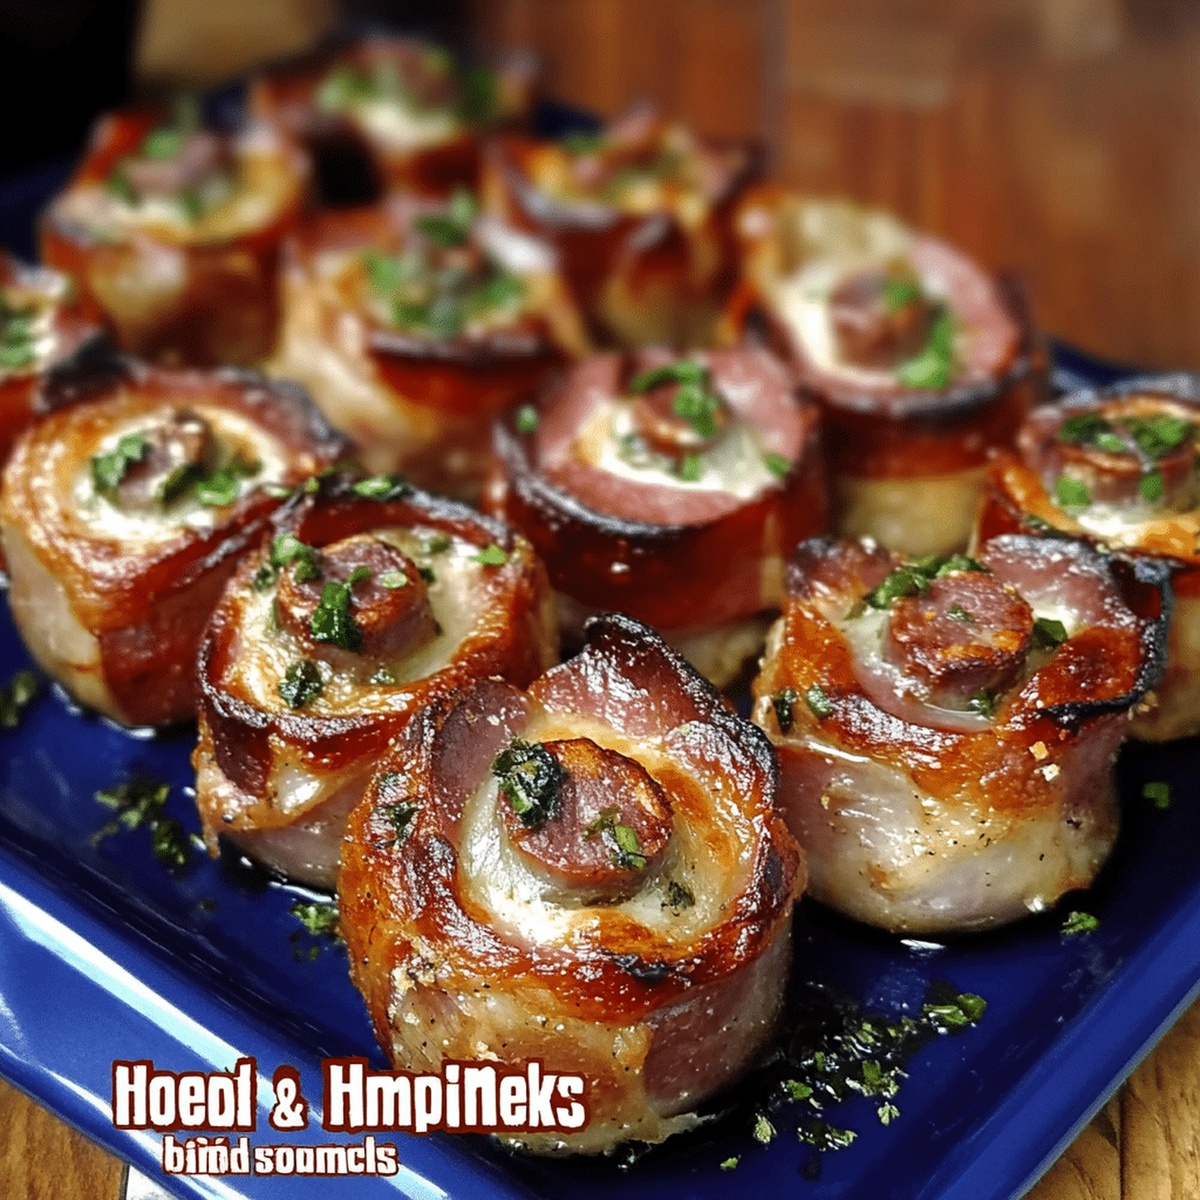
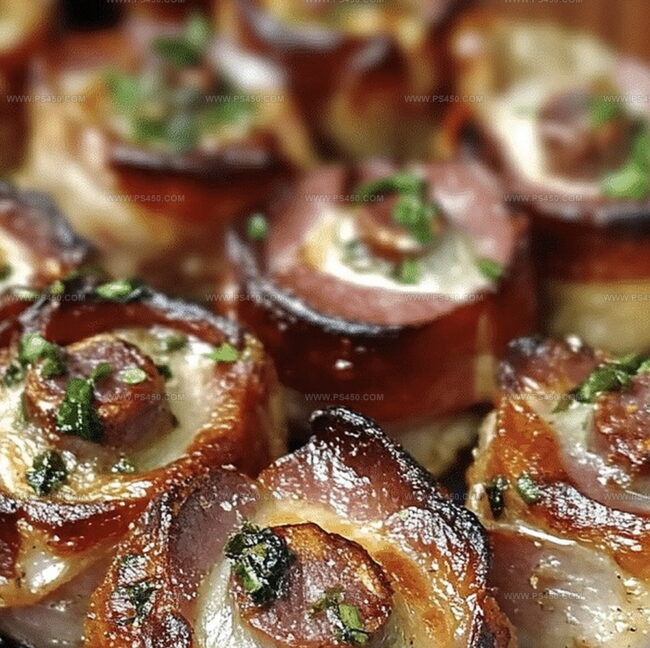
Crispy Pig Shots Recipe with Bacon and Sausage
Succulent bacon wraps around creamy cheese pig shots that promise an explosion of flavor in every bite.
These decadent appetizers combine smoky, savory elements into a mouthwatering treat.
Crisp bacon creates a perfect vessel for rich cream cheese and tangy seasonings.
Each pig shot delivers an irresistible combination of textures and tastes that will have guests asking for the recipe.
Crafted with simple ingredients, these bite-sized delights are surprisingly easy to prepare.
Packed with bold flavors and guaranteed to disappear quickly, these pig shots are the ultimate party starter that will elevate any gathering.
Prepare to be the culinary star with this crowd-pleasing appetizer that leaves everyone craving more.
Quick Recipe Overview

Pig Shots Ingredient Essentials
For Base Layer:For Creamy Filling:For Optional Spicy Kick:Tools You’ll Need for Oven-Baked Pig Shots
How to Bake Flavorful Pig Shots
Fire up your oven to a toasty 350F. This heat will transform those bacon cups into crispy, golden delights.
Blend breakfast sausage with cream cheese, blending in cheddar, garlic powder, onion powder, and paprika. Mix until the ingredients dance together in perfect harmony.
Wrap bacon slices around muffin tin edges, securing with toothpicks to create cute little cups. These will be your flavor containers.
Scoop the sausage mixture into bacon cups, leaving a little room for expansion. For adventurous eaters, sprinkle jalapeño on top for a spicy kick.
Slide your creation into the oven for 25-30 minutes. Watch the bacon transform into crispy, golden shells while the inside becomes mouthwateringly tender. For extra crunch, blast under the broiler for a quick 2-3 minutes.
Let these beauties cool slightly, then serve. Pair with ranch or barbecue sauce if you’re feeling extra indulgent. Get ready for a flavor explosion!
Tips to Amp Up the Bacon-Sausage Combo
Serving Pig Shots as Appetizers
Pig Shots: Store and Reheat with Ease
FAQs
Pig Shots are definitely a decadent treat packed with calories and fat. They’re more of an indulgent party snack or game day appetizer rather than a health-conscious option. They combine bacon, sausage, and cheese, making them rich and delicious but not nutritionally balanced.
Yes, you can prepare Pig Shots in advance. Assemble them completely and refrigerate for up to 24 hours before baking. When ready to serve, just pop them directly into the preheated oven. This makes them great for party planning and meal prep.
Thin or medium-cut bacon works best. Thick-cut bacon might not crisp up as nicely and could take longer to cook. Choose regular-cut bacon that’s not too thick or too thin to ensure perfect texture and crispiness.
You can freeze uncooked Pig Shots for up to 1 month. Place them on a baking sheet, freeze until solid, then transfer to a freezer bag. Thaw in the refrigerator overnight before baking and add a few extra minutes to cooking time.
Print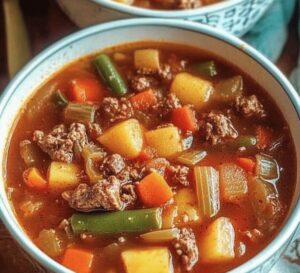
Hearty Vegetable Soup Recipe
- Total Time: 45 minutes
- Yield: 7 1x
Description
Hearty vegetable soup combines robust flavors from garden-fresh ingredients. Mediterranean-inspired seasonings elevate this comforting dish, offering you a nourishing meal perfect for chilly evenings.
Ingredients
- 4 cups vegetable broth (or chicken broth for non-vegetarian)
- 2 cups water
- 1 (14.5 oz / 411 g) can diced tomatoes (with juice)
- 3 medium potatoes, diced
- 2 medium carrots, sliced
- 2 celery stalks, chopped
- 1 medium onion, chopped
- 1 zucchini, diced
- 1 cup green beans, trimmed and cut into 1-inch pieces
- 1 cup corn kernels (fresh, canned, or frozen)
- 1 cup peas (fresh or frozen)
- 2 tbsps olive oil
- 2 garlic cloves, minced
- 1 tsp dried thyme
- 1 tsp dried basil
- 1 bay leaf
- Salt and pepper, to taste
Instructions
- Aromatic Initiation: Sauté onions, garlic, carrots, and celery in olive oil over medium heat, coaxing out their deep flavors and creating a fragrant base for the soup, allowing vegetables to soften and meld for 5-7 minutes.
- Liquid Landscape: Add potatoes, zucchini, green beans, and tomatoes to the pot, then pour in vegetable broth and water. Incorporate thyme, basil, and bay leaf, seasoning with salt and pepper to build a robust flavor foundation.
- Simmering Symphony: Bring the mixture to a boil, then reduce heat and cover, letting the ingredients simmer and develop complex flavors for approximately 25-30 minutes, allowing vegetables to tenderize and blend harmoniously.
- Final Flourish: Stir in sweet corn and delicate peas, cooking for an additional 10 minutes. Remove bay leaf, adjust seasoning to taste, and prepare for serving with an optional garnish of fresh parsley or sprinkle of Parmesan cheese.
Notes
- Boost Aromatics Carefully: Sauté vegetables slowly to develop rich, layered flavors without burning, maintaining medium heat and stirring occasionally for even caramelization.
- Control Liquid Consistency: Adjust broth quantity based on desired soup thickness; add more water or broth if too dense, or simmer uncovered to reduce if too thin.
- Optimize Vegetable Texture: Add soft vegetables like zucchini and corn later to prevent overcooking and maintain their crisp, fresh quality while ensuring proper doneness.
- Enhance Dietary Adaptability: Easily transform into gluten-free, vegan, or low-sodium version by selecting appropriate broth, eliminating cheese garnish, and controlling salt levels during seasoning.
- Prep Time: 10 minutes
- Cook Time: 35 minutes
- Category: Lunch, Dinner, Snacks
- Method: Sautéing
- Cuisine: Global
Nutrition
- Serving Size: 7
- Calories: 80
- Sugar: 4g
- Sodium: 500mg
- Fat: 3g
- Saturated Fat: 0.5g
- Unsaturated Fat: 2.5g
- Trans Fat: 0g
- Carbohydrates: 14g
- Fiber: 3g
- Protein: 3g
- Cholesterol: 0mg
John Nicholson
Lead Writer & Recipe Developer
Expertise
Recipe Testing and Development, Kitchen Hacks and Time-Saving Tips, Flavor Pairing and Ingredient Selection, Engaging Food Writing and Storytelling
Education
Johnson & Wales University
John Nicholson honed his skills at Johnson & Wales University, learning how to use fresh, local ingredients and down-to-earth techniques to make cooking simple and satisfying.
His recipes blend Southern comfort flavors with a modern touch, inviting everyone to cook with ease and confidence.
Living in Charleston, John takes cues from the city’s lively food scene, local markets, and seasonal produce. He’s all about making meals stress-free through easy tips, flavor pairings, and fun experiments in the kitchen