
Crunchy Turkey Stuffing Balls Recipe: Fun Holiday Bites
Comfort cooking reaches new heights with these irresistible crispy turkey stuffing balls that blend savory herbs and golden-brown crunch.
Every bite packs a nostalgic punch of traditional holiday flavors.
Perfectly seasoned breadcrumbs combine with tender turkey and aromatic herbs to create a delightful appetizer.
These crispy morsels elevate classic stuffing into a handheld delight that steals the show at any gathering.
The recipe delivers a crowd-pleasing twist on a classic side dish that transforms leftover ingredients into something extraordinary.
Serve these delectable stuffing balls hot and watch them disappear in moments.
Prepare to become the culinary hero at your next meal.
Quick Recipe Overview

Ingredients That Make Turkey Stuffing Balls Work
For Base and Binding:For Flavor Enhancers:For Moisture and Richness:Turkey Stuffing Balls: Gear You’ll Want Nearby
How to Form Turkey Stuffing Balls with Confidence

Crank your oven to a toasty 375°F and get your baking sheet ready with a quick spray of cooking oil or a trusty parchment paper lining.
Toss all your stuffing ingredients into a big mixing bowl, diving in with your hands to blend everything into a cohesive, mouth-watering mixture that sticks together perfectly.
Roll the stuffing into cute little balls about the size of a golf ball, making sure they’re packed tight so they hold their shape during baking.
Spread your stuffing balls across the prepared baking sheet, giving each one a bit of breathing room. Pop them into the hot oven and bake for 20-25 minutes until they turn a gorgeous golden brown and develop a crispy exterior.
Pull the baking sheet out of the oven and let the stuffing balls rest for a few minutes. This quick breather helps them firm up and makes them easier to handle. Serve these tasty treasures hot as a side dish or appetizer that’ll have everyone asking for seconds.
Switch Up Turkey Stuffing Balls With Fun Ideas
Turkey Stuffing Balls That Serve Up Flavor and Fun
Store Turkey Stuffing Balls Like a Pro
FAQs
Breadcrumbs, ground turkey, herbs like sage and thyme, and aromatic vegetables like onions and celery create a classic, flavorful stuffing mixture that’s both traditional and delicious.
They’re a balanced option with lean ground turkey, vegetables, and controlled portions. Each ball provides protein, fiber, and essential nutrients while being lighter than traditional heavy stuffing.
Yes, you can prepare the mixture and shape the balls up to 24 hours in advance. Store them covered in the refrigerator and bake just before serving for fresh, warm stuffing balls.
These are perfect alongside roasted turkey, chicken, or as a standalone appetizer. They also work great as a side dish for holiday meals or casual family dinners.
Print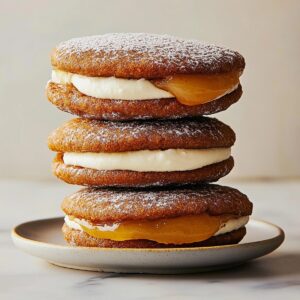
Apple Cider Whoopie Pie Cookies Recipe
- Total Time: 27 minutes
- Yield: 12 1x
Description
Sweet memories bloom with these apple cider whoopie pie cookies, combining classic autumn flavors in one irresistible treat. Warm spices and creamy filling promise comfort in each delightful bite that connects taste buds with seasonal nostalgia.
Ingredients
Main Dry Ingredients:
- 2 cups all-purpose flour
- 1 teaspoon baking soda
- ½ teaspoon baking powder
- ½ teaspoon salt
- 1 teaspoon cinnamon
- ½ teaspoon nutmeg
Wet Ingredients:
- 1 cup apple cider (to reduce to ¼ cup)
- ½ cup unsalted butter, softened
- ¾ cup brown sugar, packed
- 1 large egg
- 1 teaspoon vanilla extract
- ½ cup applesauce
Filling Ingredients:
- 4 ounces (113 grams) cream cheese, softened
- ¼ cup unsalted butter, softened
- 1 ½ cups powdered sugar
- ½ teaspoon cinnamon
- 1 teaspoon vanilla extract
Instructions
- Concentrate the apple cider by simmering it in a small saucepan over medium heat until the liquid reduces and thickens, creating a more intense flavor. Allow the reduced cider to cool completely to room temperature.
- Prepare the oven environment by heating to 350F (175C) and lining a baking sheet with parchment paper for even cooking and easy cookie removal.
- Create a dry ingredient mixture by whisking together flour, baking soda, baking powder, salt, ground cinnamon, and nutmeg in a mixing bowl, ensuring even distribution of spices and leavening agents.
- In a separate large bowl, cream together butter and brown sugar until the mixture becomes light, airy, and pale in color, developing a smooth texture.
- Incorporate liquid ingredients by adding egg, vanilla extract, applesauce, and the cooled apple cider reduction to the butter mixture, blending until thoroughly combined.
- Gradually fold the dry ingredient mixture into the wet ingredients, stirring gently until just incorporated to prevent overmixing and maintain a tender cookie texture.
- Using a tablespoon, drop cookie dough onto the prepared baking sheet, spacing each mound approximately 2 inches apart to allow for spreading during baking.
- Bake the cookies for 10-12 minutes, watching for set tops and slightly golden edges. Remove from the oven and transfer to a cooling rack, allowing them to cool completely.
- Prepare the filling by beating cream cheese and butter together until smooth and creamy, creating a uniform base.
- Enhance the filling by gradually mixing in powdered sugar, ground cinnamon, and vanilla extract until the mixture becomes light and fluffy.
- Assemble the whoopie pies by spreading or piping a generous tablespoon of filling onto the flat side of one cookie, then gently pressing a second cookie on top to create a sandwich.
- For optimal texture and flavor melding, refrigerate the assembled whoopie pies for 30 minutes before serving, or enjoy immediately if unable to wait.
Notes
- Reduce apple cider slowly to concentrate its rich, sweet flavor and prevent burning during the simmering process.
- Use room temperature ingredients to ensure smooth, even mixing and a consistent cookie texture.
- Chill the dough briefly before baking to prevent excessive spreading and maintain the cookies’ shape.
- Swap applesauce with Greek yogurt for a tangier filling and added protein boost.
- Prep Time: 15 minutes
- Cook Time: 12 minutes
- Category: Desserts, Snacks
- Method: Baking
- Cuisine: American
Nutrition
- Serving Size: 12
- Calories: 240
- Sugar: 18 g
- Sodium: 150 mg
- Fat: 10 g
- Saturated Fat: 6 g
- Unsaturated Fat: 4 g
- Trans Fat: 0 g
- Carbohydrates: 34 g
- Fiber: 1 g
- Protein: 2 g
- Cholesterol: 30 mg
John Nicholson
Lead Writer & Recipe Developer
Expertise
Recipe Testing and Development, Kitchen Hacks and Time-Saving Tips, Flavor Pairing and Ingredient Selection, Engaging Food Writing and Storytelling
Education
Johnson & Wales University
John Nicholson honed his skills at Johnson & Wales University, learning how to use fresh, local ingredients and down-to-earth techniques to make cooking simple and satisfying.
His recipes blend Southern comfort flavors with a modern touch, inviting everyone to cook with ease and confidence.
Living in Charleston, John takes cues from the city’s lively food scene, local markets, and seasonal produce. He’s all about making meals stress-free through easy tips, flavor pairings, and fun experiments in the kitchen