Decadent Chocolate Covered Cherry Brownie Bombs Recipe

Rich Cherry-Filled Chocolate Brownie Bombs Recipe: Sweet Bliss!

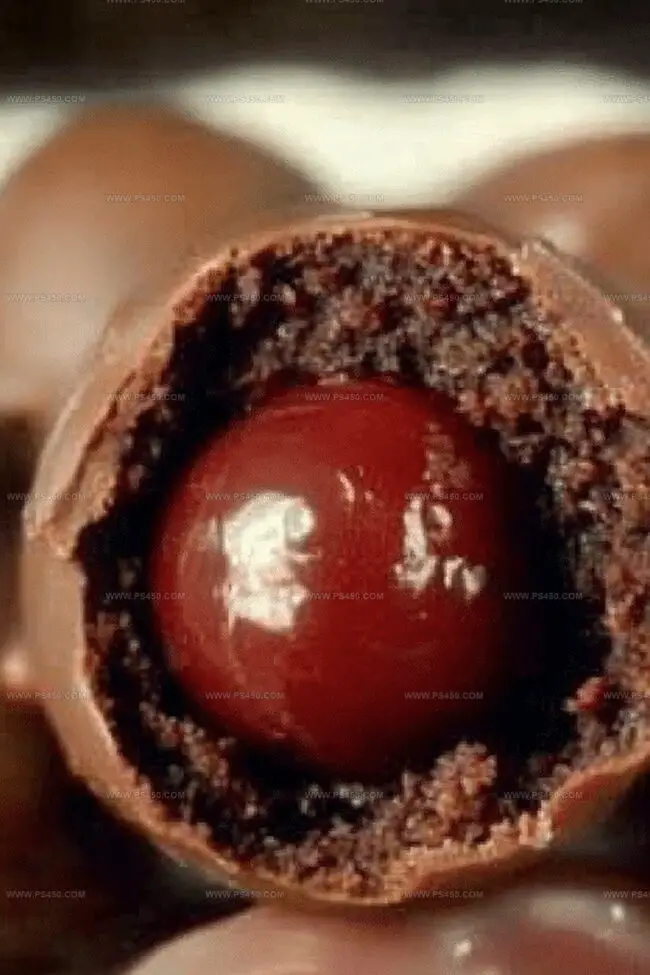
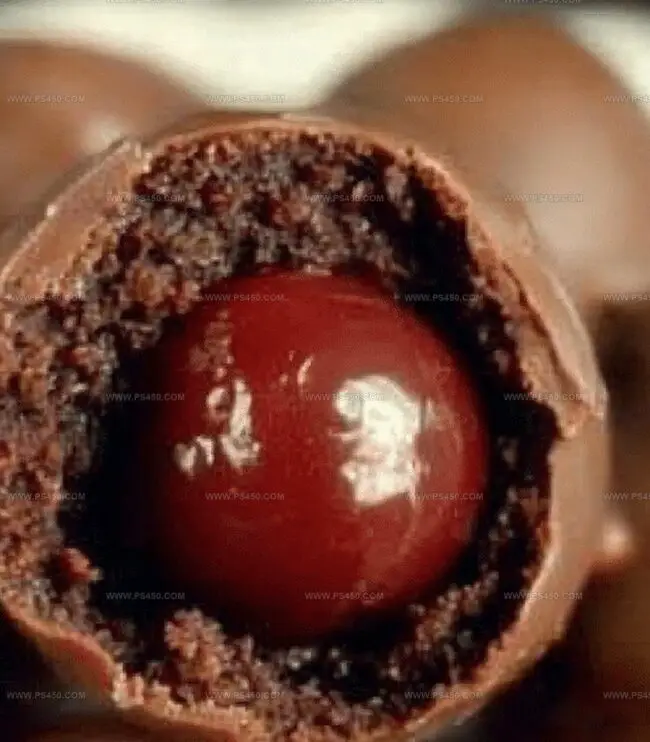
Chocolate lovers know the irresistible magic of a chocolate covered cherry brownie bomb that melts in your mouth.

Rich, fudgy brownies cradle a sweet cherry center, creating a dessert that’s pure indulgence.

Dark chocolate coats each morsel, adding a luxurious crunch to the soft interior.

The combination of deep chocolate and bright cherry creates a harmony of flavors that dance across your palate.

Unexpected and elegant, these bite-sized treats bring a touch of sophistication to any dessert spread.

Each bomb packs an explosion of flavor that transforms an ordinary moment into something extraordinary.

Prepare to fall in love with this decadent dessert that promises pure bliss in every single bite.

Quick Recipe Overview

Prep Time: 30 minutes

Cook Time: 25 minutes

Total Time: 55 minutes

Calories: 200 kcal

Servings: 25

Ingredients to Create Chocolate Covered Cherry Brownie Bombs

For Brownie Base:
  • All-Purpose Flour: Provides structure and foundation for dense, rich brownies.
  • Cocoa Powder: Delivers deep chocolate flavor and luxurious dark color.
  • Butter: Creates moisture and contributes to fudgy texture.
  • Eggs: Binds ingredients and adds richness to the brownie mixture.
For Cherry Filling:
  • Maraschino Cherries: Sweet, vibrant centerpiece that adds unexpected fruity burst.
  • Powdered Sugar: Helps bind cherry inside brownie coating for smoother texture.
For Chocolate Coating:
  • Chocolate Chips: Smooth melting chocolate for glossy, decadent exterior.
  • Coconut Oil: Enhances chocolate's shine and helps create thin, even coating.
  • Vanilla Extract: Deepens chocolate's complex flavor profile.
  • Salt: Balances sweetness and amplifies overall chocolate taste.

Gear Up to Make Brownie Bombs Burst with Flavor

  • Mixing Bowl: Large bowl for crumbling brownies and mixing ingredients.
  • Baking Sheet: Flat pan for chilling and setting brownie bombs.
  • Parchment Paper: Prevents sticking and makes cleanup easy.
  • Microwave-Safe Bowl: For melting chocolate smoothly.
  • Fork or Skewer: Perfect for dipping brownie bombs into chocolate.
  • Measuring Spoons: For precise ingredient measurements.

How to Assemble and Dip Cherry Brownie Bombs

  • Bake Brownies Create a batch of rich, fudgy brownies and let them cool completely. Crumble the brownies into soft, moist chunks in a mixing bowl.
  • Wrap Cherries Grab a small portion of brownie crumbles and gently flatten it in your palm. Place a juicy maraschino cherry in the center, then carefully fold the brownie around it, forming a perfect round ball. Continue until all cherries are lovingly wrapped.
  • Chill Balls Arrange the brownie-covered cherries on a parchment-lined tray. Pop them in the refrigerator for about 30 minutes to help them firm up and maintain their delightful shape.
  • Chocolate Dip Melt chocolate in a microwave-safe bowl, stirring every 30 seconds until silky smooth. Consider adding a touch of coconut oil for an extra glossy finish.
  • Coat and Set Dunk each brownie ball into the melted chocolate, ensuring complete coverage. Gently tap off excess chocolate and place back on the parchment. Refrigerate for 15-20 minutes until the chocolate hardens into a delectable shell.

Tips for Rich Chocolate and Cherry Fusion

  • Use slightly undercooked brownies to guarantee an ultra-moist, rich interior that melts in your mouth with each delightful bite.
  • Choose high-quality maraschino cherries without stems for easier wrapping and ensure they're thoroughly dried to prevent moisture from breaking the chocolate coating.
  • These brownie bombs can be prepared up to 5 days in advance and stored in an airtight container in the refrigerator, making them perfect for weekend baking or party planning.
  • Swap traditional brownies with gluten-free brownie mix for celiac-friendly treats, or use dairy-free chocolate and vegan brownie recipe for plant-based guests who want to enjoy this decadent dessert.
  • Experiment with dark, milk, or white chocolate coatings, or sprinkle crushed nuts, coconut flakes, or colorful sprinkles immediately after dipping for added texture and visual appeal.

Serve Brownie Bombs for Dessert Tables or Gifts

  • Cherry Dessert Centerpiece: Arrange the brownie bombs beautifully on a decorative platter with fresh mint leaves scattered around for a professional, elegant presentation that highlights the rich chocolate and vibrant cherry colors.
  • Holiday Party Delight: Serve these bite-sized treats during festive gatherings, placing them on tiered dessert stands or small individual dessert plates to create an impressive and inviting display for guests.
  • Gourmet Gift Idea: Package the brownie bombs in cute clear gift boxes with ribbons, perfect for birthdays, Valentine's Day, or as a sweet homemade present that shows thoughtful culinary creativity.
  • Sweet Pairing Suggestion: Complement these indulgent treats with a scoop of vanilla bean ice cream or a small espresso shot to balance the rich chocolate and enhance the overall dessert experience.

Store Cherry Brownie Bombs Without Melting the Magic

  • Prepare brownie bombs up to 3 days ahead, storing them in an airtight container inside the refrigerator to maintain maximum freshness and flavor integrity.
  • Keep these treats cold to prevent chocolate melting and preserve their structural shape, ensuring each bite remains perfect and visually appealing.
  • When storing, place wax paper between layers of brownie bombs to prevent sticking and maintain individual chocolate coating quality.
  • Refrigerate at 40°F or below to extend shelf life, keeping cherries and brownie core moist while preventing bacterial growth. Consume within 5 days for optimal taste experience.

FAQs

  • What ingredients do I need for the Chocolate Covered Cherry Brownie Bombs?

You’ll need brownies (homemade or boxed), maraschino cherries, chocolate chips or melting chocolate, optional coconut oil or butter for coating, and basic baking ingredients like flour, sugar, eggs depending on your brownie recipe.

  • Do I need special equipment to make these bombs?

No special equipment is required. You’ll just need basic kitchen tools like a mixing bowl, baking sheet, parchment paper, fork or skewer for dipping, and a microwave or double boiler for melting chocolate.

  • Can I use fresh cherries instead of maraschino cherries?

Maraschino cherries work best because they’re smaller, sweeter, and have less moisture. Fresh cherries might make the brownie bombs too wet and harder to form. Stick with maraschino cherries for the best results.

  • How can I ensure my brownie bombs stay together when dipping in chocolate?

Make sure to chill the formed brownie bombs for 20-30 minutes before dipping. This helps them firm up and hold their shape. Use a fork or skewer to gently dip and coat, allowing excess chocolate to drip off carefully.

Print
clock clock iconcutlery cutlery iconflag flag iconfolder folder iconinstagram instagram iconpinterest pinterest iconfacebook facebook iconprint print iconsquares squares iconheart heart iconheart solid heart solid icon
Decadent Chocolate Covered Cherry Brownie Bombs Recipe

Decadent Chocolate Covered Cherry Brownie Bombs


5 Stars 4 Stars 3 Stars 2 Stars 1 Star

4.8 from 16 reviews

  • Total Time: 55 minutes
  • Yield: 25 1x

Description

Chocolate covered cherry brownie bombs elevate classic dessert flavors into an irresistible treat. Rich chocolate and sweet cherries combine in a delightful confection that will delight chocolate enthusiasts and dessert lovers alike.


Ingredients

Scale
  • 15 oz almond bark or chocolate melting wafers
  • 1 box (18.3 oz / 519 g) chewy fudge brownie mix
  • 1 cup eggs (as specified on brownie mix box)
  • ⅓ cup vegetable oil (as specified on brownie mix box)
  • ¼ cup water (as specified on brownie mix box)
  • ¾ cup chocolate frosting
  • 1 jar (10 oz / 283 g) maraschino cherries, drained and patted dry

Instructions

  1. Brownie Preparation: Bake brownies with a fudgy consistency, slightly underbaked. Cool completely and crumble into fine crumbs in a large mixing bowl.
  2. Cherry Encapsulation: Flatten a portion of brownie crumbs in your palm, place a maraschino cherry in the center, and carefully wrap the cherry with brownie mixture to form smooth, uniform spheres.
  3. Chilling Phase: Arrange brownie-cherry spheres on a parchment-lined tray and refrigerate for 25 minutes to stabilize their structure and enhance moldability.
  4. Chocolate Coating Technique: Melt chocolate chips with coconut oil in the microwave, using 30-second intervals and stirring between each session until achieving a smooth, glossy chocolate mixture.
  5. Dipping and Finishing: Using a fork, submerge each brownie bomb completely in melted chocolate, allowing excess to drip off. Carefully place coated treats back on the parchment sheet, ensuring full chocolate coverage.
  6. Final Solidification: Refrigerate chocolate-covered bombs for 15-20 minutes until the chocolate coating completely sets and hardens, creating a perfect confectionery treat ready for serving.

Notes

  • Maintain Moisture: Slightly underbake brownies to preserve a rich, fudgy texture that prevents dryness and enhances overall taste.
  • Perfect Shaping Technique: Use cold hands or slightly dampened palms to prevent brownie mixture from sticking while creating uniform spheres.
  • Chocolate Coating Pro Tip: Add a small amount of coconut oil to melted chocolate for smoother, glossier coverage and easier dipping process.
  • Storage Strategy: Keep brownie bombs refrigerated to maintain structural integrity and prevent chocolate from melting, ensuring maximum flavor and presentation.
  • Prep Time: 30 minutes
  • Cook Time: 25 minutes
  • Category: Desserts, Snacks
  • Method: Baking
  • Cuisine: American

Nutrition

  • Serving Size: 25
  • Calories: 200
  • Sugar: 15 g
  • Sodium: 150 mg
  • Fat: 9 g
  • Saturated Fat: 3 g
  • Unsaturated Fat: 5 g
  • Trans Fat: 0 g
  • Carbohydrates: 30 g
  • Fiber: 1 g
  • Protein: 2 g
  • Cholesterol: 20 mg
John Nicholson

John Nicholson

Lead Writer & Recipe Developer

Expertise

Recipe Testing and Development, Kitchen Hacks and Time-Saving Tips, Flavor Pairing and Ingredient Selection, Engaging Food Writing and Storytelling

Education

Johnson & Wales University

  • Program: Bachelor of Science in Culinary Arts
  • Focus: A hands-on curriculum emphasizing farm-to-table cooking, local ingredient sourcing, and creative menu development. Students gained real-world restaurant experience, learning both classic techniques and modern approaches to sustainable cooking.

John Nicholson honed his skills at Johnson & Wales University, learning how to use fresh, local ingredients and down-to-earth techniques to make cooking simple and satisfying.

His recipes blend Southern comfort flavors with a modern touch, inviting everyone to cook with ease and confidence.

Living in Charleston, John takes cues from the city’s lively food scene, local markets, and seasonal produce. He’s all about making meals stress-free through easy tips, flavor pairings, and fun experiments in the kitchen

Leave a Reply

Your email address will not be published. Required fields are marked *

Recipe rating 5 Stars 4 Stars 3 Stars 2 Stars 1 Star