
Pineapple Dessert Recipe with a Cool, Creamy Finish
Sweet summer memories flood back with this classic pineapple dream dessert that captures the essence of nostalgic comfort.
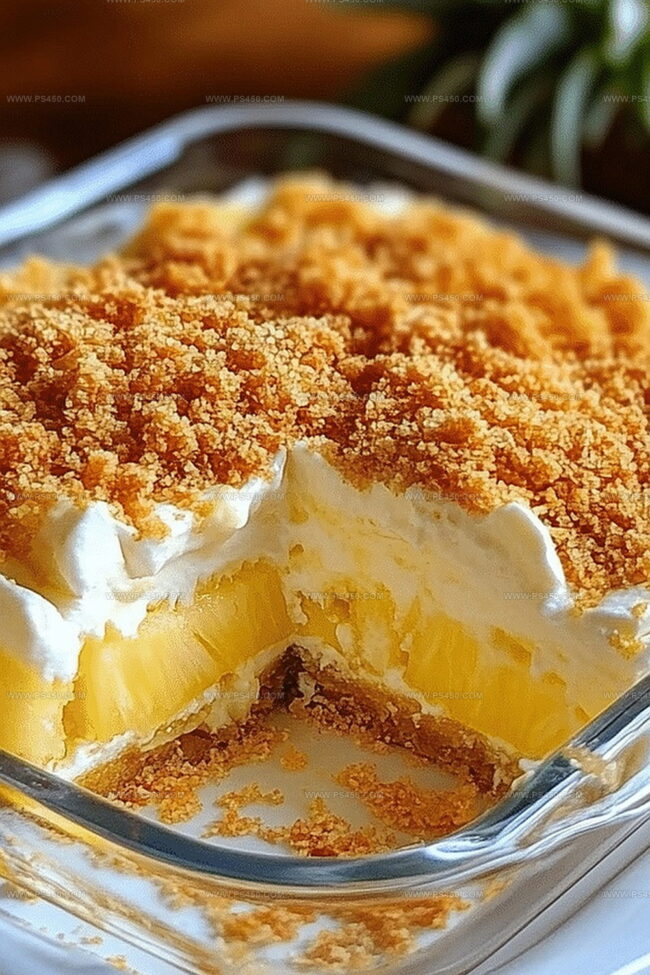
Creamy layers of pure delight dance between graham cracker crust and fluffy cream cheese filling.
This beloved southern classic packs a tropical punch of flavor and texture in every single bite.
Cool, refreshing pineapple dream dessert brings together the perfect balance of sweetness and tanginess that melts in your mouth.
Each spoonful promises a journey through rich, velvety goodness that feels like a warm embrace.
Generations have savored this simple yet spectacular treat that turns ordinary moments into something magical.
You’ll want to share this recipe with everyone who appreciates a truly delectable dessert experience.
Quick Recipe Overview
Pineapple Dream Dessert Ingredients to Grab
For Crust Base:For Creamy Filling:For Topping:Kitchen Tools for This Light & Dream
Assembling the Pineapple Dream Dessert, Layer by Layer
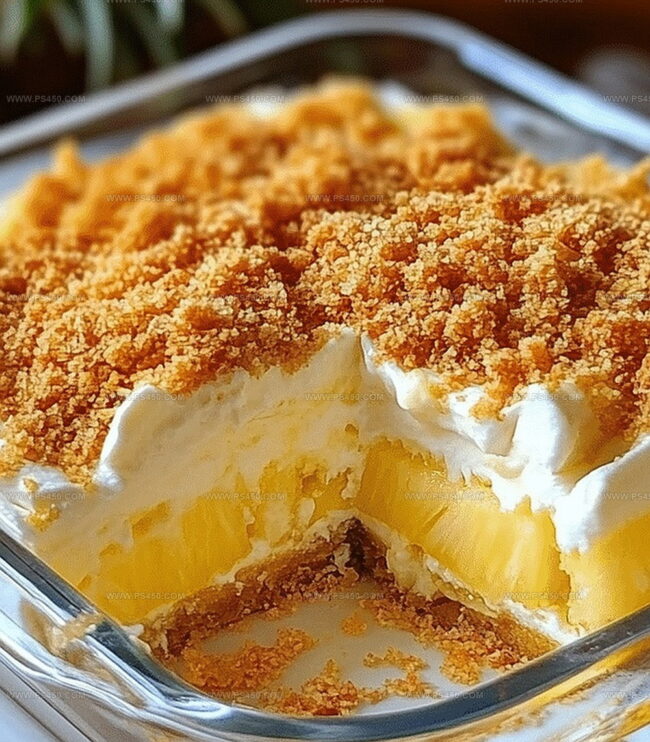
Crush graham crackers and blend with melted butter until perfectly combined. Press mixture firmly into baking dish, creating a solid foundation for your dreamy dessert. Slide into refrigerator to firm up while preparing next stage.
Blend cream cheese until silky smooth, gradually incorporating powdered sugar. Fold in juicy pineapple chunks, ensuring even distribution of tropical sweetness throughout the mixture.
Spread creamy pineapple mixture evenly across chilled crust. Top with fluffy whipped cream, creating a cloud-like surface. Sprinkle toasted coconut for extra crunch and tropical flair.
Refrigerate dessert for several hours, allowing flavors to dance and meld together. Overnight resting intensifies the delightful taste experience.
Cut into delectable squares. Present this heavenly treat chilled, watching faces light up with pure dessert delight.
Tips for That Signature Pineapple-Fluffy Texture
Serving This Dessert at Gatherings or Just Because
Storing Pineapple Dream Squares to Stay Soft
FAQs
The key ingredients include graham cracker crumbs, butter, cream cheese, powdered sugar, crushed pineapple, and whipped topping. These components create a creamy, sweet, and tropical-flavored dessert.
No, Pineapple Dream Dessert is quite simple and requires no baking. It’s a no-bake recipe that involves mixing ingredients and layering them in a dish, making it perfect for novice bakers or those who want a quick dessert.
Absolutely! This dessert is ideal for preparing in advance. You can make it a day before serving, as it needs to chill for at least 4 hours to set properly. This makes it great for gatherings and parties.
Yes, you can use low-fat cream cheese, margarine instead of butter, and sugar-free whipped topping to make a lighter version. You could also replace graham crackers with vanilla wafers for the crust if needed.
Print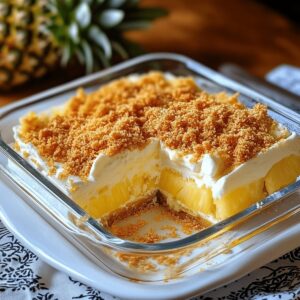
Dreamy Pineapple Dream Dessert Recipe
- Total Time: 20 minutes
- Yield: 9 1x
Description
Pineapple Dream Dessert blends creamy layers of tropical delight with a buttery graham cracker crust. Refreshing pineapple filling and fluffy cream cheese create a sublime dessert you’ll want to savor until the last sweet bite.
Ingredients
- 1 (20 oz / 567 g) crushed pineapple, drained well
- 8 oz (227 g) cream cheese, softened
- 1 cup (2 sticks / 227 g) unsalted butter, softened and melted
- 2 cups powdered sugar
- ¼ cup granulated sugar
- 2 cups graham cracker crumbs
- 1 cup whipped topping (like Cool Whip) or homemade whipped cream
- ¼ cup toasted coconut flakes
Instructions
- Crust Creation: Pulverize graham crackers with melted butter and sugar, blending until uniformly combined. Press the mixture firmly into a rectangular baking dish, establishing a solid, compact foundation that will support the subsequent layers.
- Creamy Base Formation: Whip cream cheese and butter using an electric mixer until achieving a velvety smooth texture. Gradually fold in powdered sugar, continuing to blend until the mixture transforms into a light, airy consistency that promises decadent richness.
- Pineapple Fusion: Gently fold drained crushed pineapple into the cream cheese mixture, ensuring an even distribution that marries the tropical fruit with the creamy base. Spread this luscious layer meticulously across the prepared graham cracker crust, creating a uniform surface.
- Topping Finesse: Lavish the dessert with a billowing layer of whipped topping, completely concealing the pineapple layer. Embellish the surface with a delicate sprinkle of toasted coconut flakes, adding both visual intrigue and textural contrast.
- Chilling and Setting: Refrigerate the dessert for a minimum of four hours, allowing the layers to harmonize and flavors to intensify. For optimal results, let it rest overnight, transforming the individual components into a cohesive, mouthwatering creation.
- Serving Presentation: Slice the chilled dessert into precise squares, revealing the stunning layered composition. Serve cold to maximize the refreshing and indulgent experience of this tropical-inspired treat.
Notes
- Crust Consistency Matters: Ensure graham cracker crumbs are finely ground and evenly mixed with butter to create a stable, compact base that won’t crumble when serving.
- Prevent Watery Filling: Thoroughly drain crushed pineapple to eliminate excess moisture, which could compromise the cream cheese layer’s smooth texture and structural integrity.
- Softening Ingredients: Allow cream cheese and butter to reach room temperature before mixing to guarantee a silky, lump-free blend that whips smoothly and incorporates powdered sugar effortlessly.
- Chilling is Crucial: Refrigerate the dessert for at least 4 hours or overnight, which allows layers to set properly and enhances the flavor profile, transforming individual components into a harmonious, cohesive dessert.
- Prep Time: 20 minutes
- Category: Desserts
- Method: None
- Cuisine: American
Nutrition
- Serving Size: 9
- Calories: 380
- Sugar: 28 g
- Sodium: 150 mg
- Fat: 22 g
- Saturated Fat: 14 g
- Unsaturated Fat: 6 g
- Trans Fat: 0 g
- Carbohydrates: 42 g
- Fiber: 1 g
- Protein: 2 g
- Cholesterol: 50 mg
John Nicholson
Lead Writer & Recipe Developer
Expertise
Recipe Testing and Development, Kitchen Hacks and Time-Saving Tips, Flavor Pairing and Ingredient Selection, Engaging Food Writing and Storytelling
Education
Johnson & Wales University
John Nicholson honed his skills at Johnson & Wales University, learning how to use fresh, local ingredients and down-to-earth techniques to make cooking simple and satisfying.
His recipes blend Southern comfort flavors with a modern touch, inviting everyone to cook with ease and confidence.
Living in Charleston, John takes cues from the city’s lively food scene, local markets, and seasonal produce. He’s all about making meals stress-free through easy tips, flavor pairings, and fun experiments in the kitchen