
S’mores Cheesecake Pudding Cups Recipe For Picnics
Decadent chocolate graham cracker crusts cradle a luscious smores cheesecake pudding that promises pure indulgence.
Layers of creamy marshmallow-infused filling melt seamlessly into rich chocolate depths.
Each spoonful offers a nostalgic twist on classic campfire treats.
The dessert combines velvety textures with irresistible sweetness that dance across your palate.
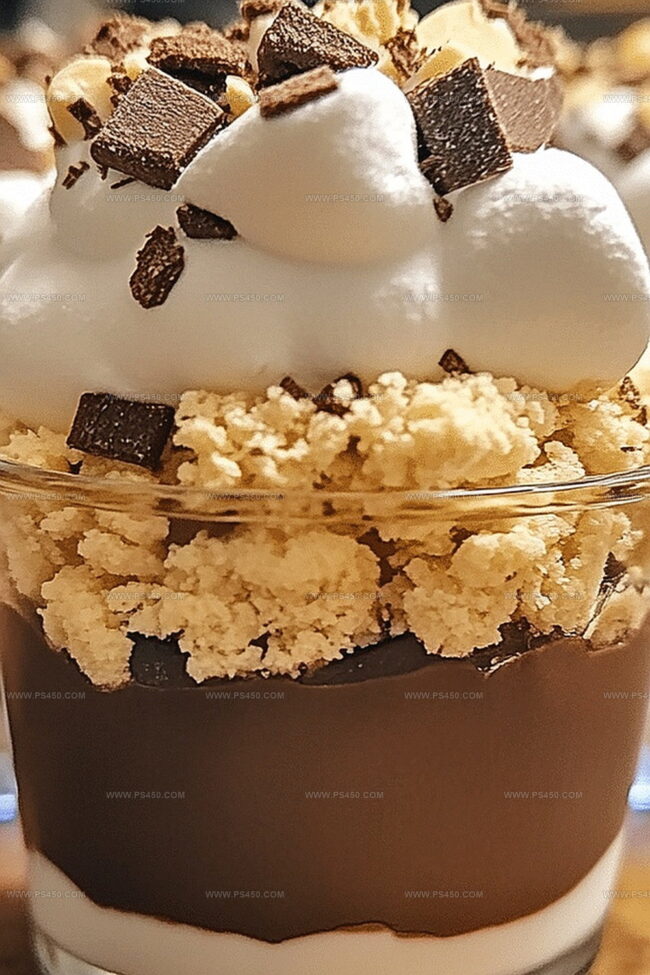
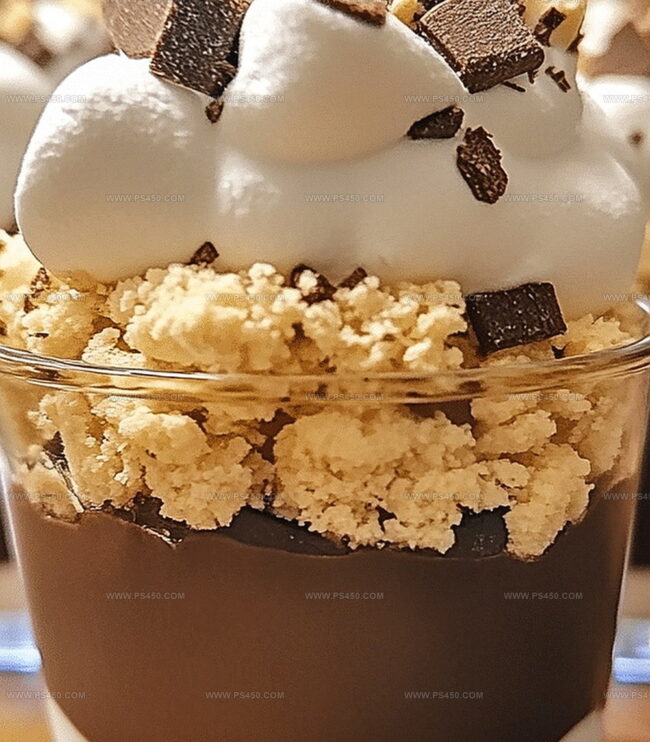
Toasted marshmallow peaks crown these individual cups, creating a stunning visual and flavor experience.
Silky smooth and utterly irresistible, these pudding cups will become your new favorite summer dessert.
Prepare to fall in love with every delightful bite.
Quick Recipe Overview
What You’ll Use for Smores Cheesecake Pudding Cups
For Base Layer:For Creamy Layers:For Toppings and Garnish:The Right Tools for Layering Pudding Cup
Step-by-Step to Build Smores Cheesecake Layers
Crush graham crackers into fine bits and mix with melted butter. Press the mixture firmly into the bottom of serving cups, creating a delicious foundation for your dessert.
Blend cream cheese with powdered sugar until silky smooth. Gently fold in whipped topping to create a light, airy texture. Spread this dreamy mixture evenly over the graham cracker base.
Whisk chocolate pudding mix with cold milk until it transforms into a rich, velvety pudding. Carefully layer this chocolatey goodness on top of the cheesecake mixture.
Sprinkle a generous handful of mini marshmallows and chocolate chips over the pudding. Break a graham cracker into playful pieces and nestle it on top. Add a fluffy dollop of whipped cream for extra indulgence.
Refrigerate the cups for at least an hour, allowing the flavors to dance and mingle. When ready, grab a spoon and dive into this irresistible layered treat that combines all the classic s’mores flavors in a cool, creamy dessert.
Tips for, Crunchy, Chocolatey Goodness
Serve These Pudding Cups with a Side of Fun
How to Chill and Save Them for Later
FAQs
Absolutely! Kids will love the fun layers and sweet chocolate pudding. These cups are easy to make and perfect for a fun dessert that children can help prepare.
Yes, you can prepare these S’mores Cheesecake Pudding Cups up to 2 days in advance. Keep them refrigerated until ready to serve, and they’ll maintain their delicious layers and texture.
No special equipment is required. You’ll just need small cups or jars, mixing bowls, and basic utensils like a whisk and spoon. Even regular drinking glasses or mason jars work great.
You can swap whipped topping with homemade whipped cream, use chocolate instant pudding for a richer flavor, or replace graham crackers with chocolate cookie crumbs for a different twist.
Print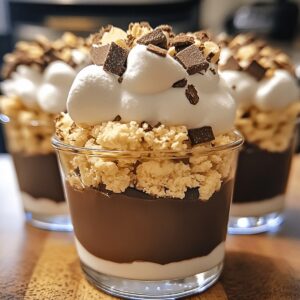
Heavenly Smores Cheesecake Pudding Cups Recipe
- Total Time: 1 hour 15 minutes
- Yield: 9 1x
Description
Irresistible s’mores cheesecake pudding cups blend classic campfire flavors into a delightful dessert. Rich chocolate, graham cracker crumbs, and marshmallow cream create a nostalgic treat you’ll savor with pure delight.
Ingredients
- 2 cups (480 ml) cold milk
- 1 package (8 oz / 226 g) cream cheese, softened
- 1 box (3.9 oz / 110 g) instant chocolate pudding mix
- 1 cup whipped topping, thawed
- 1 cup graham cracker crumbs
- 3 tbsps butter, melted
- 1 cup powdered sugar
- 1 cup mini marshmallows
- ¼ cup mini chocolate chips
- 46 whole graham crackers
- Optional: toasted marshmallows or extra whipped topping for garnish
Instructions
- Graham Cracker Base: Combine graham cracker crumbs with melted butter, pressing firmly into the bottom of serving glasses to create a solid, crunchy foundation.
- Cheesecake Layer: Whisk cream cheese and powdered sugar until ultra-smooth, then gently incorporate whipped topping to develop a light, creamy texture that blankets the graham cracker base.
- Chocolate Pudding Infusion: Blend chocolate pudding mix with cold milk, stirring until a silky, rich consistency develops, then carefully pour over the cheesecake layer.
- Decorative Finale: Generously scatter mini marshmallows and chocolate chips across the surface, strategically positioning a graham cracker fragment for added crunch and visual intrigue.
- Chilling Technique: Refrigerate the assembled dessert cups for at least 60 minutes, allowing the layers to meld and solidify into a perfectly chilled, decadent treat. Optional: Torch marshmallow topping or crown with a delicate swirl of whipped cream before serving for an extra touch of elegance.
Notes
Prepare Graham Cracker Base Carefully: Press crumbs firmly and evenly to create a compact, sturdy foundation that won’t crumble when serving.
Whip Cream Cheese Technique: Ensure cream cheese is at room temperature for smoother blending, preventing lumps and achieving a silky-smooth texture.
Control Pudding Consistency: Whisk pudding mix thoroughly and chill immediately to prevent separation and maintain a rich, creamy consistency.
Layering Strategic Approach: Allow each layer to set slightly before adding the next, preventing mixing and maintaining distinct, beautiful visual separation between components.
- Prep Time: 15 minutes
- Cook Time: 1 hour
- Category: Desserts, Snacks
- Method: None
- Cuisine: American
Nutrition
- Serving Size: 9
- Calories: 320
- Sugar: 25 g
- Sodium: 210 mg
- Fat: 14 g
- Saturated Fat: 8 g
- Unsaturated Fat: 4 g
- Trans Fat: 0 g
- Carbohydrates: 44 g
- Fiber: 1 g
- Protein: 3 g
- Cholesterol: 30 mg
John Nicholson
Lead Writer & Recipe Developer
Expertise
Recipe Testing and Development, Kitchen Hacks and Time-Saving Tips, Flavor Pairing and Ingredient Selection, Engaging Food Writing and Storytelling
Education
Johnson & Wales University
John Nicholson honed his skills at Johnson & Wales University, learning how to use fresh, local ingredients and down-to-earth techniques to make cooking simple and satisfying.
His recipes blend Southern comfort flavors with a modern touch, inviting everyone to cook with ease and confidence.
Living in Charleston, John takes cues from the city’s lively food scene, local markets, and seasonal produce. He’s all about making meals stress-free through easy tips, flavor pairings, and fun experiments in the kitchen