Butterfinger Reese’s Peanut Butter Bars Recipe
Decadent desserts often spark pure joy, and these mouthwatering butterfinger reeses peanut butter bars blend chocolate and candy into an addictive treat.
Sweet tooths will instantly fall in love with this indulgent recipe.
Every bite promises a perfect crunch and creamy texture that melts smoothly on your tongue.
The combination of classic candy bars creates a rich, multilayered flavor profile that elevates simple snacking.
Chocolate lovers understand the magic of blending favorite candies into one spectacular dessert.
No baking required means you can whip up these bars quickly and easily.
Prepare to experience a dessert that will become your new go-to sweet sensation.
Quick Recipe Overview
Ingredients List for Butterfinger Reeses Peanut Butter Bars
For Base and Binding:For Crunchy Flavor Boosters:For Coating/Topping:Tools You’ll Need for Butterfinger Reeses Bar Success
How to Press and Slice Butterfinger Reeses Peanut Butter Bars
Mix peanut butter, melted butter, and vanilla extract until silky smooth in a spacious mixing bowl. Blend ingredients thoroughly to ensure a perfect consistency.
Fold in powdered sugar and graham cracker crumbs, stirring until the mixture becomes a rich, compact dough. Work the ingredients gently to maintain a soft texture.
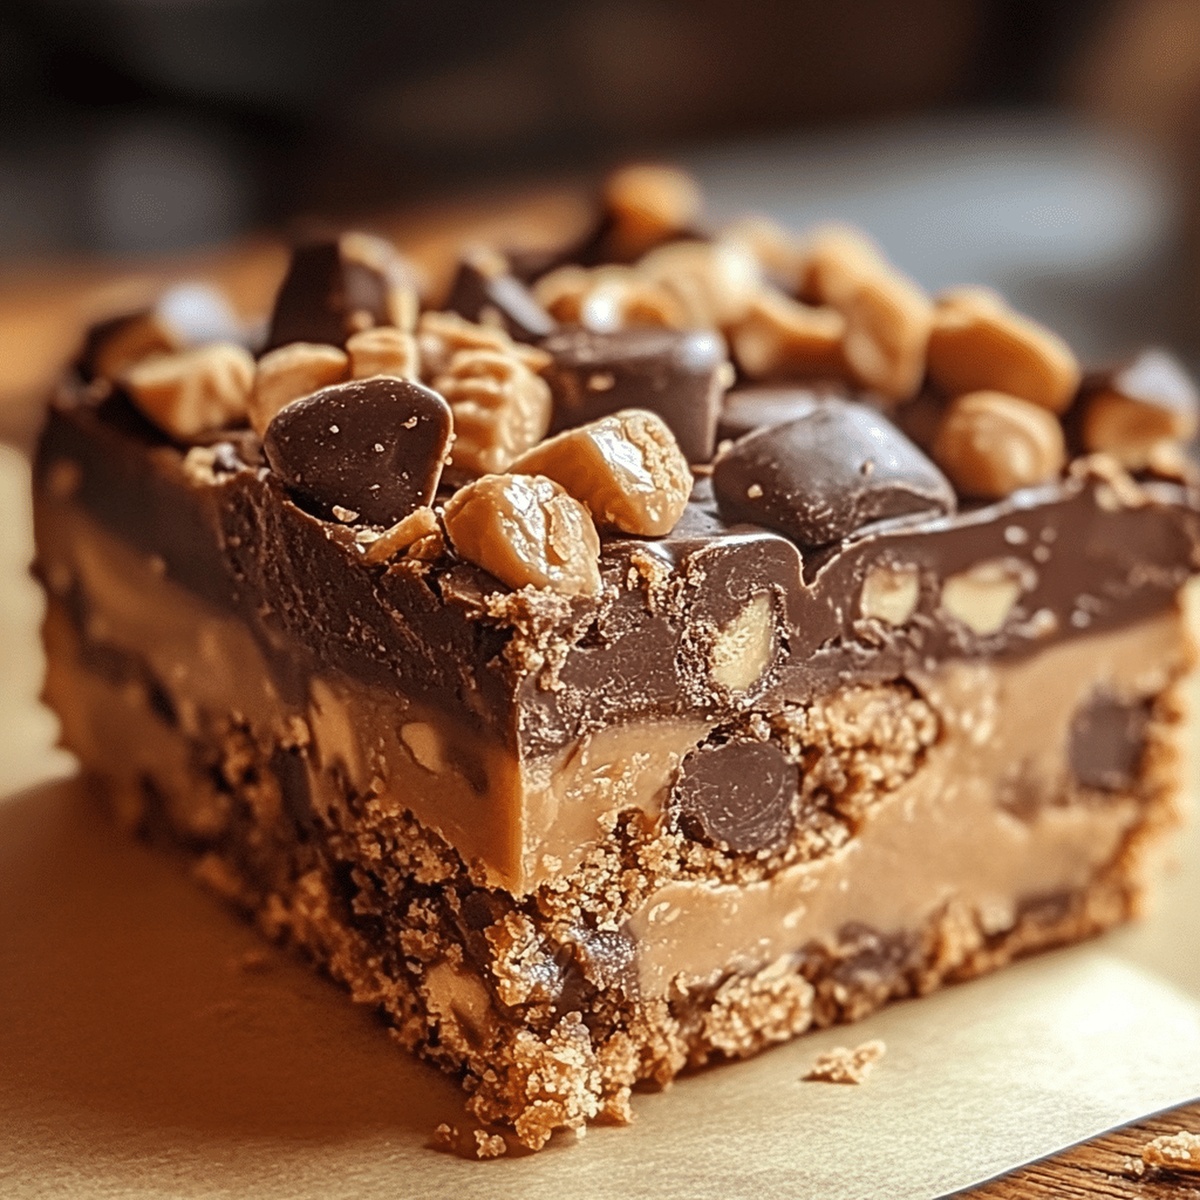
Carefully blend crushed Butterfinger pieces and Reeses Pieces into the mixture. Distribute the candy evenly to ensure every bite has a delightful crunch and burst of flavor.
Transfer the mixture into a prepared pan, using your hands or a spatula to create an even layer. Compress the mixture firmly to create a solid, compact base.
Refrigerate the bars for at least one hour, allowing the dessert to firm up and the flavors to meld together. The cooling process will help the bars maintain their perfect texture.
Remove from the refrigerator and cut into squares. Enjoy the decadent treat that combines creamy peanut butter, sweet candy, and a satisfying graham cracker base.
Change Up Your Butterfinger Reeses Bars for Fun Results
Serve These Bars at Parties or Just for You
Store Butterfinger Reeses Bars to Keep Them Crunchy
FAQs
Yes, you can substitute Butterfinger and Reeses Pieces with other candy bars or chocolate candies like Snickers or M&Ms. Just ensure they are chopped into small pieces for even distribution.
Graham cracker crumbs provide structure and texture to the bars. If you don’t have them, you can use crushed vanilla wafers or digestive biscuits as an alternative.
Make sure to mix the ingredients thoroughly and press the mixture firmly into the pan. Chilling the bars in the refrigerator will help them set and become more cohesive.
Yes, use gluten-free graham cracker crumbs or gluten-free cookie crumbs. Check that all other ingredients, including the candies, are gluten-free as well.
Print
Irresistible Butterfinger Reeses Peanut Butter Bars Recipe
- Total Time: 2 hours 15 minutes
- Yield: 13 1x
Description
Butterfinger Reeses Peanut Butter Bars combine classic candy favorites into one irresistible dessert. Chocolate and peanut butter layers create a rich, indulgent treat you’ll crave again and again.
Ingredients
- 1 cup (240 ml) creamy peanut butter
- 1 cup (240 ml) graham cracker crumbs
- 1 cup (240 ml) crushed Butterfinger candy bars (about 3 full-size bars)
- 2 cups (480 ml) powdered sugar
- ½ cup (120 ml) unsalted butter, melted
- ½ cup (120 ml) Reeses Pieces
- 1 tsp vanilla extract
- 1 ½ cups (360 ml) semi-sweet or milk chocolate chips
- 1 tbsp coconut oil or butter (optional, for smoother topping)
Instructions
- Mixing Base: Whisk peanut butter, melted butter, and vanilla extract in a large bowl until smooth and glossy, creating a rich foundational mixture.
- Incorporating Dry Elements: Gradually blend powdered sugar and graham cracker crumbs into the peanut butter base, stirring continuously to achieve a cohesive, lump-free texture that binds perfectly.
- Adding Textural Elements: Gently fold chopped Butterfinger pieces and Reeses Pieces throughout the mixture, ensuring an even distribution of crunchy and colorful candy fragments for multi-dimensional flavor and excitement.
- Setting the Bars: Transfer the complete mixture into a prepared pan, using firm, consistent pressure to compress the blend into a uniform layer that will solidify into a delectable, textured dessert bar.
Notes
- Prevent Crumbly Texture: Ensure the peanut butter and melted butter are thoroughly whisked to create a smooth, cohesive base that helps bind ingredients and prevents dry, falling-apart bars.
- Achieve Perfect Consistency: Sift powdered sugar and graham cracker crumbs to eliminate lumps, guaranteeing a smooth, uniform mixture that spreads easily and sets properly.
- Balanced Candy Distribution: Chop Butterfinger and Reeses Pieces into consistent, smaller chunks to ensure even flavor and texture throughout each bar, preventing large, overwhelming candy clusters.
- Compact Pressing Technique: Use gentle, firm pressure when pressing the mixture into the pan, creating a dense, stable bar that holds together without being too compact or losing its soft, crumbly character.
- Prep Time: 15 minutes
- Cook Time: 2 hours
- Category: Desserts, Snacks
- Method: Blending
- Cuisine: American
Nutrition
- Serving Size: 13
- Calories: 247
- Sugar: 24 g
- Sodium: 88 mg
- Fat: 12 g
- Saturated Fat: 5 g
- Unsaturated Fat: 7 g
- Trans Fat: 0 g
- Carbohydrates: 32 g
- Fiber: 1 g
- Protein: 4 g
- Cholesterol: 10 mg
John Nicholson
Lead Writer & Recipe Developer
Expertise
Recipe Testing and Development, Kitchen Hacks and Time-Saving Tips, Flavor Pairing and Ingredient Selection, Engaging Food Writing and Storytelling
Education
Johnson & Wales University
John Nicholson honed his skills at Johnson & Wales University, learning how to use fresh, local ingredients and down-to-earth techniques to make cooking simple and satisfying.
His recipes blend Southern comfort flavors with a modern touch, inviting everyone to cook with ease and confidence.
Living in Charleston, John takes cues from the city’s lively food scene, local markets, and seasonal produce. He’s all about making meals stress-free through easy tips, flavor pairings, and fun experiments in the kitchen