Creamy Mint Oreo Balls Recipe for Sweet Dessert Trays
Sweet chocolate meets cool mint in these delightful mint oreo balls that pack a seriously addictive punch.
Crushing cookies into fine crumbs creates the perfect base for these no-bake treats.
Each bite delivers a smooth, creamy texture that melts deliciously on your tongue.
Chocolate lovers will absolutely adore the rich combination of classic oreo cookies and mint flavor.
Preparing these little spheres of happiness requires minimal effort and zero baking skills.
Kids and adults alike will go crazy for this simple yet impressive dessert.
You’ll want to make a double batch because these mint oreo balls disappear faster than you can roll them.
Grab a mixing bowl and let’s create something magical that will have everyone begging for seconds.
Why Mint Oreo Balls Are Bite-Sized Bliss

Everything You Need For Mint Oreo Balls
Main Ingredients:
Cookies and Binders:Coating and Decoration:Garnish and Optional Toppings:How To Make Mint Oreo Balls Fast

Step 1: Crush and Blend Oreos
Grab your food processor and toss in the mint Oreo cookies. Pulse and blend until the cookies transform into fine, powdery crumbs. Set aside a small portion of crumbs for a fabulous final touch. In a mixing bowl, welcome the softened cream cheese and combine it with the crushed Oreos. Mix and mash until you create a delightfully thick and sticky mixture that holds together perfectly.
Step 2: Shape Delectable Balls
Using a spoon or cookie scoop, gather small portions of the Oreo mixture. Roll these between your palms, creating adorable bite-sized spheres. Arrange the balls on a parchment-lined baking sheet. Pop them into the freezer for a quick 20-30 minute chill to help them firm up and maintain their shape.
Step 3: Chocolate Dipping Magic
Prepare your chocolate coating by combining chocolate chips and coconut oil in a microwave-safe bowl. Melt the mixture in short 30-second bursts, stirring between each interval until smooth and glossy. Take each chilled Oreo ball and carefully dunk it into the melted chocolate. Use a fork or toothpick to help you coat evenly and let excess chocolate drip away.
Step 4: Decorate and Garnish
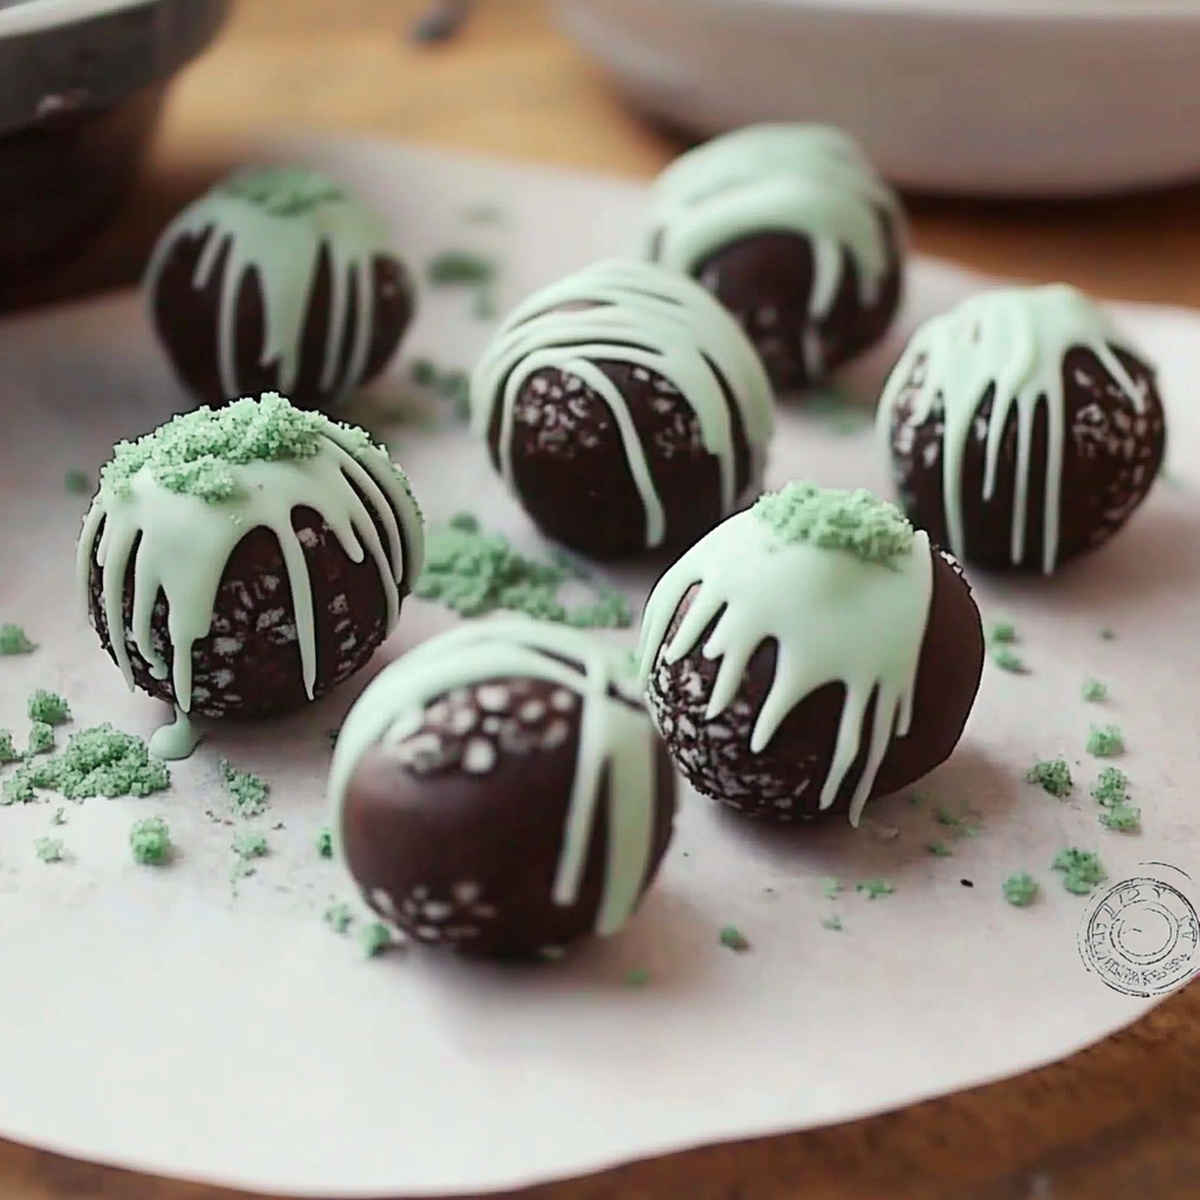
While the chocolate is still wet, sprinkle your reserved Oreo crumbs on top. For extra flair, add green sprinkles or drizzle white chocolate. Get creative with your decorations and make each ball unique.
Step 5: Chill and Serve
Transfer the chocolate-covered Oreo balls to the refrigerator. Let them set for about 30 minutes until the chocolate becomes firm and crisp. When ready, serve these cool, minty treats and watch everyone’s eyes light up with delight!
Tips To Make Mint Oreo Balls Extra Smooth
How To Keep Mint Oreo Balls Fresh Longer
What Goes Great With Mint Oreo Balls
Creative Ways To Tweak Mint Oreo Balls
FAQs About Mint Oreo Balls
These balls use specifically Mint Oreos, giving them a refreshing mint flavor that’s more intense and unique compared to traditional Oreo truffles. The mint twist makes them perfect for holiday gatherings or summer treats.
You only need a food processor to crush the Oreos and a microwave or double boiler to melt chocolate. If you don’t have a food processor, you can also crush Oreos in a sealed plastic bag using a rolling pin.
Absolutely! You can prepare these balls up to 5 days in advance. Store them in an airtight container in the refrigerator, and they’ll stay fresh and delicious. They’re actually great for meal prep or party planning.
Yes! Kids can help with crushing Oreos, rolling balls, and sprinkling toppings. It’s a fun, simple recipe that doesn’t require complicated cooking techniques, making it perfect for family baking activities.
Print
Mint Oreo Balls Recipe
- Total Time: 40 minutes
- Yield: 36 1x
Description
Creamy mint oreo balls bring a delightful twist to classic dessert indulgence. Chocolate lovers will savor these easy no-bake treats that combine smooth cream cheese, crushed cookies, and refreshing mint for an irresistible winter confection you can enjoy right now.
Ingredients
Mint Oreo Balls
Cookies:
- 1 package (15.25 ounces / 432 grams) Mint Oreo cookies (about 36 Oreos)
Binding Ingredients:
- 8 ounces (226 grams) cream cheese, softened
Coating and Garnish:
- 12 ounces (340 grams) semi-sweet or white chocolate chips
- 1 teaspoon (5 milliliters) coconut oil or vegetable shortening (optional, for smoother chocolate)
- Green sprinkles, crushed Oreos, or melted white chocolate (for garnish)
Instructions
- Create a fine powder from Mint Oreo cookies using a food processor, ensuring a consistent texture. Set aside a small portion of crumbs for potential decoration later.
- Transfer the ground Oreo cookies into a mixing bowl and combine thoroughly with softened cream cheese. Knead the mixture until it forms a cohesive, uniform consistency that holds together easily.
- Carefully shape the mixture into uniform, compact spheres approximately the size of a small truffle. Arrange the formed balls on a parchment-lined tray and transfer to the freezer for approximately 25 minutes to enhance structural integrity.
- Prepare the chocolate coating by gently melting chocolate chips with coconut oil in a microwave-safe container. Stir periodically to achieve a smooth, glossy texture without burning.
- Utilize a fork or specialized dipping tool to submerge each chilled Oreo sphere completely in the melted chocolate. Allow excess coating to drip off before positioning back on the parchment sheet.
- While the chocolate remains slightly wet, sprinkle reserved Oreo crumbs, green decorative sprinkles, or delicately drizzle white chocolate across the surface for visual appeal.
- Refrigerate the chocolate-coated treats for 35-40 minutes until the coating solidifies completely and becomes crisp to the touch.
- Remove from refrigeration and serve immediately. These mint-infused chocolate bites are best enjoyed chilled and can be stored in an airtight container for several days.
Notes
- Swap mint Oreos with classic Oreos for a traditional flavor, perfect for those who prefer a less minty taste.
- Experiment with different chocolate coatings like dark or white chocolate to add variety and personalize the treat.
- Ensure cream cheese is at room temperature for smoother mixing and easier ball formation.
- Use a cookie scoop for uniformly sized Oreo balls, creating a professional and consistent look.
- Prep Time: 10 minutes
- Cook Time: 30 minutes
- Category: Desserts, Snacks
- Method: Mixing
- Cuisine: American
Nutrition
- Serving Size: 36
- Calories: 110
- Sugar: 9 g
- Sodium: 45 mg
- Fat: 6 g
- Saturated Fat: 3.5 g
- Unsaturated Fat: 2.5 g
- Trans Fat: 0 g
- Carbohydrates: 13 g
- Fiber: 0.5 g
- Protein: 1 g
- Cholesterol: 10 mg
Emily Morgan
Food Critic & Kitchen Tips Specialist
Expertise
Global Food Exploration & Critique, Simple Kitchen Hacks & Time-Saving Tips, Presentation & Plating Techniques, Culinary Research & Storytelling.
Education
New York University
Emily Morgan has journeyed across the globe, collecting culinary secrets that turn everyday ingredients into impressive meals.
Based in Seattle and armed with a Journalism degree from NYU, she blends thorough research with a flair for presentation, ensuring every dish looks just as good as it tastes.
Focusing on fresh flavors, simple methods, and a bit of fun, Emily shows home cooks how to elevate their daily cooking without fancy gadgets or complex steps.