
The Best Cheesy Pepperoni Pizza Bombs Recipe for Pizza Night
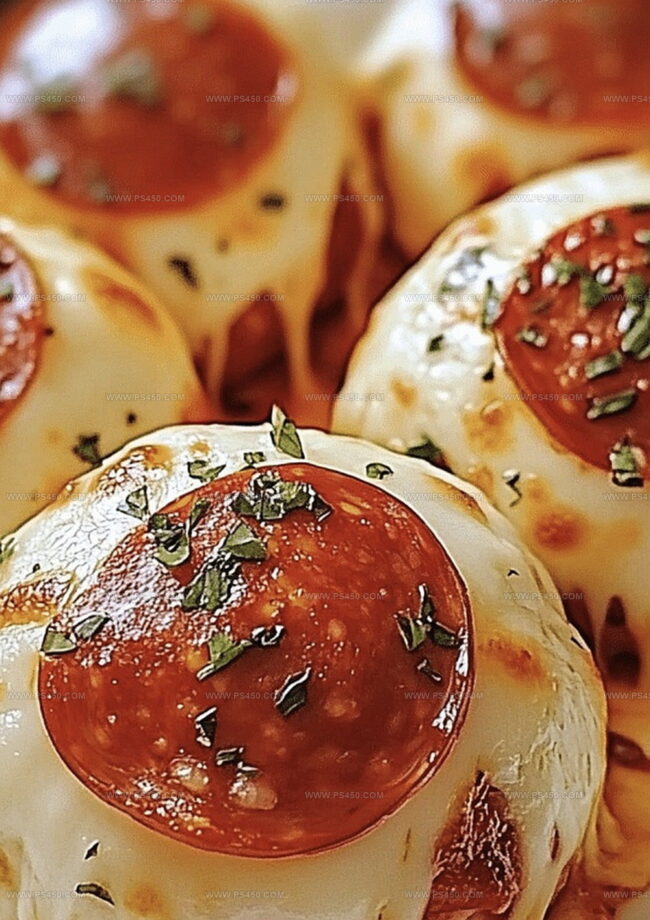
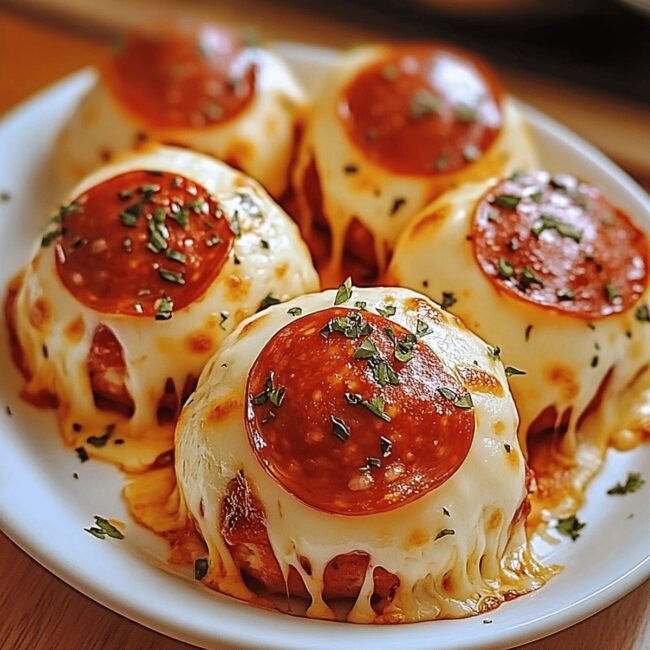
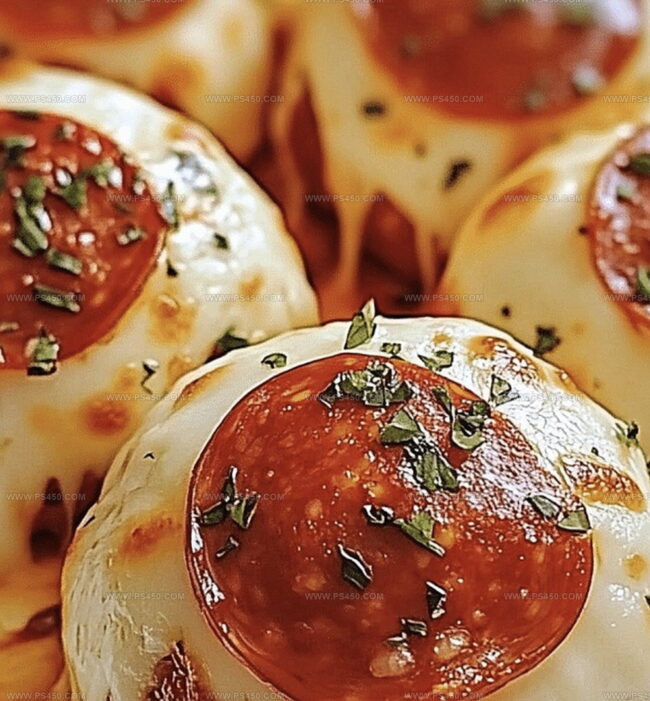
Crispy golden pepperoni pizza bombs burst with mouth-watering flavor that’ll make you weak in the knees.
These delightful little parcels pack an incredible punch of cheesy goodness in every single bite.
Small yet mighty, each bomb delivers a perfect combination of melted cheese and zesty pepperoni.
Crafted with simple ingredients from your pantry, these handheld treats will quickly become a crowd-pleasing favorite.
Kids and adults alike cannot resist their irresistible charm and delectable filling.
Pulling these golden pockets from the oven creates an aroma that instantly draws everyone to the kitchen.
Bet you cannot stop at just one of these irresistible pizza bombs!
Why Cheesy Pepperoni Pizza Bombs Are So Fun To Eat
Everything Needed For Cheesy Pepperoni Pizza Bombs
Main Ingredients:
Biscuit Dough: – Refrigerated Biscuits: Soft, flaky base that creates the outer shell for the pizza bombs. Pre-made tubes are convenient and quick to use.
Cheese Group: – Mozzarella Cheese, Parmesan Cheese: Provides rich, melty flavor and creamy texture. Fresh or pre-shredded work well.
Meat Ingredient: – Pepperoni Slices: Classic pizza topping that adds spicy and savory flavor. Thin slices melt nicely inside the bombs.
Sauce and Seasoning Group:
Sauce: – Marinara Sauce: Classic pizza sauce that adds moisture and traditional pizza taste. Store-bought works perfectly.
Seasoning Group: – Garlic Powder, Italian Seasoning, Melted Butter: Enhances overall flavor profile and creates a golden, tasty exterior. Dried herbs provide intense seasoning.
Garnish Group:
Garnish Herbs: – Fresh Basil, Fresh Parsley: Optional fresh herbs that add bright color and aromatic touch. Completely optional but recommended for extra freshness.
How To Make Cheesy Pepperoni Pizza Bombs Easily
Step 1: Warm Up the Oven
Fire up your oven to 375°F (190°C). Grab a baking sheet and line it with parchment paper or give it a quick spray of cooking oil.
Step 2: Prepare Dough Discs
Take your biscuit dough and slice each round into two halves, creating 16 perfect little pizza pockets waiting to be filled with deliciousness.
Step 3: Create Flavor Pockets
Gently press each dough piece flat. Add these tasty ingredients to the center:Step 4: Seal the Flavor Treasure
Carefully wrap the dough around the filling, pinching edges together. Create perfect little sealed pouches with no sneaky cheese escape routes. Position each pocket seam-side down on the baking sheet.
Step 5: Add Magical Seasoning
Whip up a flavor-packed butter mixture:Brush this magical potion over each pocket. Dust with Parmesan cheese for an extra flavor punch.
Step 6: Bake to Golden Perfection
Slide the baking sheet into the oven. Bake for 12-15 minutes until the pockets turn a gorgeous golden brown and cheese melts into gooey goodness.
Step 7: Serve and Devour
Pull out your crispy pizza pockets. Let them cool for a moment. Sprinkle with fresh chopped basil or parsley if you’re feeling fancy. Serve with extra marinara sauce for dipping and watch everyone’s eyes light up!
Pro Tip: These little flavor bombs are perfect for game nights, movie marathons, or when you’re craving something quick and irresistible!
Top Tips For Cheesy Pepperoni Pizza Bombs
How To Store Cheesy Pepperoni Pizza Bombs Properly
Best Pairings For Cheesy Pepperoni Pizza Bombs
Cheesy Pepperoni Pizza Bombs With A Twist
Quick FAQs About Cheesy Pepperoni Pizza Bombs
Make sure to press the edges firmly and completely close any gaps. Use slightly damp fingers to help seal the dough, ensuring no filling escapes during baking.
Absolutely! While mozzarella works best, you can experiment with cheddar, provolone, or even a blend of cheeses. Just keep the cheese amount similar to maintain the right texture.
Yes! You can assemble the pizza bombs ahead of time and refrigerate them for up to 24 hours before baking. Just add a few extra minutes to the baking time if cooking directly from the refrigerator.
No worries! You can create a simple substitute by mixing dried oregano, basil, thyme, and a pinch of rosemary. The key is to add herbs that complement the pizza flavor.
Print
Cheesy Pepperoni Pizza Bombs Recipe
- Total Time: 25 minutes
- Yield: 8 1x
Description
Pepperoni pizza bombs explode with cheesy goodness, delivering irresistible Italian-inspired flavors in one perfect bite. Crispy golden dough surrounds melted mozzarella and zesty pepperoni, promising a delightful snack you’ll crave again and again.
Ingredients
Primary Ingredients:
- 1 can (16 ounces/453 grams) refrigerated biscuit dough (8 biscuits)
- 1 cup shredded mozzarella cheese (or cheese sticks cut into small pieces)
- 24 slices pepperoni (about 3 slices per bomb)
Sauce and Seasoning Ingredients:
- ½ cup marinara or pizza sauce, plus more for dipping
- 2 tablespoons butter, melted
- 1 teaspoon garlic powder
- 1 teaspoon Italian seasoning
Topping Ingredients:
- 2 tablespoons grated Parmesan cheese
- Fresh basil or parsley, chopped (for garnish, optional)
Instructions
- Prepare the baking environment by heating the oven to 375F (190C) and lining a baking sheet with parchment paper or applying a light grease coating.
- Carefully separate the biscuits and slice each into two equal halves, creating 16 uniform dough pieces.
- Gently press each dough piece to create a slightly flattened surface, ensuring enough space for filling.
- Position a modest dollop of marinara sauce at the center of each dough piece, then layer with 2-3 pepperoni slices and a compact portion of mozzarella cheese.
- Delicately wrap the dough edges around the filling, meticulously pinching and sealing to create a secure, compact ball without any potential cheese leakage points.
- Arrange the sealed pizza bombs with their seam facing downward on the prepared baking sheet, maintaining even spacing.
- Craft a flavor-enhancing mixture by combining melted butter with garlic powder and Italian seasoning, then generously brush this over each pizza bomb’s surface.
- Sprinkle a light dusting of Parmesan cheese across the tops to intensify the savory profile.
- Transfer the baking sheet to the preheated oven and bake for 12-15 minutes, monitoring until the bombs achieve a golden-brown exterior and internal cheese becomes thoroughly melted.
- Once baked, remove from the oven and allow a brief cooling period to prevent potential burns.
- Optional: Garnish with freshly chopped basil or parsley for an aromatic finishing touch.
- Serve immediately alongside additional marinara sauce for a delightful dipping experience.
Notes
- Ensure the dough is completely sealed to prevent cheese leakage during baking, using pinching techniques to close any potential gaps.
- Experiment with alternative cheese options like cheddar or provolone for unique flavor variations that still provide a gooey, melted interior.
- Make these pizza bombs gluten-free by substituting regular biscuits with gluten-free biscuit dough or using cauliflower-based alternatives for a low-carb version.
- Prepare the pizza bombs ahead of time by assembling and refrigerating them before baking, perfect for meal prep or last-minute gatherings with minimal day-of preparation.
- Prep Time: 10 minutes
- Cook Time: 15 minutes
- Category: Snacks, Appetizer
- Method: Baking
- Cuisine: Italian
Nutrition
- Serving Size: 8
- Calories: 330
- Sugar: 2 g
- Sodium: 780 mg
- Fat: 19 g
- Saturated Fat: 10 g
- Unsaturated Fat: 9 g
- Trans Fat: 0 g
- Carbohydrates: 30 g
- Fiber: 1 g
- Protein: 12 g
- Cholesterol: 40 mg
Emily Morgan
Food Critic & Kitchen Tips Specialist
Expertise
Global Food Exploration & Critique, Simple Kitchen Hacks & Time-Saving Tips, Presentation & Plating Techniques, Culinary Research & Storytelling.
Education
New York University
Emily Morgan has journeyed across the globe, collecting culinary secrets that turn everyday ingredients into impressive meals.
Based in Seattle and armed with a Journalism degree from NYU, she blends thorough research with a flair for presentation, ensuring every dish looks just as good as it tastes.
Focusing on fresh flavors, simple methods, and a bit of fun, Emily shows home cooks how to elevate their daily cooking without fancy gadgets or complex steps.