
Chocolate Hazelnut Thumbprint Cookie Recipe with Crunch
Soft, buttery chocolate hazelnut thumbprint cookies promise a delightful twist on classic treats.
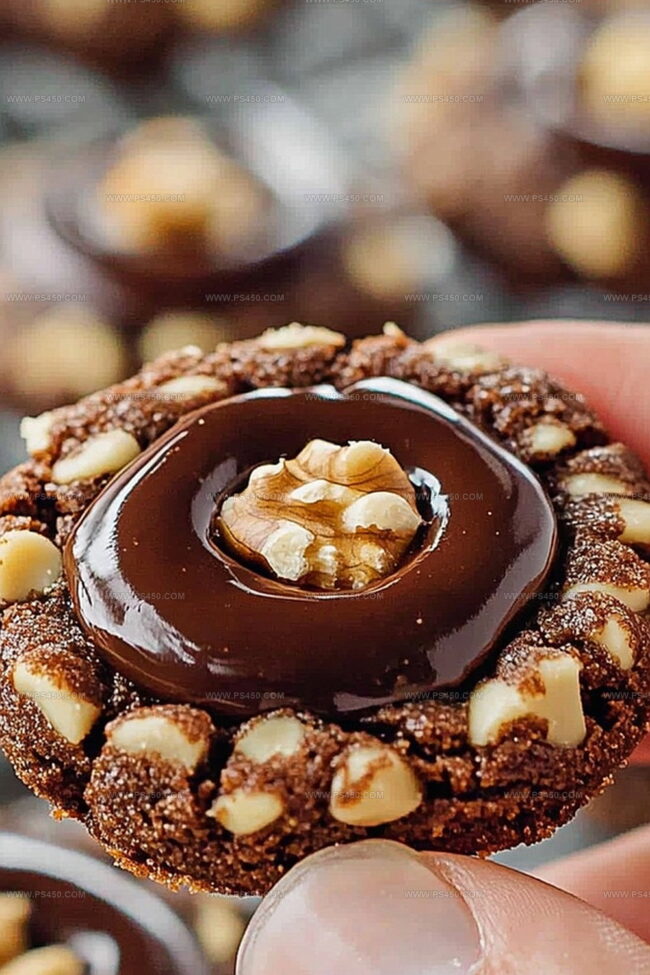
Rich cocoa swirls through tender dough, creating a melt-in-your-mouth texture.
Nutty hazelnuts add unexpected crunch and depth to each bite.
Delicate indentations filled with smooth chocolate spread invite playful exploration.
These elegant cookies bring warmth to any gathering or quiet afternoon.
Crumbly edges and glossy centers make them impossible to resist.
Bake a batch and watch smiles bloom with each sweet, rich morsel.
Why Chocolate Hazelnut Thumbprint Cookies Are Always A Hit
Ingredients For Chocolate Hazelnut Thumbprint Cookies
Cookie Base Ingredients:Fat and Sweet Ingredients:Moisture and Binding Ingredients:How To Prepare Chocolate Hazelnut Thumbprint Cookies

Step 1: Warm Up the Oven
Crank up your oven to a cozy 350°F (175°C). Grab a baking sheet and line it with parchment paper for easy cookie removal.
Step 2: Whip Up a Creamy Base
Grab your mixing bowl and create magic by blending:Whip these ingredients until they transform into a light, fluffy cloud of sweetness.
Step 3: Introduce Moisture and Flavor
Crack in an egg and splash some vanilla extract. Mix until everything comes together in a smooth, glossy embrace.
Step 4: Combine Dry Ingredients
In a separate bowl, create a delightful dry mixture:Whisk these ingredients until they’re perfectly integrated.
Step 5: Merge Wet and Dry Worlds
Gradually fold the dry ingredients into the wet mixture. Watch as a beautiful dough emerges, ready to become delicious cookies.
Step 6: Shape Adorable Cookie Balls
Roll the dough into cute little balls, each about the size of a golf ball. Arrange them on the prepared baking sheet, giving each cookie some breathing room.
Step 7: Create Signature Thumbprints
Use your thumb or the back of a teaspoon to create a gentle indent in the center of each cookie. This is where the magic will happen!
Step 8: Bake to Golden Perfection
Slide the baking sheet into the oven and let the cookies bake for 10-12 minutes. They should turn a beautiful light golden color around the edges. Once out of the oven, give those thumbprints a gentle press to deepen their wells.
Step 9: Fill with Chocolate Hazelnut Decadence
Once the cookies have completely cooled, grab your favorite chocolate hazelnut spread. Spoon or pipe the spread into each delightful thumbprint, creating a luxurious center that will make taste buds dance.
Enjoy your homemade chocolate hazelnut thumbprint cookies – a perfect blend of nutty, sweet, and utterly irresistible!
Tips To Improve Chocolate Hazelnut Thumbprint Cookies
How To Store Chocolate Hazelnut Thumbprint Cookies
Delicious Pairings With Chocolate Hazelnut Thumbprint Cookies
New Twists For Chocolate Hazelnut Thumbprint Cookies
Answers For Chocolate Hazelnut Thumbprint Cookies Questions
You can substitute chopped almonds or pecans if you prefer. Just make sure to finely chop them to maintain the cookie’s texture and ensure even distribution in the dough.
No special tool is needed! You can use your thumb or the back of a teaspoon to create the indentation. The key is to be gentle and create a shallow well in the center of each cookie.
Chill the dough for 30 minutes before shaping and baking. This helps the cookies maintain their shape and prevents excessive spreading. Also, make sure your butter isn’t too soft when creaming.
Absolutely! You can prepare the dough in advance and refrigerate it for up to 3 days. You can also freeze the shaped cookies before baking for up to a month. Just add a few extra minutes to the baking time when baking from frozen.
Print
Chocolate Hazelnut Thumbprint Cookies Recipe
- Total Time: 27 minutes
- Yield: 24 1x
Description
Sweet chocolate hazelnut thumbprint cookies bring warmth from Italy’s rich baking traditions. Delicate cookies with rich chocolate centers promise delightful moments of pure indulgence for cookie enthusiasts.
Ingredients
Main Ingredients:
- 2 cups all-purpose flour
- 1 cup unsalted butter, softened
- ½ cup granulated sugar
- ½ cup brown sugar, packed
- ½ cup finely chopped toasted hazelnuts
- ½ cup Nutella or homemade chocolate hazelnut spread
Binding and Flavor Ingredients:
- 1 large egg
- 1 teaspoon vanilla extract
- ½ teaspoon salt
- ½ teaspoon baking powder
Garnish Ingredients:
- ¼ cup chopped toasted hazelnuts
- Powdered sugar
Instructions
- Prepare the workspace by heating the oven to 350F (175C) and lining a baking sheet with parchment paper.
- Cream together softened butter with granulated and brown sugars until the mixture becomes light and airy, using an electric mixer for about 2-3 minutes.
- Incorporate the egg and vanilla extract into the butter-sugar mixture, blending until smooth and well combined.
- In a separate bowl, thoroughly combine flour, salt, baking powder, and finely chopped hazelnuts using a whisk.
- Gradually fold the dry ingredient mixture into the wet ingredients, mixing until a cohesive dough forms.
- Gently roll the dough into small, uniform balls approximately 1-inch in diameter, positioning them evenly across the prepared baking sheet with sufficient spacing.
- Create a distinctive indentation in the center of each cookie using either your thumb or the back of a teaspoon, ensuring a gentle but firm press.
- Transfer the cookie sheet to the preheated oven and bake for 10-12 minutes, watching for light golden edges as an indicator of doneness.
- Once removed from the oven, carefully press the centers again to reinforce the thumbprint impression, then allow the cookies to cool completely.
- Fill each cooled cookie’s center with a generous dollop of chocolate hazelnut spread, using either a spoon or piping bag for precise application.
Notes
- Add extra chopped hazelnuts to the dough for a more intense nutty crunch that elevates the cookie’s texture and flavor profile.
- Chill the dough for 30 minutes before shaping to prevent spreading and create more precise, compact cookie shapes during baking.
- Swap Nutella with dairy-free chocolate spread for a vegan-friendly version, ensuring those with dietary restrictions can enjoy these delightful treats.
- Use a small measuring spoon or the back of a clean cork to create perfectly uniform and neat thumbprint indentations without sticking to the dough.
- Prep Time: 15 minutes
- Cook Time: 12 minutes
- Category: Desserts, Snacks
- Method: Baking
- Cuisine: American
Nutrition
- Serving Size: 24
- Calories: 152
- Sugar: 8 g
- Sodium: 45 mg
- Fat: 8 g
- Saturated Fat: 4 g
- Unsaturated Fat: 3 g
- Trans Fat: 0 g
- Carbohydrates: 20 g
- Fiber: 1 g
- Protein: 2 g
- Cholesterol: 15 mg
Emily Morgan
Food Critic & Kitchen Tips Specialist
Expertise
Global Food Exploration & Critique, Simple Kitchen Hacks & Time-Saving Tips, Presentation & Plating Techniques, Culinary Research & Storytelling.
Education
New York University
Emily Morgan has journeyed across the globe, collecting culinary secrets that turn everyday ingredients into impressive meals.
Based in Seattle and armed with a Journalism degree from NYU, she blends thorough research with a flair for presentation, ensuring every dish looks just as good as it tastes.
Focusing on fresh flavors, simple methods, and a bit of fun, Emily shows home cooks how to elevate their daily cooking without fancy gadgets or complex steps.