Dairy Queen Ice Cream Cake Copycat Recipe at Home
Cool summer memories dance through my dairy queen ice cream cake adventure, revealing a nostalgic treat anyone can craft at home.
Each creamy layer whispers sweet childhood secrets waiting to unfold.
The magic starts with simple ingredients and playful creativity brewing in your kitchen.
Smooth vanilla and rich chocolate layers promise delightful surprises with every slice.
Casual bakers and dessert enthusiasts will find this recipe surprisingly accessible and fun.
Weekend celebrations or spontaneous sugar cravings never looked so deliciously promising.
Grab your mixing bowl and let the delectable journey begin!
Why Copycat Dairy Queen Ice Cream Cake Recipe Tastes Like The Real Thing
What You’ll Need For Copycat Dairy Queen Ice Cream Cake Recipe
Ice Cream Cake Base:Notes: Choose high-quality, full-fat ice cream for best texture and taste.
Crunch Layer:Notes: Use regular or double-stuffed Oreos based on preference.
Whipped Frosting:Notes: Use cold cream for best whipping results.
Decoration and Finish:Notes: Choose toppings that complement chocolate and vanilla flavors.
How To Make Copycat Dairy Queen Ice Cream Cake Recipe At Home
Step 1: Prepare Cake Pan
Line a 9-inch springform pan with plastic wrap, ensuring complete coverage with extra wrap hanging over the sides. This trick makes removing the cake super easy later.
Step 2: Create Crunchy Chocolate Base
Ingredients for Crunch Layer:Crush the Oreos into fine crumbs and mix thoroughly with hot fudge sauce. The mixture should be well combined and slightly sticky. Set aside while preparing the ice cream layers.
Step 3: Build Ice Cream Layers
First Layer – Chocolate Magic:
Spread softened chocolate ice cream evenly across the bottom of the prepared pan. Use a spatula to create a smooth, even surface. Pop the pan into the freezer for 30 minutes until the layer becomes firm and solid.
Crunch Layer Adventure:
Carefully spread the Oreo-fudge mixture over the chocolate ice cream. Create an even layer that covers the entire surface. Return to the freezer for 15 minutes to set.
Top Layer – Vanilla Dream:
Spread softened vanilla ice cream over the crunch layer. Smooth the top with a spatula to create a perfectly even surface. Freeze for at least 4 hours or until completely solid.
Step 4: Whip Up Dreamy Frosting
In a chilled mixing bowl, whip together:Beat the ingredients until stiff, fluffy peaks form. This creates a cloud-like frosting that will beautifully cover the cake.
Step 5: Decorate With Flair
Generously frost the entire cake with the whipped cream, covering the top and sides completely. Add fun toppings like:Step 6: Final Freeze and Serve
Place the decorated cake back in the freezer for an additional 2 hours or overnight. Before serving, let the cake rest at room temperature for 10-15 minutes. This makes slicing easier and enhances the flavor.
Tips To Build Copycat Dairy Queen Ice Cream Cake Recipe Right
How To Store Copycat Dairy Queen Ice Cream Cake Recipe Without Mess
Toppings And Treats To Pair With Copycat Dairy Queen Ice Cream Cake Recipe
Fun Twists On Copycat Dairy Queen Ice Cream Cake Recipe
FAQs About Copycat Dairy Queen Ice Cream Cake Recipe
Oreos provide a delicious chocolate cookie texture that adds a perfect crispy element to the ice cream cake, mimicking the classic Dairy Queen cake’s signature crunch layer.
Absolutely! While chocolate and vanilla are traditional, you can experiment with your favorite flavors like strawberry, mint chocolate chip, or even cookies and cream to create a personalized ice cream cake.
Work quickly and keep your ice cream and cake layers in the freezer between steps. Use softened (but not melted) ice cream and have all your ingredients and tools ready before starting to minimize melting time.
While a springform pan makes removal easier, you can use a regular cake pan lined with plastic wrap. Just ensure you have enough overhang to lift the cake out smoothly after freezing.
Print
Copycat Dairy Queen Ice Cream Cake Recipe
- Total Time: 6 hours 30 minutes
- Yield: 12 1x
Description
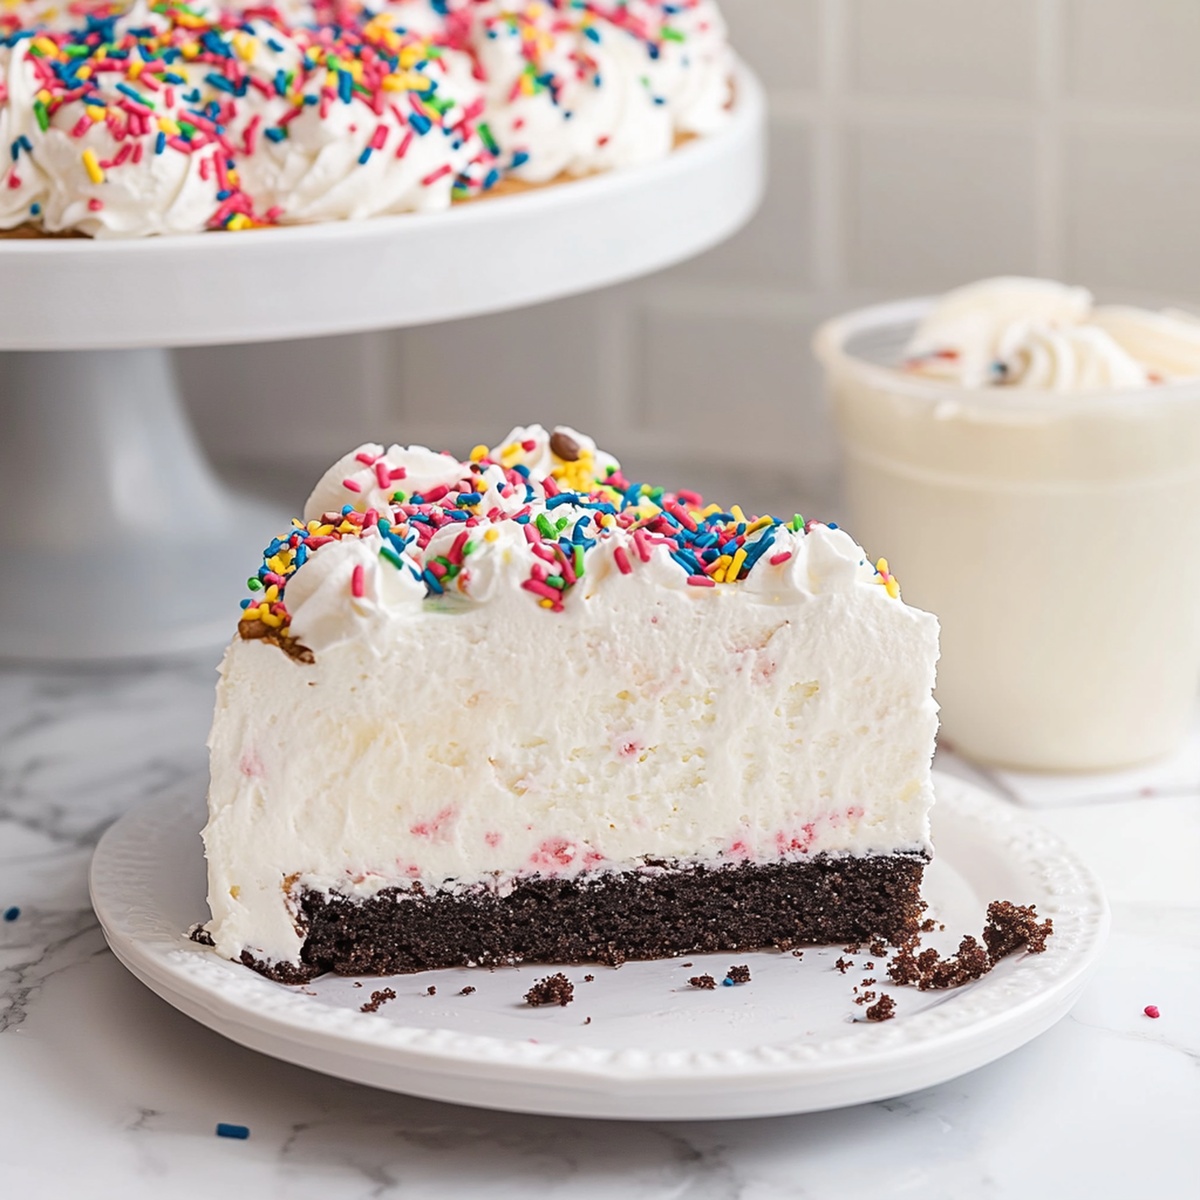
Indulgent Copycat Dairy Queen Ice Cream Cake delivers a nostalgic dessert experience straight from childhood memories. Layers of creamy vanilla and chocolate ice cream nestled between fudge crumbs create a delightful treat you’ll want to savor with every cool, delectable bite.
Ingredients
Main Ingredients:
- 1.5 quarts (1.4 liters) vanilla ice cream (softened)
- 1.5 quarts (1.4 liters) chocolate ice cream (softened)
Crunch Layer Ingredients:
- 24 Oreo cookies, crushed
- ½ cup (120 milliliters) hot fudge sauce (store-bought or homemade)
Frosting and Decoration Ingredients:
- 2 cups (480 milliliters) heavy whipping cream
- ¼ cup (60 grams) powdered sugar
- 1 teaspoon (5 milliliters) vanilla extract
- Sprinkles
- Chocolate shavings
- Extra fudge sauce
- Maraschino cherries
Instructions
- Meticulously prepare the cake mold by lining it with plastic wrap or parchment paper, ensuring complete coverage for effortless cake removal. Select a springform pan or a deep cake pan with ample wrap overhang.
- Create a delectable crunch layer by thoroughly blending crushed Oreo cookies with hot fudge sauce until uniformly mixed. Set the mixture aside for later assembly.
- Construct the cake’s foundation by evenly spreading softened chocolate ice cream across the pan’s bottom. Allow the layer to solidify in the freezer for approximately 30 minutes.
- Apply the prepared Oreo-fudge crunch layer directly onto the chocolate ice cream, ensuring an even distribution. Return the cake to the freezer for 15 minutes to set the crunch layer.
- Carefully spread softened vanilla ice cream over the crunch layer, smoothing the surface to create a uniform top. Freeze the entire cake for a minimum of 4 hours until completely solid.
- Prepare the whipped frosting by whipping heavy cream, powdered sugar, and vanilla extract in a chilled bowl until stiff peaks form. Generously coat the frozen cake’s top and sides with the delicate cream.
- Elevate the cake’s presentation by drizzling additional fudge sauce and garnishing with colorful sprinkles, delicate chocolate shavings, or vibrant cherries.
- For optimal serving, return the decorated cake to the freezer for an additional 2 hours or overnight. Before slicing, allow the cake to rest at room temperature for 10-15 minutes to facilitate easier cutting.
Notes
- Smooth out ice cream layers gently to prevent air bubbles and ensure a compact, professional-looking cake.
- Work quickly when layering to keep ice cream from melting and maintain crisp, defined layers.
- Use room temperature ice cream for easier spreading, but not too soft to prevent structural collapse.
- For a gluten-free version, replace Oreos with gluten-free chocolate cookie crumbs or crushed chocolate rice cereal.
- Customize the cake by swapping flavors like adding mint chocolate chip or using different cookie crunch layers.
- Stabilize whipped cream by chilling the bowl and beaters beforehand, ensuring a sturdy frosting that holds its shape.
- Make ahead and freeze up to a week in advance, wrapped tightly in plastic wrap to maintain fresh flavor and texture.
- Create individual portions by using a springform pan with removable bottom or line muffin tins for mini ice cream cakes.
- Prep Time: 30 minutes
- Cook Time: 6 hours
- Category: Desserts, Snacks
- Method: Mixing
- Cuisine: American
Nutrition
- Serving Size: 12
- Calories: 320
- Sugar: 23 g
- Sodium: 150 mg
- Fat: 19 g
- Saturated Fat: 11 g
- Unsaturated Fat: 6 g
- Trans Fat: 0 g
- Carbohydrates: 36 g
- Fiber: 1 g
- Protein: 4 g
- Cholesterol: 70 mg
Emily Morgan
Food Critic & Kitchen Tips Specialist
Expertise
Global Food Exploration & Critique, Simple Kitchen Hacks & Time-Saving Tips, Presentation & Plating Techniques, Culinary Research & Storytelling.
Education
New York University
Emily Morgan has journeyed across the globe, collecting culinary secrets that turn everyday ingredients into impressive meals.
Based in Seattle and armed with a Journalism degree from NYU, she blends thorough research with a flair for presentation, ensuring every dish looks just as good as it tastes.
Focusing on fresh flavors, simple methods, and a bit of fun, Emily shows home cooks how to elevate their daily cooking without fancy gadgets or complex steps.