
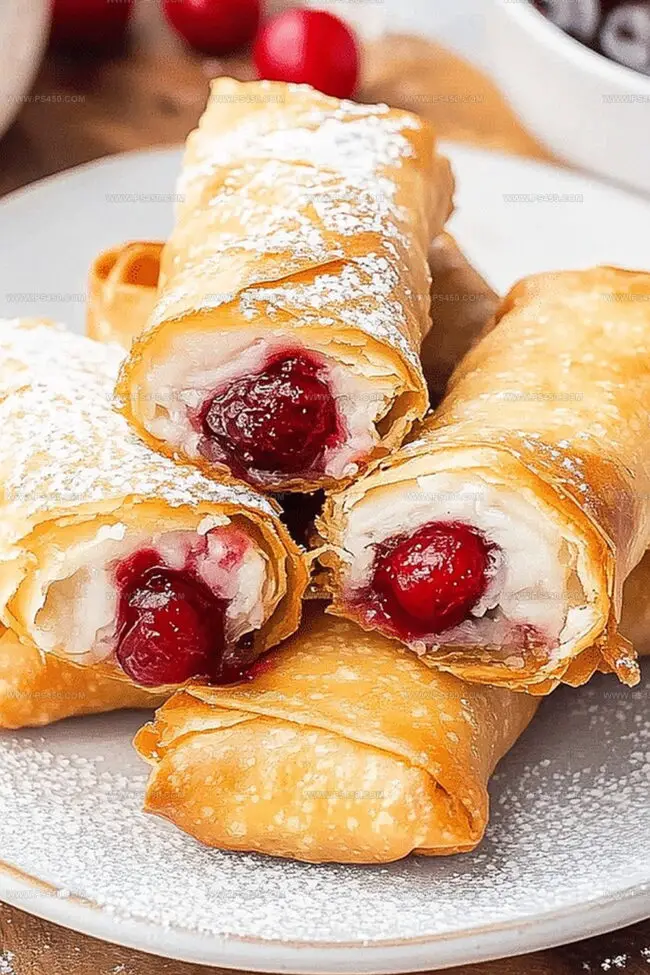
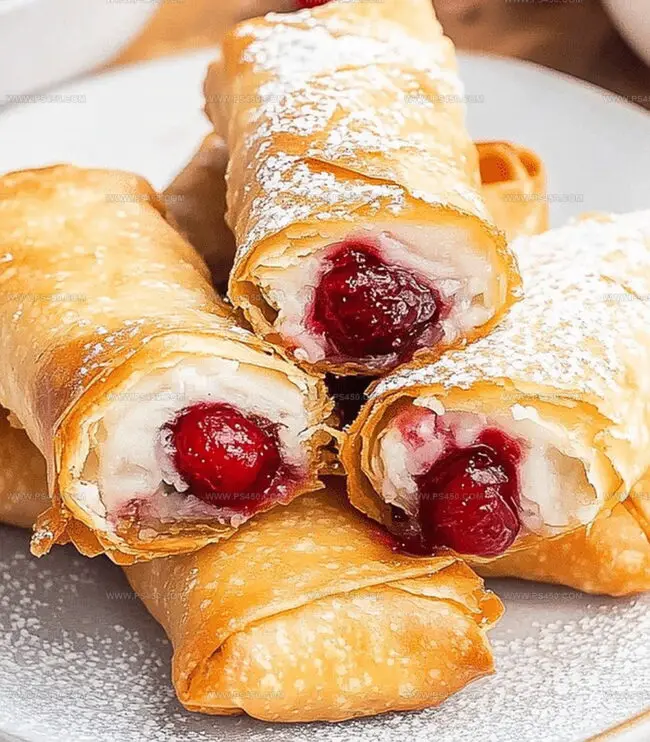
Cherry Cheesecake Egg Rolls Recipe to Impress
Sweet and tangy meets crispy delight in these incredible crispy cherry cheesecake egg rolls that blend creamy textures with a golden-brown crunch.
Dessert enthusiasts adore this playful twist on traditional cheesecake and egg roll combinations.
The delicate wrapper creates a perfect shell for the luscious cherry and cream cheese filling.
Each bite promises a delightful contrast between the warm, crisp exterior and the cool, smooth interior.
Drizzling a light honey glaze or dusting powdered sugar adds an extra layer of indulgence.
These egg rolls emerge from the fryer with a gorgeous golden color that beckons you to take a bite.
Prepare to savor a dessert that transforms classic flavors into an irresistible handheld treat.
Quick Recipe Overview
Cherry Cheesecake Egg Rolls: Ingredients to Gather
For Filling:For Wrapping:For Filling and Garnish:For Frying:Necessary Tools for Cherry Cheesecake Egg Rolls
How to Make Cherry Cheesecake Egg Rolls
Whip cream cheese, sugar, vanilla, and cream together until silky smooth. This delectable mixture will be the heart of your dessert.
Place wrapper diagonally on surface. Dollop cheesecake mixture in center, then crown with cherry filling. Leave room around edges to prevent messy leaks.
Fold wrapper sides inward, then roll tightly from bottom up. Use water as your glue to secure the edges, ensuring a perfect seal.
Pour oil into pan and heat until sizzling. Gently slide egg rolls into hot oil, turning occasionally. Watch them transform into crunchy golden treasures in 2-3 minutes.
Transfer egg rolls to paper towels to drain excess oil. Let cool briefly, then dust with powdered sugar or drizzle with chocolate sauce. Enjoy your crispy, creamy dessert!
Cooking Tips for Cherry Cheesecake Egg Rolls
Serve Cherry Cheesecake Egg Rolls Like a Pro
Storing & Meal Planning for Cherry Cheesecake Egg Rolls
FAQs
Not at all! They’re surprisingly simple to prepare. Even beginner cooks can master this recipe with basic kitchen skills and a few practice rolls.
Yes, you can assemble the egg rolls ahead of time and keep them refrigerated, covered, for a few hours before frying. Just make sure to seal them well to prevent moisture.
Traditional egg roll wrappers from the refrigerated section of grocery stores work perfectly. They’re thin, crispy, and hold the filling beautifully when fried.
Seal the edges carefully with water and roll them tightly. Avoid overfilling, which can cause the wrapper to tear or burst during frying.
Print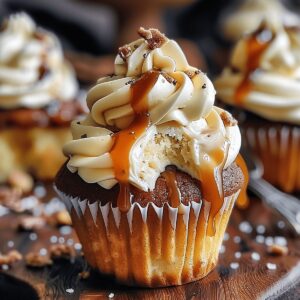
Indulgent Salted Caramel Cream Cheese Cupcakes Recipe
- Total Time: 35 minutes
- Yield: 13 1x
Description
Gooey salted caramel cream cheese cupcakes blend rich cream cheese with silky caramel for an indulgent dessert. Bakers can elevate their skills with this luxurious sweet treat that delights senses and satisfies sweet cravings.
Ingredients
- 1 ½ cups (190 grams) all-purpose flour
- ½ cup (115 grams) unsalted butter, softened
- 1 cup (200 grams) granulated sugar
- 2 large eggs, room temperature
- ½ cup (120 ml / 4 fl oz) sour cream, room temperature
- 8 oz (225 grams) cream cheese, softened
- ¼ cup (50 grams) granulated sugar
- 1 large egg, room temperature
- 1 tsp baking powder
- ½ tsp baking soda
- ¼ tsp salt
- 1 tsp vanilla extract
- ½ tsp vanilla extract
- ½ cup (120 ml / 4 fl oz) caramel sauce (store-bought or homemade)
- ¼ cup (60 ml / 2 fl oz) caramel sauce
- ½ tsp sea salt flakes (for sprinkling on top)
Instructions
- Preparation: Warm the oven to 350F (175C) and arrange cupcake liners in a 12-cup muffin tin, ensuring precise spacing for consistent baking.
- Dry Blend: Whisk flour, baking powder, baking soda, and salt in a medium bowl until uniformly combined, creating a balanced dry mixture.
- Butter Fusion: Cream butter and sugar in a large mixing bowl until the mixture transforms into a light, airy consistency, establishing a smooth cupcake foundation.
- Liquid Integration: Blend eggs individually into the butter mixture, then incorporate vanilla extract and sour cream, developing a silky batter with seamless texture.
- Caramel Infusion: Gently fold caramel sauce into the batter, creating delicate golden swirls throughout the mixture.
- Batter Completion: Delicately combine dry ingredients with wet ingredients, stirring minimally to preserve the batter’s delicate structure.
- Cream Cheese Preparation: Whip cream cheese, sugar, egg, and vanilla extract until achieving a luxuriously smooth filling with no visible lumps.
- Cupcake Assembly: Strategically layer batter in liners – place a tablespoon of batter, add a cream cheese dollop, then cover with another batter spoonful, filling each liner to three-quarters capacity.
- Baking Process: Bake in the preheated oven for 18-20 minutes, checking doneness with a toothpick that emerges clean when inserted near the center (avoiding cream cheese filling).
- Cooling and Finishing: Rest cupcakes in the tin for 5 minutes, then transfer to a wire rack. Once cooled, embellish with a caramel sauce drizzle and a delicate sea salt flake sprinkle.
- Storage: Serve immediately or preserve in an airtight container, maintaining delectable quality for up to 3 days.
Notes
- Prevent Overmixing: Gently fold dry ingredients into wet ingredients to maintain a light, tender cupcake texture. Overmixing can lead to dense, tough cupcakes.
- Check Cream Cheese Placement: When inserting the toothpick to test doneness, carefully avoid the cream cheese center to get an accurate baking assessment.
- Temperature Matters: Use room temperature butter and eggs for smoother batter integration and more consistent mixing results.
- Customize Salt Levels: Adjust sea salt flakes based on personal preference, starting with a light sprinkle and increasing gradually to find the perfect sweet-salty balance.
- Prep Time: 15 minutes
- Cook Time: 20 minutes
- Category: Desserts, Snacks
- Method: Baking
- Cuisine: American
Nutrition
- Serving Size: 13
- Calories: 330
- Sugar: 24 g
- Sodium: 150 mg
- Fat: 17 g
- Saturated Fat: 10 g
- Unsaturated Fat: 5 g
- Trans Fat: 0 g
- Carbohydrates: 40 g
- Fiber: 1 g
- Protein: 4 g
- Cholesterol: 75 mg
John Nicholson
Lead Writer & Recipe Developer
Expertise
Recipe Testing and Development, Kitchen Hacks and Time-Saving Tips, Flavor Pairing and Ingredient Selection, Engaging Food Writing and Storytelling
Education
Johnson & Wales University
John Nicholson honed his skills at Johnson & Wales University, learning how to use fresh, local ingredients and down-to-earth techniques to make cooking simple and satisfying.
His recipes blend Southern comfort flavors with a modern touch, inviting everyone to cook with ease and confidence.
Living in Charleston, John takes cues from the city’s lively food scene, local markets, and seasonal produce. He’s all about making meals stress-free through easy tips, flavor pairings, and fun experiments in the kitchen