
Crunchy Dorito Chicken with Bacon & Cream Cheese Recipe
Satisfying comfort food reaches new heights with this irresistible doritos-crusted chicken stuffed with creamy, savory goodness.
Crispy bacon and tangy cream cheese blend seamlessly inside tender chicken breasts for an epic meal.
Each bite delivers a crunchy exterior that gives way to a mouthwatering filling packed with rich flavor.
The combination of zesty Doritos, melted cream cheese, and smoky bacon creates a seriously addictive dish that transforms ordinary chicken into something extraordinary.
Home cooks will love how simple yet impressive this recipe turns out.
Prepare to wow your taste buds and impress everyone at the dinner table with this crowd-pleasing chicken masterpiece.
Quick Recipe Overview

Everything Inside Cream Cheese and Bacon Stuffed Doritos Chicken
For Filling Base:For Chip Component:For Garnish (Optional):Equipment for Cream Cheese and Bacon Stuffed Doritos Chicken
Steps to Make Bacon & Doritos Stuffed Chicken Happen

Blend softened cream cheese with crispy bacon bits, sharp cheddar, chopped green onions, and a dash of garlic powder until silky smooth.
Gently split each Dorito chip along its side, crafting a delicate pocket without shattering the crispy shell.
Carefully spoon or pipe the creamy mixture into each chip’s hidden pocket, ensuring a generous but neat fill.
Arrange the loaded chips on a cool platter, letting them rest in the refrigerator for 15 minutes to set. Top with fresh chives or extra bacon crumbles for an eye-catching finish. Serve and watch guests dive in!
Cooking Tips for Cheesy Bacon Doritos Chicken Success
Serve Cream Cheese Doritos Chicken Hot and Gooey
Save Leftovers of Stuffed Doritos Chicken the Smart Way
FAQs
Yes, you can experiment with various Doritos flavors like Nacho Cheese or Cool Ranch to add a unique twist to the stuffed chips.
Absolutely! These stuffed Doritos are perfect for gatherings, game nights, or as a fun and unexpected snack that will impress your guests.
To maintain crispiness, stuff the chips just before serving and avoid leaving them out for too long. Refrigerating briefly helps the filling set without compromising the chip’s texture.
Yes, you can prepare the filling up to a day in advance and store it in an airtight container in the refrigerator until you’re ready to stuff the Doritos.
Print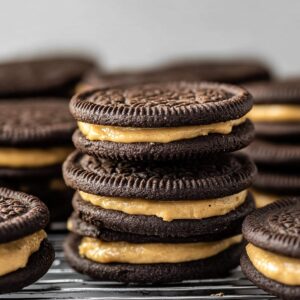
Soft Homemade Peanut Butter Oreos Recipe
- Total Time: 30 minutes
- Yield: 24 1x
Description
Homemade Peanut Butter Oreos bring nostalgic comfort with a gourmet twist. Classic cookies get a rich upgrade through creamy peanut butter centers and dark chocolate-kissed sandwich cookies perfect for sharing.
Ingredients
Soft Homemade Peanut Butter Oreos
Cookies:
- 1 cup (2 sticks / 227 grams) unsalted butter, softened
- 1 cup (200 grams) brown sugar, packed
- ½ cup (100 grams) granulated sugar
- 2 large eggs
- 2 teaspoons vanilla extract
- 2 cups (240 grams) all-purpose flour
- ¾ cup (75 grams) unsweetened cocoa powder
- 1 teaspoon baking soda
- ½ teaspoon salt
Peanut Butter Filling:
- ¾ cup (190 grams) creamy peanut butter
- ½ cup (113 grams) unsalted butter, softened
- 1 ½ cups (180 grams) powdered sugar
- 1 teaspoon vanilla extract
- ½ tablespoon (7.5 milliliters) heavy cream (if needed for consistency)
Instructions
- Craft rich, dark chocolate wafers by creaming softened butter with brown and granulated sugars until they transform into a light, airy mixture.
- Incorporate eggs and vanilla extract, whisking until the batter becomes silky and uniform in texture.
- In a separate vessel, thoroughly combine flour, cocoa powder, baking soda, and salt, creating a deep brown dry mixture.
- Gradually fold the dry ingredients into the wet mixture, blending until a cohesive chocolate dough forms without overmixing.
- Preheat the oven to 350F (175C) and prepare baking sheets with parchment paper for optimal cookie release.
- Portion the chocolate dough into uniform tablespoon-sized orbs, positioning them with ample spacing on the lined baking sheets.
- Bake the chocolate wafers for 8-10 minutes, ensuring edges are set while maintaining a tender, soft center.
- Allow cookies to rest on the baking sheet for five minutes, then transfer to a wire cooling rack to reach room temperature.
- Meanwhile, whip peanut butter and butter together until they create a smooth, glossy foundation for the filling.
- Progressively integrate powdered sugar, mixing until the filling achieves a light, fluffy consistency.
- Enhance the filling with vanilla extract and a touch of heavy cream to reach the perfect spreadable texture.
- Carefully spread or pipe a generous layer of peanut butter filling onto the flat surface of one chocolate wafer.
- Gently sandwich another wafer on top, applying slight pressure to create a harmonious cookie.
- Serve immediately for a soft, decadent treat or chill briefly to develop a firmer, more structured sandwich cookie.
Notes
- Ensure butter is at room temperature for easier mixing and smoother cookie dough texture.
- Use unsweetened cocoa powder for a rich, deep chocolate flavor without added sweetness.
- Sift dry ingredients to prevent lumps and create a more uniform cookie texture.
- Chill dough for 15-30 minutes before baking to prevent excessive spreading and maintain cookie shape.
- Opt for natural peanut butter with no added sugar for a more authentic, less sweet filling.
- Use a cookie scoop for consistent cookie sizes and even baking.
- For gluten-free version, substitute all-purpose flour with a 1:1 gluten-free baking blend.
- Create dairy-free alternatives by using coconut oil instead of butter and plant-based milk in filling.
- Store cookies in an airtight container at room temperature for up to 5 days, or refrigerate for longer shelf life.
- Experiment with different nut butters like almond or cashew for unique flavor variations.
- Prep Time: 10 minutes
- Cook Time: 20 minutes
- Category: Desserts, Snacks
- Method: Baking
- Cuisine: American
Nutrition
- Serving Size: 24
- Calories: 260
- Sugar: 18 g
- Sodium: 150 mg
- Fat: 12 g
- Saturated Fat: 6 g
- Unsaturated Fat: 4 g
- Trans Fat: 0 g
- Carbohydrates: 36 g
- Fiber: 1 g
- Protein: 4 g
- Cholesterol: 25 mg
John Nicholson
Lead Writer & Recipe Developer
Expertise
Recipe Testing and Development, Kitchen Hacks and Time-Saving Tips, Flavor Pairing and Ingredient Selection, Engaging Food Writing and Storytelling
Education
Johnson & Wales University
John Nicholson honed his skills at Johnson & Wales University, learning how to use fresh, local ingredients and down-to-earth techniques to make cooking simple and satisfying.
His recipes blend Southern comfort flavors with a modern touch, inviting everyone to cook with ease and confidence.
Living in Charleston, John takes cues from the city’s lively food scene, local markets, and seasonal produce. He’s all about making meals stress-free through easy tips, flavor pairings, and fun experiments in the kitchen