
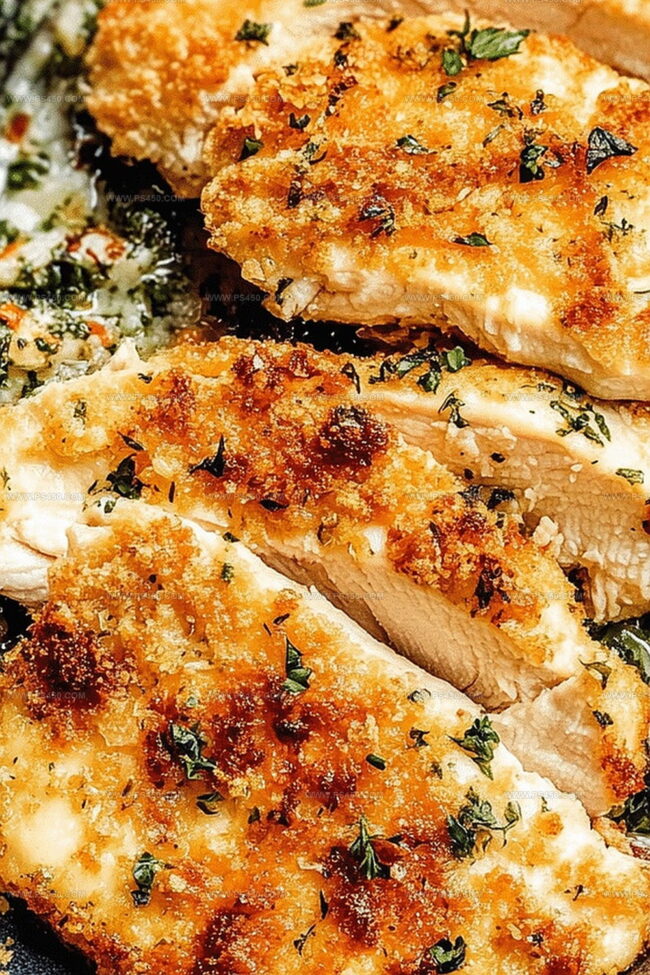
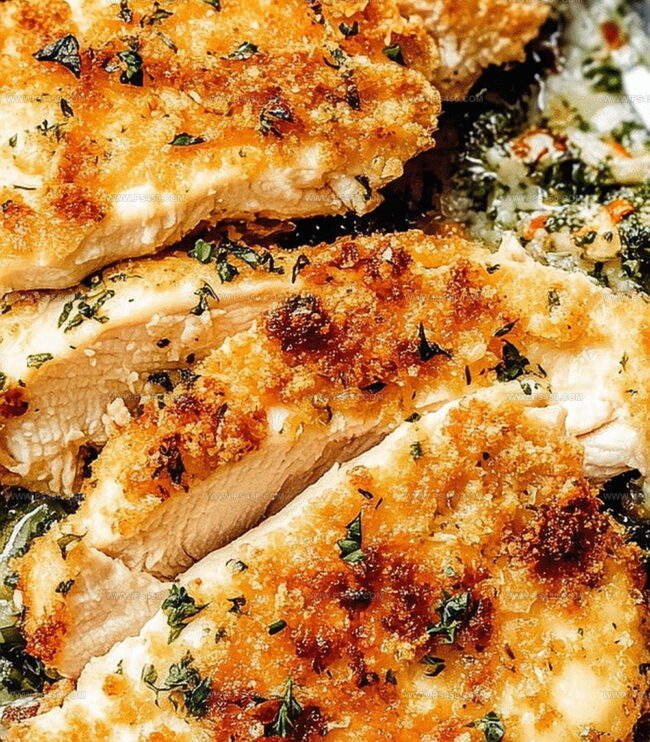
Ranch Chicken Recipe with Crunchy Golden Coating
Weeknight dinners demand something special, and this crispy ranch chicken recipe hits all the right notes with its irresistible blend of flavors.
Tender chicken coated in a zesty ranch seasoning creates a mouthwatering main dish that sparks excitement at the dinner table.
The golden, crunchy exterior gives way to juicy meat that keeps everyone coming back for more.
Simple ingredients combine to make an extraordinary meal that takes minimal effort.
Ranch lovers will swoon over the bold, tangy coating that transforms ordinary chicken into something extraordinary.
Each bite delivers a perfect balance of crispy texture and rich, creamy seasoning.
Serve this crowd-pleasing dish and watch plates clean up in record time.
Quick Recipe Overview
What You’ll Need for Baked Ranch Chicken
For Chicken Base:For Seasoning Blend:For Coating and Moisture:Tools for a Quick Baked Ranch Chicken Prep
How to Bake Ranch Chicken That’s Juicy and Crisp
Ways to Customize Baked Ranch Chicken Easily
Serving Baked Ranch Chicken with Style
Keeping Baked Ranch Chicken Fresh for Later Meals
FAQs
You’ll need boneless chicken breasts, ranch seasoning mix, breadcrumbs, parmesan cheese, and a bit of olive oil or melted butter to help the coating stick.
Absolutely! Mix dried dill, dried parsley, garlic powder, onion powder, salt, and pepper to create your own ranch seasoning blend that works perfectly for this recipe.
Don’t overcook the chicken. Use a meat thermometer to check that the internal temperature reaches 165F, which guarantees juicy chicken without drying it out. Also, avoid using thin chicken breasts that can quickly become tough.
You can make it gluten-free by substituting regular breadcrumbs with gluten-free breadcrumbs or crushed gluten-free crackers. Check that your ranch seasoning mix is also gluten-free if you have dietary restrictions.
Print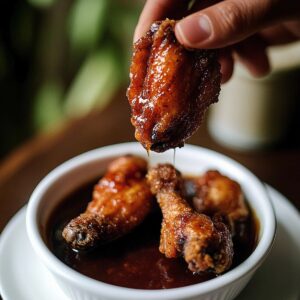
Breaded Smoked And Fried Chicken Wings Recipe
- Total Time: 25 minutes
- Yield: 4 1x
Description
Crispy smoked chicken wings bring Southern comfort straight to your plate with golden-brown perfection. Seasoned breading and smoky flavor create an irresistible combination you’ll crave again and again.
Ingredients
Protein Ingredients:
- 2 lbs (907 grams) chicken wings (drums and flats)
- 1 egg
Breading Ingredients:
- 1 cup all-purpose flour
- ½ cup (120 milliliters) cornstarch
- ½ teaspoon baking powder
Seasoning and Spice Ingredients:
- 1 tablespoon olive oil
- 1 teaspoon salt
- 1 teaspoon garlic powder
- 1 teaspoon onion powder
- 1 teaspoon smoked paprika
- ½ teaspoon black pepper
- ½ teaspoon cayenne pepper (optional, for heat)
Liquid Ingredients:
- ½ cup (120 milliliters) buttermilk
Cooking Ingredients:
- 4 cups (946 milliliters) peanut oil (or vegetable oil)
Serving Ingredients:
- Your favorite wing sauce (Buffalo, BBQ, Garlic Parmesan, etc.)
- Ranch or blue cheese dressing
Instructions
- Prepare the smoker by setting the temperature to 225F, selecting aromatic wood chips like hickory, apple, or cherry for enhanced flavor profile.
- Thoroughly pat the chicken wings dry, then massage with olive oil and a robust spice blend combining salt, black pepper, garlic powder, onion powder, smoked paprika, and cayenne for deep, complex seasoning.
- Position the seasoned wings directly onto smoker grates, allowing them to slowly infuse with wood-fired essence for approximately 1.5 hours until the internal temperature reaches 155F.
- Remove wings from smoker and let them rest momentarily while assembling the breading station.
- Create a dynamic dry coating by whisking flour, cornstarch, salt, black pepper, smoked paprika, garlic powder, and baking powder into a uniform mixture.
- In a separate vessel, blend egg and buttermilk until thoroughly incorporated, creating a smooth, creamy binding agent.
- Heat peanut oil in a deep fryer or heavy-bottomed Dutch oven to precisely 350F, ensuring optimal frying conditions.
- Dredge each smoked wing first through the buttermilk-egg mixture, then completely enrobe in the seasoned flour mixture, guaranteeing full coverage.
- Carefully lower breaded wings into hot oil, frying in small batches for 2-3 minutes until achieving a golden, crispy exterior and internal temperature of 175F.
- Transfer fried wings to a wire rack, allowing excess oil to drain and maintaining maximum crispiness.
- Optionally toss in preferred sauce or serve alongside complementary dipping sauces for a delectable finish.
Notes
- Smoke Your Wings Perfectly: Choose wood chips like hickory or apple for a subtle, sweet smoky flavor that enhances the chicken’s natural taste.
- Achieve Crispy Coating Magic: Add baking powder to the flour mixture to help break down proteins, creating an extra-crispy and lighter breading that stays crunchy longer.
- Temperature Control is Key: Use a meat thermometer to ensure wings reach safe internal temperatures without overcooking, keeping the meat juicy and tender.
- Customize for Dietary Needs: Swap wheat flour with gluten-free alternatives like rice flour or almond flour for a celiac-friendly version that maintains the same delicious crunch.
- Prep Time: 10 minutes
- Cook Time: 15 minutes
- Category: Dinner, Appetizer, Snacks
- Method: Frying
- Cuisine: American
Nutrition
- Serving Size: 4
- Calories: 450
- Sugar: 0 g
- Sodium: 850 mg
- Fat: 30 g
- Saturated Fat: 5 g
- Unsaturated Fat: 25 g
- Trans Fat: 0 g
- Carbohydrates: 30 g
- Fiber: 1 g
- Protein: 25 g
- Cholesterol: 75 mg
John Nicholson
Lead Writer & Recipe Developer
Expertise
Recipe Testing and Development, Kitchen Hacks and Time-Saving Tips, Flavor Pairing and Ingredient Selection, Engaging Food Writing and Storytelling
Education
Johnson & Wales University
John Nicholson honed his skills at Johnson & Wales University, learning how to use fresh, local ingredients and down-to-earth techniques to make cooking simple and satisfying.
His recipes blend Southern comfort flavors with a modern touch, inviting everyone to cook with ease and confidence.
Living in Charleston, John takes cues from the city’s lively food scene, local markets, and seasonal produce. He’s all about making meals stress-free through easy tips, flavor pairings, and fun experiments in the kitchen