
Fudgy Chocolate Peanut Butter Brownies Recipe
Chocolate and peanut butter create a magical symphony in these irresistible peanut butter brownies that melt hearts with every bite.
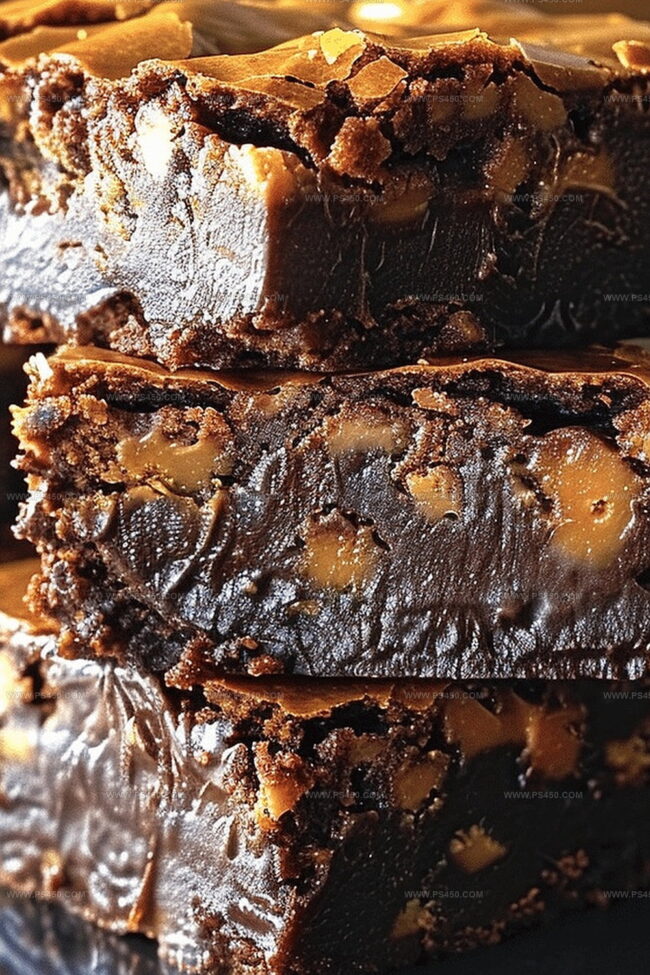
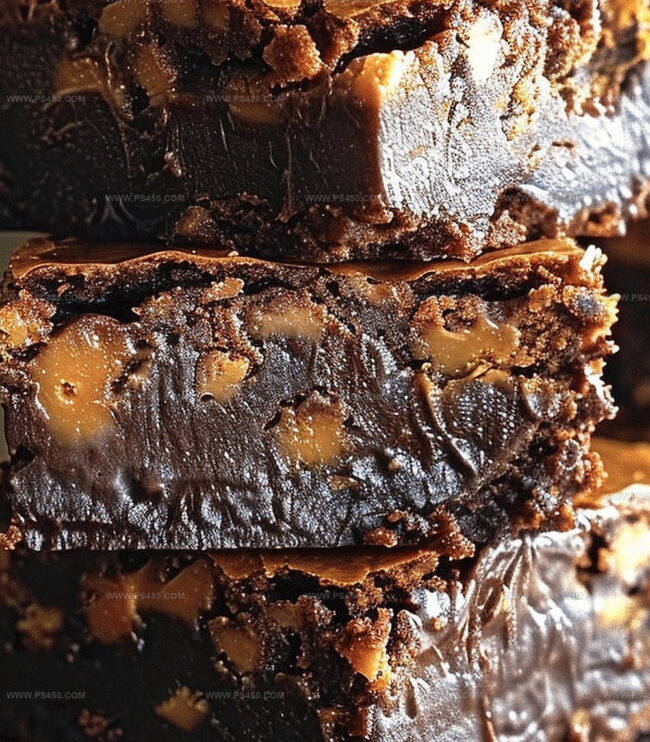
Rich, fudgy layers promise pure indulgence for dessert enthusiasts.
The chocolate base carries deep, intense notes of cocoa and warmth.
Swirls of creamy peanut butter dance through the brownie, creating pockets of nutty goodness.
Each square delivers a perfect balance of sweet and salty flavors that tantalize taste buds.
These brownies transform an ordinary afternoon into a delightful moment of pure comfort.
Prepare to savor a dessert that elevates your baking game and leaves everyone craving another slice.
Quick Recipe Overview
Peanut Butter Brownie Ingredient Essentials
For Wet Ingredients: – Melted Butter: Brings rich, velvety texture and helps bind ingredients smoothly. Choose unsalted butter for better flavor control.
For Dry Ingredients: – All-Purpose Flour: Provides structure and thickness to brownie base. Use fresh, sifted flour to prevent lumps.
For Flavor Enhancers: – Peanut Butter: Creates delightful swirl and adds nutty richness. Select creamy peanut butter for smooth texture.
Baking Tools for Fudgy Peanut Butter Brownies
Making Rich Brownies with a Nutty Kick
Fire up your oven to a toasty 350F and get a square pan ready with parchment paper, letting some edges hang over for easy lifting.
Blend melted butter with sugars until silky smooth. Crack in eggs one by one, stirring after each. Toss in vanilla for extra flavor. Gently fold in flour, cocoa, and salt without beating the mixture too much.
Pour brownie mixture into the pan, spreading it evenly. Zap peanut butter in the microwave for a few seconds to make it drizzle-friendly. Dot peanut butter across the surface and swirl with a knife to create beautiful marbled patterns.
Slide the pan into the oven and bake for 30-35 minutes. Check doneness by poking with a toothpick – a few moist crumbs are your green light. Avoid overcooking to keep things extra fudgy.
Let brownies chill completely in the pan. Lift out using parchment edges, slice into squares, and dive into chocolatey, peanut buttery bliss.
Tips to Make Brownies Extra Thick or Gooey
Serving Brownies for Dessert or Snack Time
Save Peanut Butter Brownies
FAQs
The peanut butter swirl creates a beautiful marbled effect and adds a rich, creamy texture that complements the deep chocolate flavor. By slightly warming the peanut butter, it becomes easier to drizzle and swirl through the batter.
Look for a toothpick with a few moist crumbs when inserted into the center. This ensures a fudgy texture. If the toothpick comes out completely clean, the brownies might be overdone and dry.
Creamy peanut butter works best for creating a smooth swirl. Natural peanut butter can be used, but it might separate during baking. Avoid chunky peanut butter as it will disrupt the smooth marbling effect.
Avoid overmixing the batter and be careful not to overbake. Removing the brownies when there are still a few moist crumbs ensures a rich, fudgy texture that chocolate lovers crave.
Print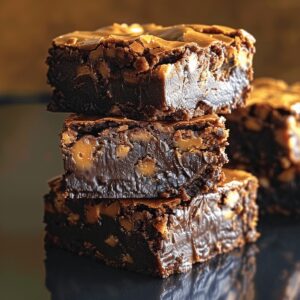
Decadent Peanut Butter Brownies Recipe
- Total Time: 50 minutes
- Yield: 13 1x
Description
Sinfully rich Fudgy Peanut Butter Brownies blend chocolate and nutty flavors in a delectable dessert. Chocolate lovers will savor this indulgent treat that promises pure bliss with each delightful bite.
Ingredients
- 4 large eggs
- 1 cup (230g / 8 oz) unsalted butter, melted
- 1 cup (125g / 4.4 oz) all-purpose flour
- 1 cup (85g / 3 oz) unsweetened cocoa powder
- ¾ cup (180g / 6.3 oz) creamy peanut butter
- 1 ½ cups (300g / 10.5 oz) granulated sugar
- ½ cup (100g / 3.5 oz) brown sugar, packed
- 2 tsps vanilla extract
- ½ tsp salt
Instructions
- Oven Preparation: Heat oven to 350F (175C) and line an 8×8-inch pan with parchment paper, ensuring extended edges for easy removal.
- Batter Creation: Blend melted butter with granulated and brown sugars in a large bowl. Whisk eggs individually until the mixture transforms into a smooth, glossy consistency.
- Dry Ingredient Integration: Sift flour, cocoa powder, and salt into the wet mixture, folding gently to maintain a luxurious, tender batter texture without deflating its potential for ultimate fudginess.
- Peanut Butter Infusion: Microwave peanut butter until fluid, then strategically drizzle and dot across the brownie surface, creating an artistic marbling effect using a knife to weave the golden swirls through the chocolate base.
- Baking Process: Transfer the pan to the preheated oven and bake for 30-35 minutes. Check doneness by inserting a toothpick – it should emerge with a few moist crumbs attached.
- Cooling and Serving: Allow brownies to cool completely in the pan, then lift using parchment edges and slice into indulgent squares, revealing the perfect fusion of chocolate and peanut butter.
Notes
- Prevent Overmixing: Stir batter gently to maintain a fudgy, tender texture; overmixing develops gluten and results in tough brownies.
- Peanut Butter Consistency: Microwave peanut butter briefly to achieve a drizzling consistency, making marbling easier and more attractive.
- Toothpick Test Precision: Look for moist crumbs on the toothpick, not completely clean, to ensure maximum fudginess and prevent dry brownies.
- Temperature Matters: Allow brownies to cool completely in the pan to set properly and develop rich, complex flavors before cutting.
- Prep Time: 15 minutes
- Cook Time: 35 minutes
- Category: Desserts, Snacks
- Method: Baking
- Cuisine: American
Nutrition
- Serving Size: 13
- Calories: 266
- Sugar: 23g
- Sodium: 60mg
- Fat: 18g
- Saturated Fat: 10g
- Unsaturated Fat: 8g
- Trans Fat: 0g
- Carbohydrates: 30g
- Fiber: 2g
- Protein: 5g
- Cholesterol: 70mg
John Nicholson
Lead Writer & Recipe Developer
Expertise
Recipe Testing and Development, Kitchen Hacks and Time-Saving Tips, Flavor Pairing and Ingredient Selection, Engaging Food Writing and Storytelling
Education
Johnson & Wales University
John Nicholson honed his skills at Johnson & Wales University, learning how to use fresh, local ingredients and down-to-earth techniques to make cooking simple and satisfying.
His recipes blend Southern comfort flavors with a modern touch, inviting everyone to cook with ease and confidence.
Living in Charleston, John takes cues from the city’s lively food scene, local markets, and seasonal produce. He’s all about making meals stress-free through easy tips, flavor pairings, and fun experiments in the kitchen