
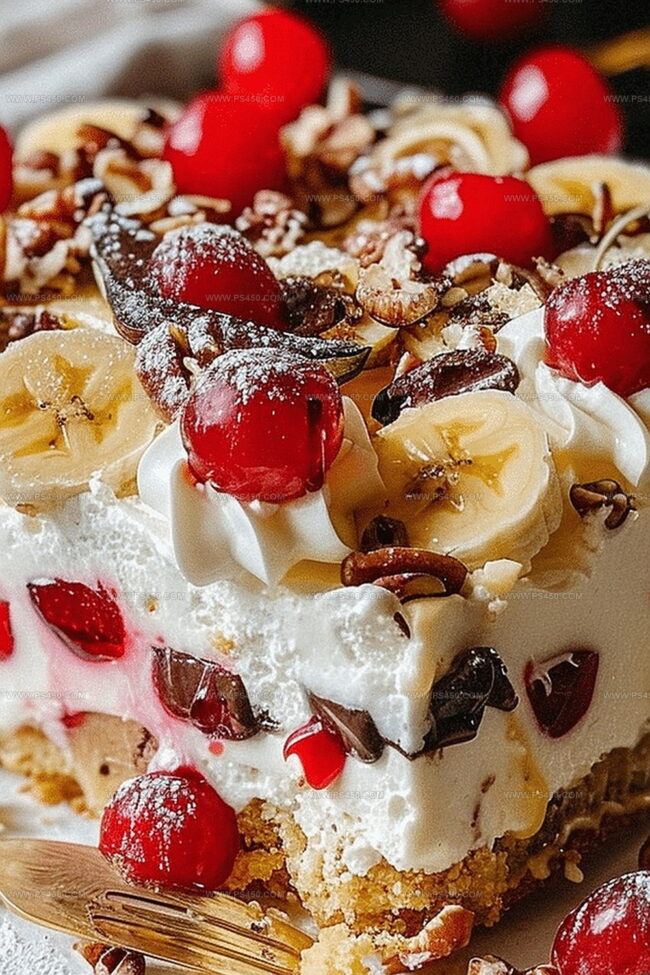
Enchanting Banana Split Cake Recipe for Sweet Dreamers
Sweet summer memories melt into this classic banana split cake that brings pure dessert magic to your table.
Layers of creamy goodness and nostalgic flavors dance together in each delightful bite.
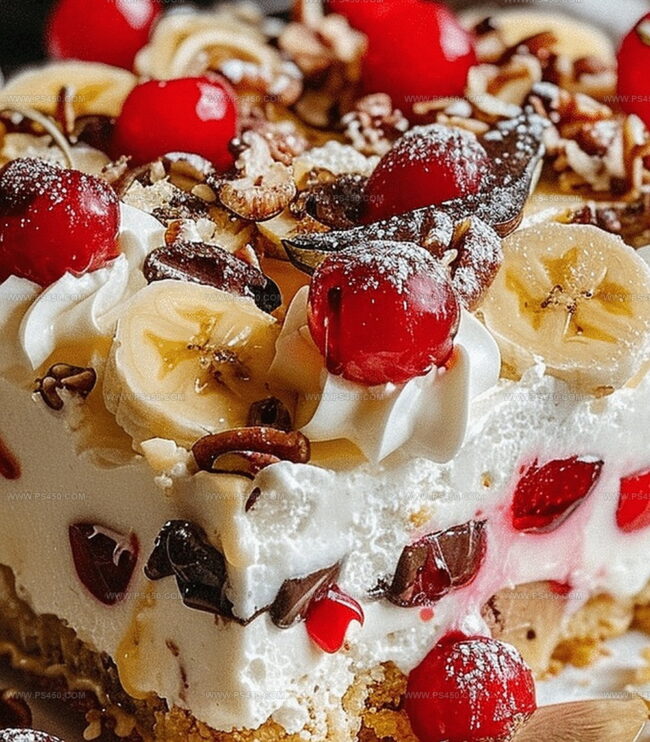
This no-bake wonder combines the best of childhood treats with sophisticated dessert charm.
Ripe bananas, luscious cream cheese, and velvety whipped topping create a symphony of textures that sing on your palate.
Cool and refreshing, the dessert offers a stunning twist on traditional banana splits.
You’ll love how simple ingredients transform into an elegant crowd-pleasing treat.
Prepare to wow everyone with this irresistible dessert that promises to become a new family favorite.
Quick Recipe Overview
Ingredients for No-Bake Banana Split Cake
For Crust Base:For Creamy Layer:For Fruity and Topping Layer:Tools That Help Layer a No-Bake Banana Split Cake
Assembling Your No-Bake Banana Split Cake Step-by-Step
Crush graham crackers and mix with melted butter, pressing firmly into a baking dish to make a solid foundation for your dessert. Chill in refrigerator for quick setting.
Blend cream cheese with sweet powders until silky smooth. Spread evenly across the chilled crust, creating a luxurious foundation.
Slice bananas and arrange them carefully over cream cheese. Sprinkle crushed pineapple across the surface for bright, tangy flavor.
Cover fruit layers with soft, airy whipped cream. Ensure complete coverage to lock in freshness and protect delicate fruit.
Scatter chopped nuts across the top for delightful crunch. Drop maraschino cherries strategically and drizzle chocolate sauce for extra indulgence.
Refrigerate dessert for several hours, allowing flavors to meld and texture to set perfectly. Serve cold for maximum enjoyment.
Customizing a No-Bake Banana Split Cake with Extras
How to Serve a No-Bake Banana Split Cake Beautifully
Store No-Bake Banana Split Cake Without Losing Texture
FAQs
Yes, you can easily swap the nuts. Chopped almonds, pecans, or walnuts work great and add a similar crunchy texture to the dessert.
Not in its current form. The graham cracker crust contains gluten. To make it gluten-free, use gluten-free graham crackers or substitute with gluten-free cookie crumbs.
Toss the sliced bananas with a little lemon juice before placing them on the cream cheese layer. The citric acid helps slow down oxidation and keeps them looking fresh.
Absolutely! This no-bake cake can be prepared a day in advance. In fact, it tastes even better after the flavors have had time to meld together in the refrigerator overnight.
Print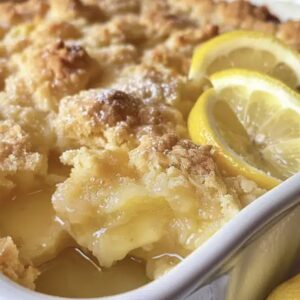
Magic Lemon Cobbler Recipe
- Total Time: 1 hour 10 minutes
- Yield: 8 1x
Description
Sweet Southern charm fills kitchens with magic lemon cobbler, a delightful dessert blending tangy citrus and buttery crust. Comfort meets zesty delight in this simple yet irresistible treat you’ll crave after one delectable bite.
Ingredients
Main Ingredients:
- 1 cup (125 g) all-purpose flour
- 1 cup (200 g) granulated sugar
- 1 cup (240 ml) whole milk
- ½ cup (100 g) granulated sugar
- 1 ¼ cups (300 ml) hot water
Flavoring Ingredients:
- 2 tablespoons fresh lemon zest
- ¼ cup (60 ml) fresh lemon juice
- 1 teaspoon vanilla extract
Binding and Seasoning Ingredients:
- ½ cup (115 g) unsalted butter, melted
- 2 teaspoons baking powder
- ¼ teaspoon salt
- ¼ cup (50 g) brown sugar
Instructions
- Prepare the baking vessel by coating a 9×9-inch baking dish with melted butter, creating a smooth base for the cobbler’s foundation.
- Craft the cobbler batter by whisking flour, granulated sugar, baking powder, and salt in a medium mixing bowl until fully integrated.
- Incorporate milk, vanilla extract, and fragrant lemon zest into the dry ingredients, stirring gently until just combined to maintain a light texture.
- Carefully pour the batter over the melted butter, allowing it to settle without disturbing the layers.
- Create a sweet topping by blending granulated sugar and brown sugar in a separate bowl, ensuring a thorough mixture.
- Evenly distribute the sugar mixture across the batter’s surface, creating a delicate crystalline layer.
- Prepare a liquid infusion by combining hot water and fresh lemon juice, which will create magical layers during baking.
- Gently cascade the lemon-water mixture over the sugar layer, allowing it to naturally distribute without mixing.
- Transfer the baking dish to a preheated oven at 350°F (175°C) and bake for 40-45 minutes, watching for a golden-brown crust and bubbling edges.
- Remove from the oven and allow the cobbler to rest for 10 minutes, enabling the dessert to set and develop its signature texture.
- Serve warm, optionally accompanied by a scoop of creamy vanilla ice cream or a delicate dollop of whipped cream for an indulgent finishing touch.
Notes
- Adjust oven temperature based on your specific baking dish to ensure even golden-brown coloration and prevent burning.
- Use fresh lemon zest for the most vibrant citrus flavor, avoiding pre-packaged dried zest which can taste flat.
- Mix batter gently to keep the texture light and avoid developing tough gluten strands that can make the cobbler dense.
- Opt for room temperature milk and eggs to help ingredients blend more smoothly and create a more consistent batter.
- Swap regular milk with almond or oat milk for a dairy-free version that maintains the same creamy texture.
- Reduce sugar content by using half the recommended amount or substituting with monk fruit sweetener for a lower-calorie dessert.
- Add a sprinkle of cinnamon or nutmeg to the sugar layer for a warm, complementary spice that enhances the lemon’s brightness.
- Ensure hot water is truly hot when pouring to help create the signature self-saucing magic of the cobbler’s texture.
- Prep Time: 15 minutes
- Cook Time: 10 minutes
- Category: Desserts
- Method: Baking
- Cuisine: American
Nutrition
- Serving Size: 8
- Calories: 265
- Sugar: 29 g
- Sodium: 150 mg
- Fat: 10 g
- Saturated Fat: 6 g
- Unsaturated Fat: 3 g
- Trans Fat: 0 g
- Carbohydrates: 41 g
- Fiber: 1 g
- Protein: 2 g
- Cholesterol: 30 mg
John Nicholson
Lead Writer & Recipe Developer
Expertise
Recipe Testing and Development, Kitchen Hacks and Time-Saving Tips, Flavor Pairing and Ingredient Selection, Engaging Food Writing and Storytelling
Education
Johnson & Wales University
John Nicholson honed his skills at Johnson & Wales University, learning how to use fresh, local ingredients and down-to-earth techniques to make cooking simple and satisfying.
His recipes blend Southern comfort flavors with a modern touch, inviting everyone to cook with ease and confidence.
Living in Charleston, John takes cues from the city’s lively food scene, local markets, and seasonal produce. He’s all about making meals stress-free through easy tips, flavor pairings, and fun experiments in the kitchen