Classic Mini Cheesecakes Recipe to Impress
Creamy cheesecake meets adorable mini desserts in this irresistible mini cheesecakes recipe that promises pure delight.
Bakers of all skill levels can master these bite-sized treats with ease.
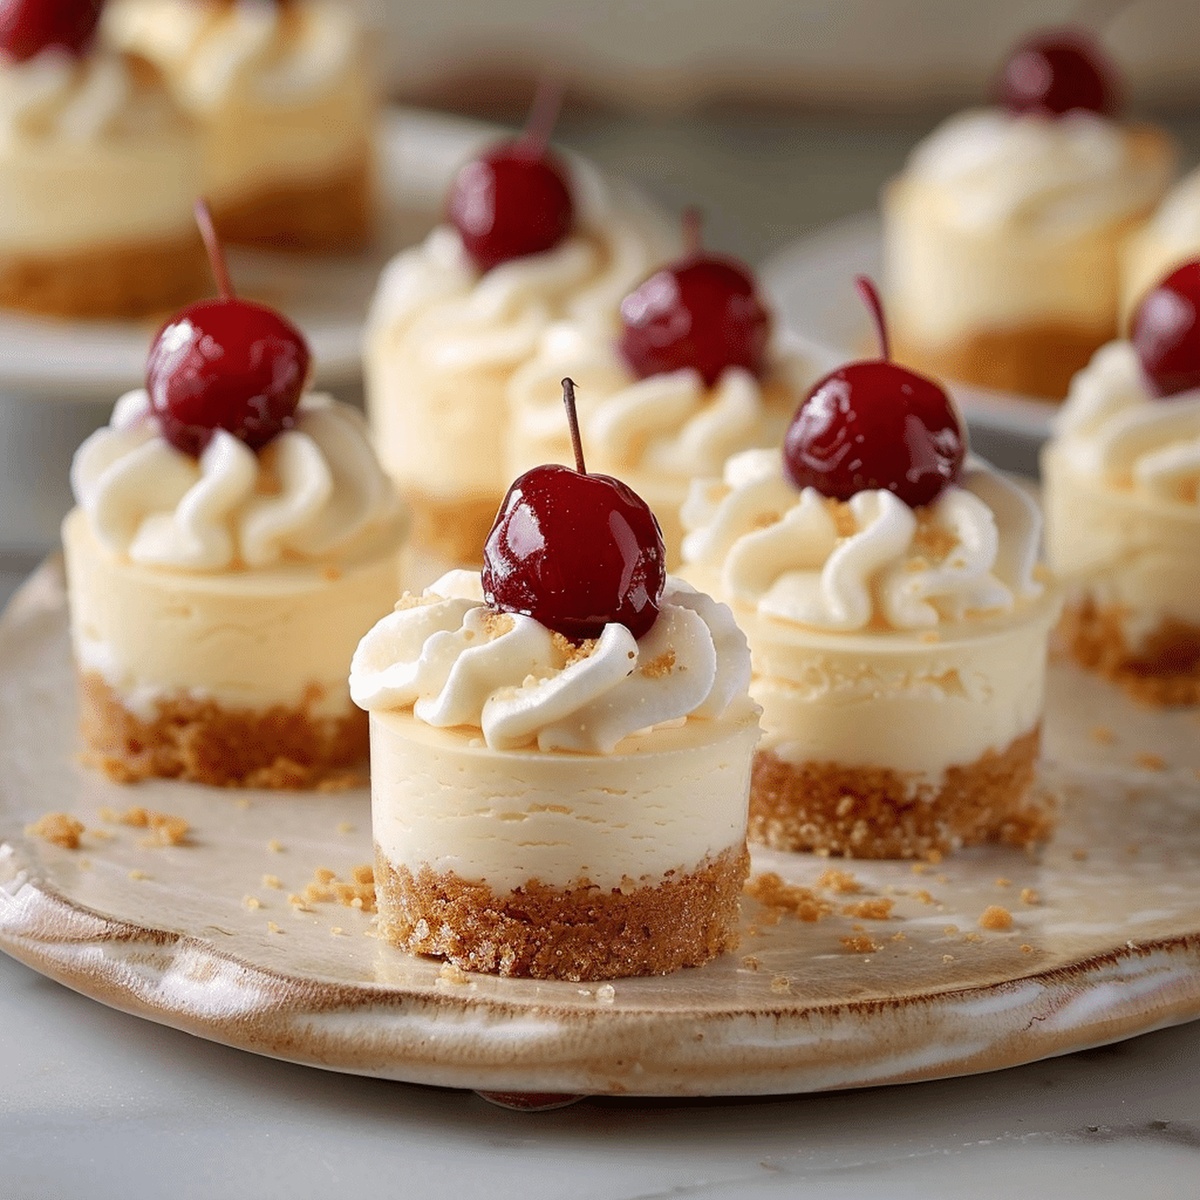
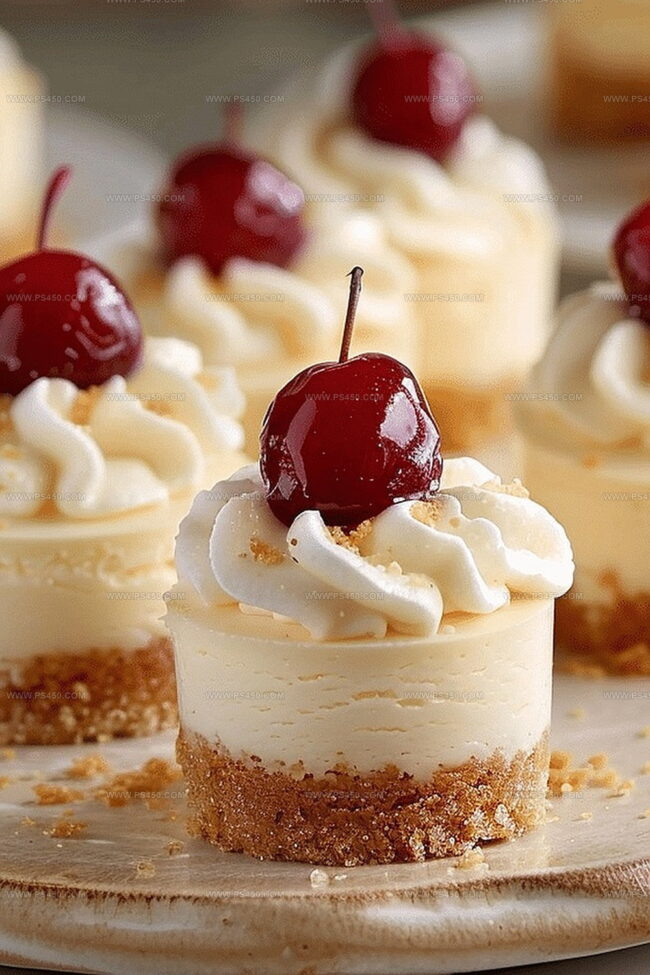
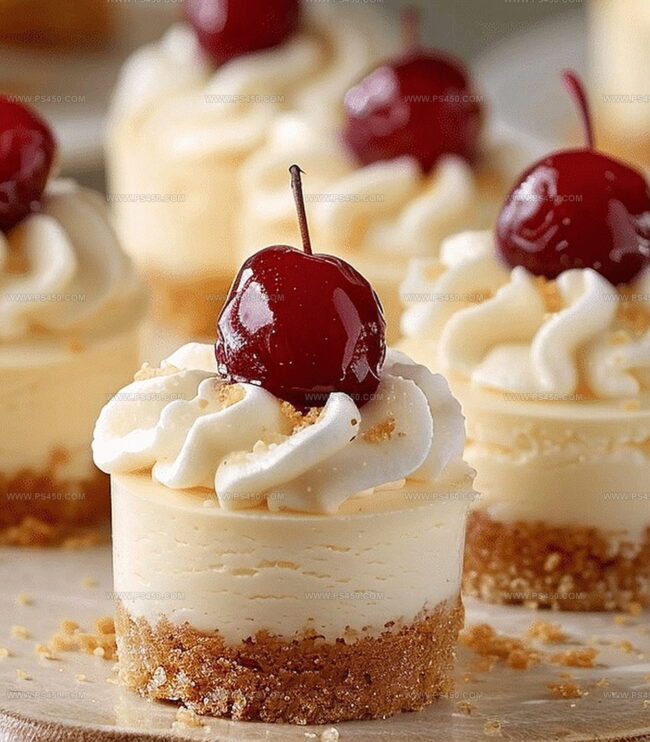
Small yet stunning, these little delights pack incredible flavor into every single bite.
The delicate graham cracker crust provides a perfect crisp foundation for the silky smooth filling.
Rich cream cheese blends seamlessly with sweet vanilla and a hint of tangy sour cream.
Each miniature cheesecake emerges from the oven with a perfect golden top and velvety center.
Serve these charming desserts at your next gathering and watch them disappear in moments.
Quick Recipe Overview
Mini Cheesecake Ingredient Highlights
For Crust:For Cheesecake Filling:For Toppings:Tools to Prep and Bake These Cute Cheesecakes
How to Bake and Cool Mini Cheesecakes Properly
Warm your oven to a cozy 325F. Grab a muffin tin and line it with pretty paper cups. Mix graham cracker crumbs with sweet sugar and melted butter until everything feels like soft sand. Press this mixture firmly into each cup and let it bake for a quick 5 minutes, creating a golden foundation.
Grab your mixing bowl and blend cream cheese and sour cream until silky smooth. Sprinkle in sugar and vanilla, mixing until everything looks dreamy. Gently fold eggs one by one, being careful not to overmix. The key is keeping everything light and airy.
Pour the luscious cheesecake mixture into each prepared cup, filling almost to the top. Slide the pan into the oven and bake for 17-20 minutes. You’ll want the centers to look slightly wobbly but set. Once done, let them cool in the pan for an hour, then tuck them into the refrigerator for at least 3 hours.
After chilling, go wild with toppings! Drizzle with fruit sauce, dollop whipped cream, or sprinkle chocolate for a decadent finish. Your mini cheesecakes are ready to steal the show.
Topping Ideas to Customize Each Bite
Serve Mini Cheesecakes on Trays or Plates
Keep Them Fresh and Chilled Until Ready
FAQs
Yes, you can substitute graham crackers with crushed Oreo cookies, digestive biscuits, or vanilla wafers for a different flavor and texture.
Beat the ingredients at low speed, avoid overmixing, and let the cheesecakes cool gradually in the oven with the door slightly open to reduce temperature shock.
No, these mini cheesecakes don’t require a water bath. The individual portions and shorter baking time help prevent cracking and ensure even baking.
Absolutely! Wrap them individually in plastic wrap and store in an airtight container in the freezer for up to 2 months. Thaw in the refrigerator overnight before serving.
Print
Crispy Air Fryer Zucchini Chips Recipe
- Total Time: 20 minutes
- Yield: 5 1x
Description
Crispy air fryer zucchini chips deliver a guilt-free snack that elevates garden vegetables into an irresistible treat. Seasoned with parmesan and herbs, these chips will satisfy your craving for something crunchy and satisfying.
Ingredients
- 2 medium zucchinis (thinly sliced)
- ⅓ cup (79 ml) grated Parmesan cheese
- ⅓ cup (79 ml) panko breadcrumbs
- ½ tsp garlic powder
- ½ tsp onion powder
- ½ tsp salt
- ¼ tsp black pepper
- 1 tbsp (15 ml) olive oil
- Fresh parsley (optional)
- Dipping sauce (optional)
Instructions
- Preparation: Employ a mandoline to precision-slice zucchinis into uniform, translucent rounds approximately 1/8 inch thick, ensuring consistent texture and cooking.
- Moisture Removal: Use paper towels to meticulously blot zucchini slices, extracting excess liquid to guarantee maximum crispiness during the air frying process.
- Seasoning & Coating: Combine Parmesan cheese, breadcrumbs, garlic powder, onion powder, salt, and black pepper in a mixing bowl, then delicately massage olive oil onto zucchini rounds before thoroughly coating each slice in the flavor-packed seasoning mixture.
- Air Frying Setup: Preheat air fryer to 375F (190C), then strategically arrange zucchini chips in a single, uncrowded layer within the basket to optimize air circulation and ensure even browning.
- Cooking Technique: Cook for 8-10 minutes, rotating chips midway through to achieve a uniform golden-brown crispness, watching carefully to prevent burning while developing a perfectly crunchy texture.
- Serving: Immediately transfer crispy zucchini chips from air fryer, garnish with freshly chopped parsley, and serve alongside a complementary dipping sauce to elevate the culinary experience.
Notes
- Master Slicing Technique: Use a mandoline for precise, uniform 1/8-inch zucchini rounds to guarantee consistent cooking and crispy texture.
- Moisture Removal Strategy: Thoroughly blot zucchini slices with paper towels to eliminate excess water, preventing sogginess and ensuring maximum crunchiness.
- Seasoning Pro Tip: Gently press breadcrumb mixture onto slices to help coating adhere securely, creating a flavorful and crisp exterior.
- Batch Cooking Wisdom: Arrange chips in a single uncrowded layer, cooking in multiple batches if needed to maintain optimal air circulation and achieve perfect golden crispness.
- Prep Time: 10 minutes
- Cook Time: 10 minutes
- Category: Snacks
- Method: Frying
- Cuisine: American
Nutrition
- Serving Size: 5
- Calories: 150
- Sugar: 2 g
- Sodium: 300 mg
- Fat: 9 g
- Saturated Fat: 3 g
- Unsaturated Fat: 5 g
- Trans Fat: 0 g
- Carbohydrates: 14 g
- Fiber: 2 g
- Protein: 6 g
- Cholesterol: 10 mg
John Nicholson
Lead Writer & Recipe Developer
Expertise
Recipe Testing and Development, Kitchen Hacks and Time-Saving Tips, Flavor Pairing and Ingredient Selection, Engaging Food Writing and Storytelling
Education
Johnson & Wales University
John Nicholson honed his skills at Johnson & Wales University, learning how to use fresh, local ingredients and down-to-earth techniques to make cooking simple and satisfying.
His recipes blend Southern comfort flavors with a modern touch, inviting everyone to cook with ease and confidence.
Living in Charleston, John takes cues from the city’s lively food scene, local markets, and seasonal produce. He’s all about making meals stress-free through easy tips, flavor pairings, and fun experiments in the kitchen