
Blast-Off Butterfinger Peanut Butter Bombs Recipe: Sweet Fun!
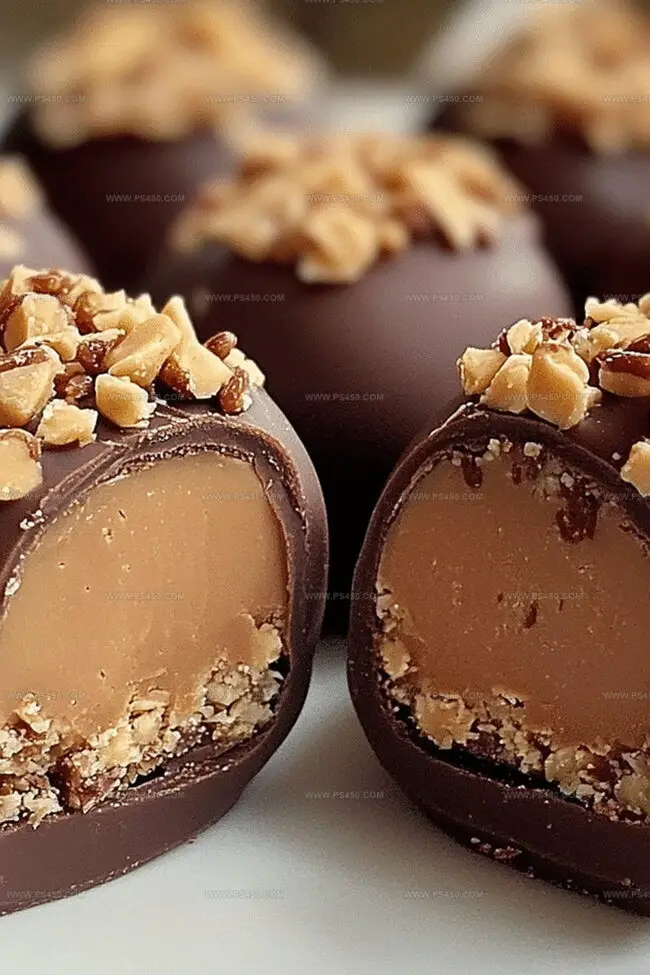
Decadent chocolate treats with Butterfinger peanut butter bombs deliver an irresistible burst of sweet and salty flavors that dance across your taste buds.
These little morsels pack a punch of indulgence from the first bite.
Rich chocolate coating gives way to a creamy peanut butter center studded with crunchy Butterfinger pieces.
Each bomb promises a delightful contrast of textures and intense flavor profiles.
The recipe combines simple ingredients into a dessert that transforms an ordinary moment into something extraordinary.
No baking required means you can whip up these delectable treats in minutes.
Prepare to be the star of any gathering with these addictive little bites of pure bliss.
Quick Recipe Overview
Everything You Need for Butterfinger Peanut Butter Bombs
For Base Ingredients:For Sweetener:For Texture and Crunch:Helpful Tools for Making Butterfinger Peanut Butter Bombs
How to Shape and Chill Butterfinger Peanut Butter Bombs

Grab your mixing bowl and blend peanut butter, softened butter, and vanilla extract until smooth and silky. The mixture should look rich and glossy.
Slowly incorporate powdered sugar, stirring gently until the mixture transforms into a thick, moldable dough. Keep mixing until everything feels perfectly combined.
Sprinkle in crushed Butterfinger pieces, folding them through the dough with a light touch. Make sure the candy bits are evenly spread for maximum flavor in every bite.
Roll the mixture into small, bite-sized balls using your hands. Each bomb should be compact and uniform, about the size of a quarter.
Place the bombs on a parchment-lined tray and pop them in the refrigerator. Let them firm up for about 30 minutes, allowing the flavors to meld and the texture to become wonderfully dense.
Remove the chilled bombs from the fridge and serve immediately. These sweet treats are perfect for sharing with friends or enjoying as a quick dessert indulgence.
Mix It Up with New Additions to Peanut Butter Bombs
Butterfinger Bombs: Ways to Plate and Present
Storage Tips for Butterfinger Peanut Butter Bombs
FAQs
Use a rolling pin or food processor to crush the Butterfinger bars into small, uniform pieces. Place the bars in a sealed plastic bag and gently crush them to avoid turning them into fine crumbs.
Stick with creamy, commercial peanut butter for best results. Natural peanut butter has a different oil content and might make the mixture too runny or difficult to form into bombs.
Make sure the peanut butter mixture is well-chilled before shaping. Refrigerate the mixture for about 30 minutes to help it firm up and make it easier to roll into smooth, compact balls.
Yes, you can prepare the Butterfinger Peanut Butter Bombs up to 3 days in advance. Store them in an airtight container in the refrigerator to maintain their texture and flavor.
Print
Explosive Butterfinger Peanut Butter Bombs Recipe
- Total Time: 45 minutes
- Yield: 25 1x
Description
Butterfinger Peanut Butter Bombs deliver pure indulgence with crushed candy bars and creamy peanut butter centers. Rich chocolate coating and crunchy candy pieces create an irresistible treat you cannot resist.
Ingredients
- 1 cup (240 ml) creamy peanut butter
- ½ cup (113 g) unsalted butter, softened
- 2 cups (226 g) powdered sugar
- 1 cup crushed Butterfinger candy bars
- 2 cups (340 g) semi-sweet or milk chocolate chips
- 1 tbsp (15 ml) coconut oil or vegetable shortening (optional, for smoother chocolate coating)
- 1 tsp vanilla extract
Instructions
- Blending Base: In a large mixing bowl, cream together peanut butter, softened butter, and vanilla extract until smooth and fully integrated, creating a luxurious foundational mixture.
- Dough Preparation: Gradually fold powdered sugar into the creamy base, working the ingredients until a malleable dough forms that holds its shape and has a consistent texture.
- Butterfinger Incorporation: Gently fold crushed Butterfinger pieces throughout the dough, ensuring even distribution of the candied chocolate-peanut butter fragments for maximum flavor complexity.
- Shaping Technique: Craft uniform spherical bombs by rolling small portions of dough between palms, creating perfectly rounded morsels with smooth exterior surfaces.
- Chilling Process: Arrange the shaped bombs on a parchment-lined baking sheet, spacing them slightly apart, and refrigerate for 30 minutes to solidify and enhance structural integrity.
- Final Enhancement: Optional gourmet finishing involves drizzling melted chocolate over the chilled bombs or rolling them in additional crushed Butterfinger fragments to elevate visual appeal and textural intrigue.
Notes
- Chill Thoroughly: Refrigerate the bombs for at least 30 minutes to ensure a perfect, firm texture that holds its shape and enhances flavor melding.
- Crush Carefully: Break Butterfinger bars into fine, consistent pieces to distribute evenly throughout the mixture, preventing large chunks that might disrupt the smooth texture.
- Room Temperature Matters: Use softened butter and room temperature ingredients to create a smooth, easily blendable dough that combines seamlessly without lumps.
- Versatile Coating Options: Experiment with chocolate drizzles, additional Butterfinger crumbs, or alternative coatings like crushed nuts or cocoa powder to customize the bombs’ exterior and flavor profile.
- Prep Time: 15 minutes
- Cook Time: 30 minutes
- Category: Snacks, Desserts
- Method: Blending
- Cuisine: American
Nutrition
- Serving Size: 25
- Calories: 180
- Sugar: 14 g
- Sodium: 50 mg
- Fat: 12 g
- Saturated Fat: 5 g
- Unsaturated Fat: 7 g
- Trans Fat: 0 g
- Carbohydrates: 20 g
- Fiber: 1 g
- Protein: 3 g
- Cholesterol: 10 mg
John Nicholson
Lead Writer & Recipe Developer
Expertise
Recipe Testing and Development, Kitchen Hacks and Time-Saving Tips, Flavor Pairing and Ingredient Selection, Engaging Food Writing and Storytelling
Education
Johnson & Wales University
John Nicholson honed his skills at Johnson & Wales University, learning how to use fresh, local ingredients and down-to-earth techniques to make cooking simple and satisfying.
His recipes blend Southern comfort flavors with a modern touch, inviting everyone to cook with ease and confidence.
Living in Charleston, John takes cues from the city’s lively food scene, local markets, and seasonal produce. He’s all about making meals stress-free through easy tips, flavor pairings, and fun experiments in the kitchen