
Crunchy Frozen Yogurt Granola Cups Recipe for Sweet Smiles
Chilly summer days demand a tangy frozen yogurt granola cups treat that surprises and delights.
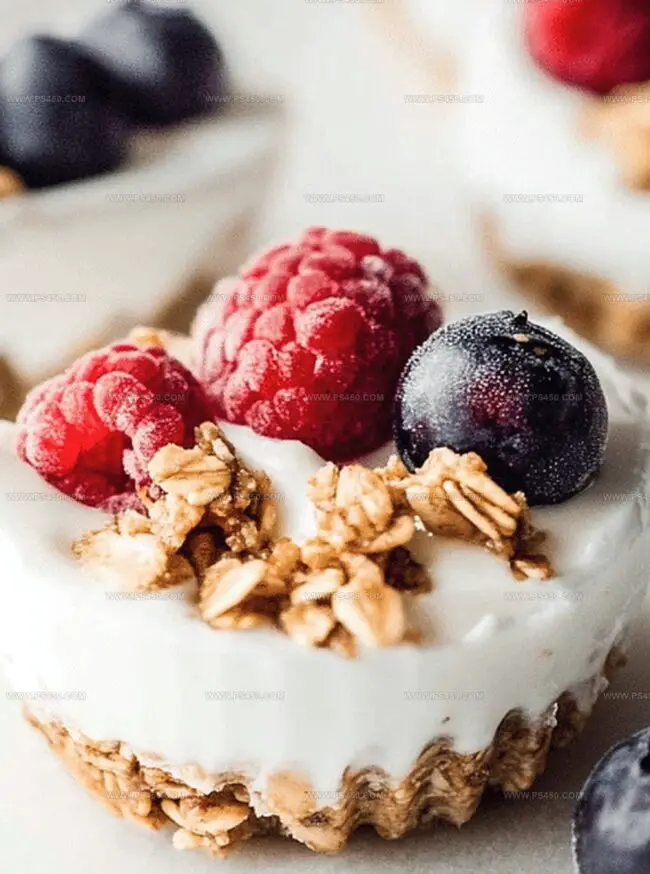
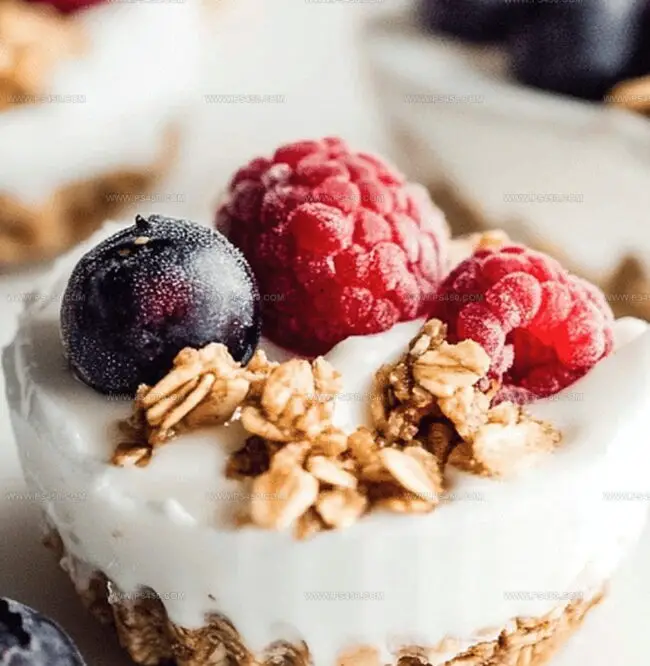
Creamy swirls of yogurt nestled into crisp, golden granola create a delectable handheld dessert.
Each bite delivers a perfect balance between smooth and crunchy textures that dance across your palate.
Simple ingredients transform into an elegant snack that feels both indulgent and refreshing.
Minimal preparation means you can whip up these delightful cups in just minutes, making them ideal for spontaneous sweet cravings.
Kids and adults alike will adore these cool, customizable treats that offer a playful twist on traditional desserts.
Grab some fresh berries and let your creativity shine with these irresistible frozen delights.
Why Frozen Yogurt Granola Cups Make The Best Chilled Treat
Everything You Need For Frozen Yogurt Granola Cups
Base Ingredients:Yogurt Filling:Toppings:How To Build Frozen Yogurt Granola Cups Step By Step
Step 1: Craft the Crunchy Foundation
Grab a muffin tin and line it with soft silicone or paper cups. In a mixing bowl, combine:Stir everything until the mixture looks perfectly blended. Scoop about a tablespoon of this delicious mixture into each muffin cup. Press down firmly to create a solid, tasty base that will make your taste buds dance.
Step 2: Create the Creamy Center
Grab a fresh bowl and whip together:Whisk these ingredients until they become smooth and inviting. Carefully spoon about two tablespoons of this dreamy yogurt mixture over each granola foundation.
Step 3: Decorate with Deliciousness
Sprinkle your cups with an array of mouthwatering toppings like:Get creative and make each bite a unique flavor adventure!
Step 4: Freeze and Transform
Slide the muffin tin into the freezer. Let these little gems chill for 2-3 hours until they become perfectly solid. The waiting is the hardest part, but trust me, it’s worth it!
Step 5: Serve and Savor
Remove your yogurt bites from the freezer and let them sit for a couple of minutes. This quick rest helps them soften just enough to become irresistibly creamy. Grab a bite and enjoy your homemade treat right away. If you somehow resist eating them all, store the extras in a sealed container in the freezer for up to a month.
Pro Tip: These make fantastic post-workout snacks or cool summer desserts that will impress everyone!
Tips For Frozen Yogurt Granola Cups That Stay Crunchy
How To Store Frozen Yogurt Granola Cups Without A Mess
Toppings That Go Great With Frozen Yogurt Granola Cups
Fun Flavor Twists On Frozen Yogurt Granola Cups
Questions Answered For Frozen Yogurt Granola Cups
Absolutely! You can use any granola you like, whether homemade or from the store. Just make sure it’s not too crumbly so it holds together in the base.
While Greek yogurt works best because it’s thick and creamy, you can use regular yogurt. If using regular yogurt, strain it through a cheesecloth first to remove excess liquid and create a similar consistency.
Using silicone liners works best for easy removal. If using paper liners, lightly spray them with cooking spray before adding the granola mixture to help prevent sticking.
These cups are a nutritious snack packed with protein from Greek yogurt, fiber from granola, and vitamins from fresh berries. They’re a healthier alternative to traditional frozen desserts, offering a balanced mix of ingredients.
Print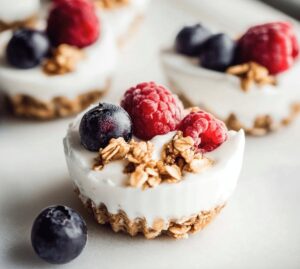
Frozen Yogurt Granola Cups Recipe
- Total Time: 2.5 hours
- Yield: 12 1x
Description
Cool summer snacks reach new heights with these frozen yogurt granola cups, blending creamy yogurt and crunchy granola into perfect handheld treats. Refreshing and simple, these cups offer a delightful balance of flavors that will satisfy sweet cravings on warm days.
Ingredients
Main Ingredients:
- 1.5 cups granola (store-bought or homemade)
- 1.5 cups Greek yogurt (vanilla or plain)
Binding/Liquid Ingredients:
- 2 tablespoons honey or maple syrup
- 2 tablespoons melted coconut oil or peanut butter
- 1 teaspoon vanilla extract (optional for extra flavor)
- 2 tablespoons honey or maple syrup (optional, for sweetness)
Topping Ingredients:
- Fresh berries (strawberries, blueberries, raspberries, etc.)
- Chopped nuts (almonds, walnuts, or pistachios)
- Mini chocolate chips or coconut flakes (optional)
Instructions
- Prepare the muffin tin by lining with silicone or paper liners, creating a smooth surface for the granola base.
- Combine granola with honey and melted coconut oil in a mixing bowl, stirring until the mixture becomes cohesive and slightly sticky.
- Distribute the granola mixture evenly into each muffin cup, using the back of a spoon to compress and create a firm, compact foundation.
- In a separate bowl, whisk Greek yogurt with honey and vanilla extract until the mixture becomes smooth and well-integrated.
- Carefully layer the yogurt mixture over the granola base, ensuring an even distribution in each cup.
- Enhance the cups with a decorative and flavorful topping of fresh berries, chopped nuts, or chocolate chips, creating visual appeal and added texture.
- Transfer the muffin tin to the freezer, allowing the cups to solidify completely for approximately 2-3 hours.
- When ready to serve, remove the tin from the freezer and let the cups rest briefly at room temperature to soften slightly.
- Gently extract the frozen yogurt cups from the liners and enjoy immediately.
- Store any remaining cups in an airtight container in the freezer for future enjoyment, maintaining their quality for up to one month.
Notes
- Customize the granola base by using your favorite granola blend or making a homemade version for a more personalized touch.
- Swap honey with maple syrup or agave nectar for a vegan-friendly alternative that adds unique flavor profiles.
- Use non-fat Greek yogurt or plant-based yogurt to create lighter, dietary-specific versions of these frozen treats.
- Experiment with different toppings like chia seeds, shredded coconut, or dried fruit to add extra nutrition and crunch to your cups.
- Prep Time: 10 minutes
- Cook Time: 2-3 hours
- Category: Breakfast, Snacks, Desserts
- Method: Mixing
- Cuisine: American
Nutrition
- Serving Size: 12
- Calories: 160
- Sugar: 6 g
- Sodium: 10 mg
- Fat: 7 g
- Saturated Fat: 4 g
- Unsaturated Fat: 2 g
- Trans Fat: 0 g
- Carbohydrates: 20 g
- Fiber: 2 g
- Protein: 5 g
- Cholesterol: 5 mg
Emily Morgan
Food Critic & Kitchen Tips Specialist
Expertise
Global Food Exploration & Critique, Simple Kitchen Hacks & Time-Saving Tips, Presentation & Plating Techniques, Culinary Research & Storytelling.
Education
New York University
Emily Morgan has journeyed across the globe, collecting culinary secrets that turn everyday ingredients into impressive meals.
Based in Seattle and armed with a Journalism degree from NYU, she blends thorough research with a flair for presentation, ensuring every dish looks just as good as it tastes.
Focusing on fresh flavors, simple methods, and a bit of fun, Emily shows home cooks how to elevate their daily cooking without fancy gadgets or complex steps.