
No-Knead Rosemary Garlic Bread Recipe with a Rustic Crust
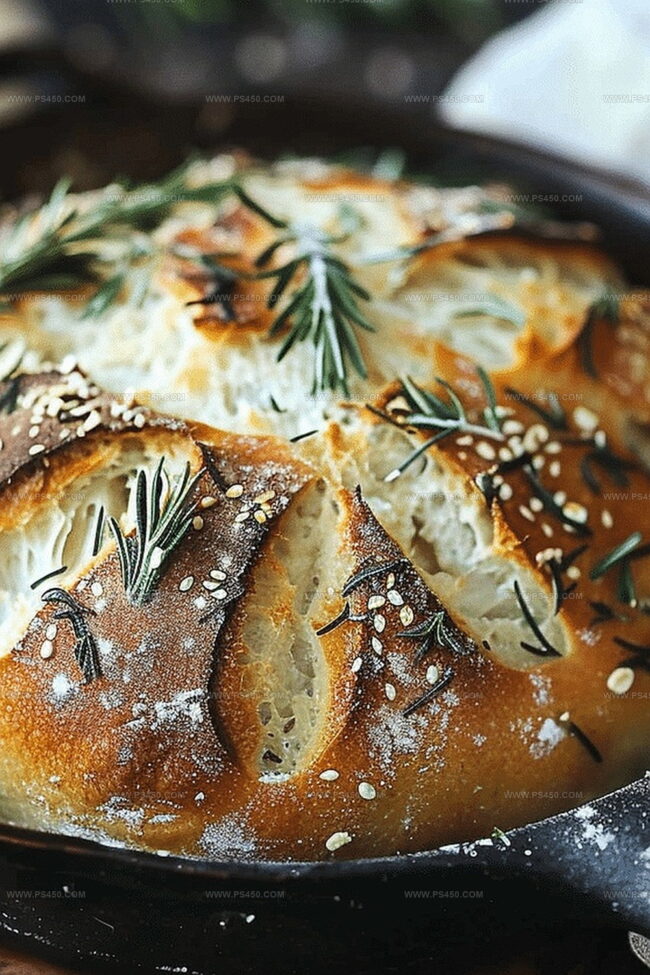
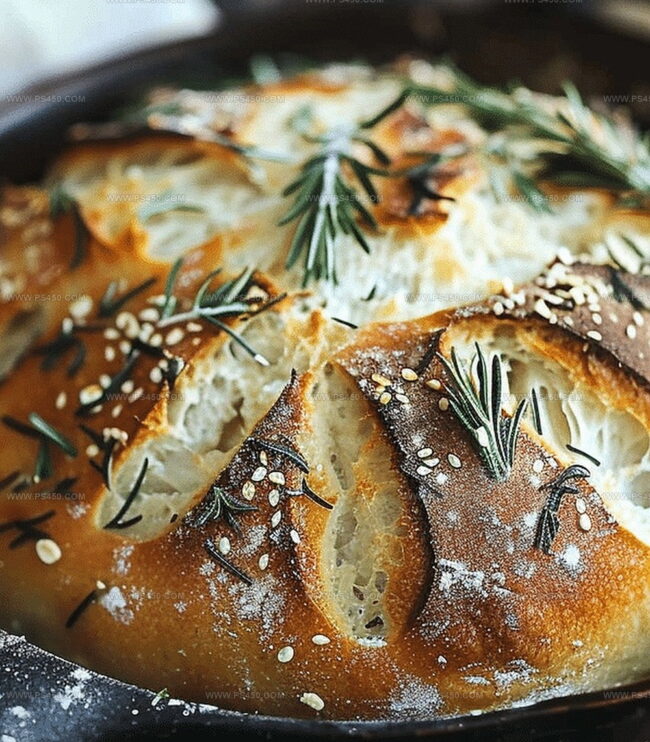
Bread baking reaches new heights with this no-knead rosemary garlic bread that promises golden, crusty perfection.
Aromatic herbs and robust garlic infuse every fiber of this rustic loaf with irresistible flavor.
Simple ingredients come together effortlessly, creating a bread that looks like it emerged from a professional bakery.
Minimal effort yields maximum deliciousness in this foolproof recipe.
The kitchen will fill with an enticing aroma that beckons everyone to the table.
Warm, crusty slices await, ready to transform an ordinary meal into something extraordinary.
Grab a slice and savor the magic of homemade bread.
Quick Recipe Overview
Rustic No Knead Rosemary Garlic Bread Ingredient List
For Dry Ingredients:For Aromatic Ingredients:For Liquid and Binding Ingredient:Tools for Rustic No Knead Rosemary Garlic Bread Success
How to Bake Rustic No Knead Rosemary Garlic Bread at Home
Grab a big mixing bowl and toss in flour, crumbled herbs, salt, pepper, and yeast. Stir everything quickly to combine. Pour in water and mix until you create a messy, wet mixture that looks slightly uneven and rough.
Cover the bowl completely and let it sit quietly on your kitchen counter for a full day. Watch as tiny bubbles start forming and the dough transforms slowly.
Lightly coat a cast iron skillet with oil and dust with cornmeal. Gently pour the risen dough onto a floured surface. Carefully mold it into a beautiful round shape without crushing its delicate air pockets.
Set the shaped dough back into the skillet. Drape a clean kitchen towel over it and allow it to expand for two hours until it looks puffy and almost doubled.
Heat your oven to a toasty 450F. Slide the skillet inside and bake for 35-40 minutes. The bread will turn a gorgeous golden color and sound hollow when you tap its bottom.
Let the bread rest briefly before slicing. Serve alongside soups, salads, or simply spread with creamy butter for a delightful treat.
Flavor Boosts for Rosemary Garlic Bread That Stands Out
Serve Rustic Bread with Stew, Soup, or Olive Oil
Store Rosemary Garlic Bread Without Losing Its Crust
FAQs
No knead bread requires minimal handling and uses extended fermentation time to develop gluten and flavor, eliminating the need for manual kneading. The long resting period allows natural enzymes to break down flour, creating a complex taste and soft texture.
Absolutely! While rosemary works perfectly, you can substitute with thyme, oregano, or basil. Each herb will bring a unique flavor profile to the bread while maintaining the same basic technique.
The extended fermentation develops deeper flavors and creates better gluten structure. During this time, wild yeasts and bacteria work to enhance the bread’s taste and create those signature air pockets that give the bread its rustic texture.
A cast iron skillet or Dutch oven works best, but you can also use a heavy ceramic dish with a lid. The key is having a vessel that can withstand high temperatures and create steam during baking, which helps develop a crispy crust.
Print
Hearty No Knead Rosemary Garlic Bread Recipe
- Total Time: 50 minutes
- Yield: 9 1x
Description
Rustic No Knead Rosemary Garlic Bread brings Mediterranean warmth to home kitchens with minimal effort. Crusty exterior and tender crumb showcase simple ingredients that deliver complex flavor profiles for bread enthusiasts.
Ingredients
- 3 cups (375 grams) all-purpose flour
- 1 ½ cups (360 ml) water, room temperature
- ½ tsp instant yeast
- 3 cloves garlic, minced
- 1 tbsp fresh rosemary, chopped (or 1 tsp dried)
- 1 ¼ tsps kosher salt
- ¾ tsp black pepper
- 2 tbsps cornmeal, for dusting the pan
Instructions
- Mixing Dry Ingredients: Combine flour, minced garlic, rosemary, salt, and yeast in a large mixing bowl, ensuring even distribution of all components.
- Creating Dough Base: Pour lukewarm water into the dry ingredients, stirring until a shaggy, moist dough forms with an uneven texture.
- Initial Fermentation: Cover the bowl with plastic wrap and let the dough rest at room temperature for 18-24 hours, during which it will become bubbly and expand significantly.
- Dough Preparation: Gently transfer the fermented dough onto a lightly floured surface, carefully shaping it into a rustic round without deflating the delicate air pockets.
- Secondary Proofing: Place the shaped dough into an oiled cast iron skillet or Dutch oven dusted with cornmeal. Drape a clean kitchen towel over the dough and allow it to rise for approximately two hours until visibly puffy.
- Baking Process: Preheat the oven to 450F (230C). Once fully heated, introduce the dough-filled skillet and bake for 35-40 minutes, watching for a deep golden-brown crust to develop.
- Finishing and Serving: Remove the bread from the oven and confirm doneness by tapping the bottom – a hollow sound indicates perfect baking. Let the loaf cool briefly before slicing and serving with olive oil or softened butter.
Notes
Gentle Dough Handling: Avoid overworking the dough to maintain its light, airy texture and prevent dense bread formation.
Temperature Precision: Ensure lukewarm water (around 110°F) activates yeast without killing it, creating optimal fermentation conditions.
Moisture Management: Cover dough completely during long fermentation to prevent surface drying and maintain proper hydration.
Gluten-Free Adaptation: Substitute regular flour with a gluten-free blend and add xanthan gum to improve bread structure and prevent crumbling.
- Prep Time: 10 minutes
- Cook Time: 40 minutes
- Category: Snacks, Dinner, Appetizer
- Method: Baking
- Cuisine: Italian
Nutrition
- Serving Size: 9
- Calories: 160
- Sugar: 0 g
- Sodium: 210 mg
- Fat: 1 g
- Saturated Fat: 0 g
- Unsaturated Fat: 0 g
- Trans Fat: 0 g
- Carbohydrates: 33 g
- Fiber: 1 g
- Protein: 4 g
- Cholesterol: 0 mg
John Nicholson
Lead Writer & Recipe Developer
Expertise
Recipe Testing and Development, Kitchen Hacks and Time-Saving Tips, Flavor Pairing and Ingredient Selection, Engaging Food Writing and Storytelling
Education
Johnson & Wales University
John Nicholson honed his skills at Johnson & Wales University, learning how to use fresh, local ingredients and down-to-earth techniques to make cooking simple and satisfying.
His recipes blend Southern comfort flavors with a modern touch, inviting everyone to cook with ease and confidence.
Living in Charleston, John takes cues from the city’s lively food scene, local markets, and seasonal produce. He’s all about making meals stress-free through easy tips, flavor pairings, and fun experiments in the kitchen