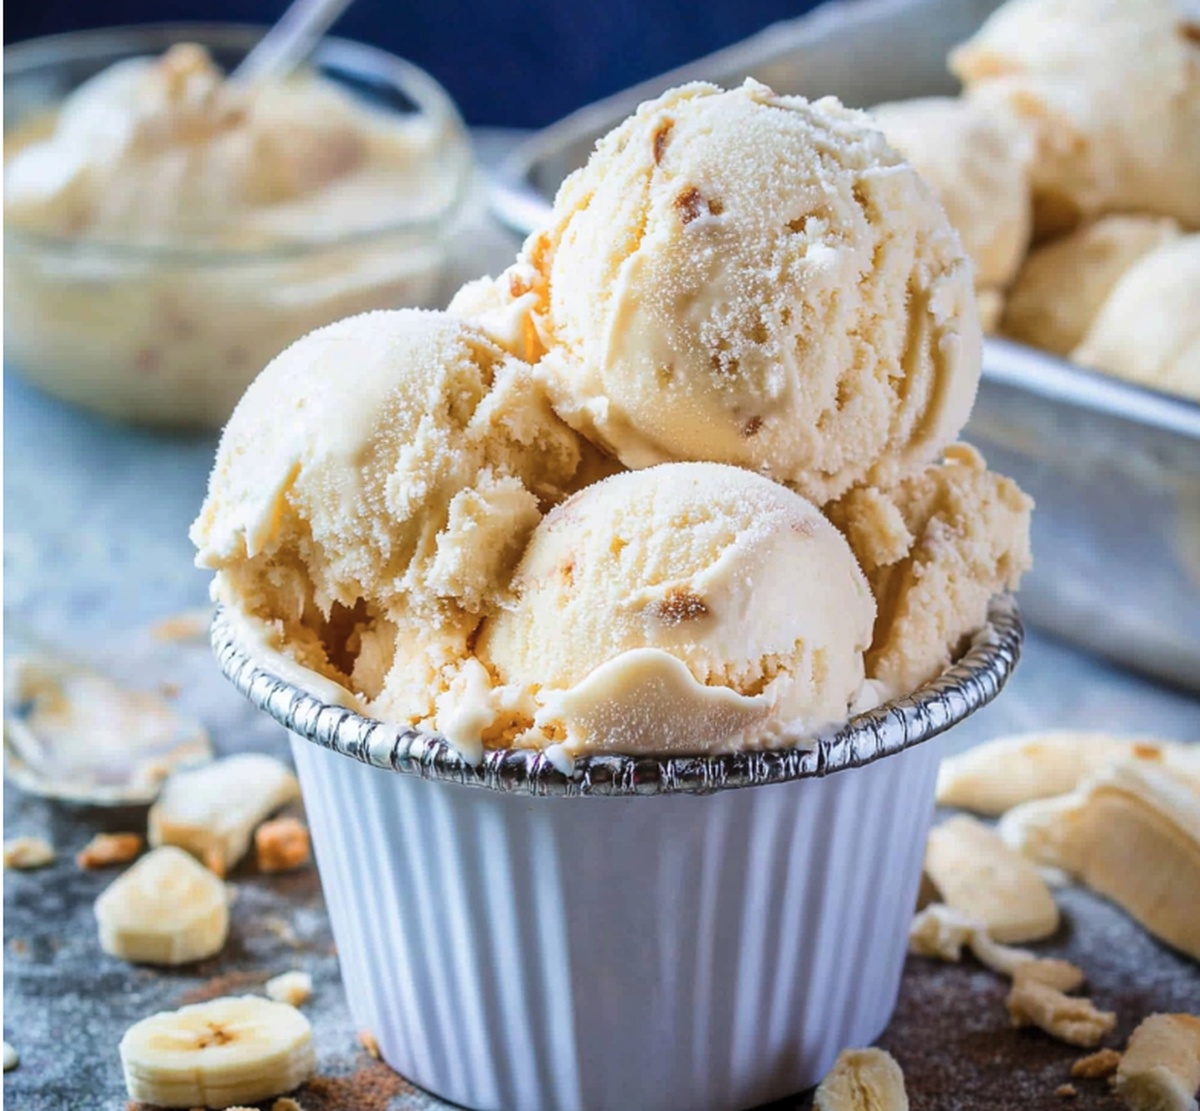
Creamy No Churn Banana Ice Cream Recipe to Try Soon
Creamy homemade no churn banana ice cream promises a delightful dessert without complex equipment or techniques.
Summer afternoons call for something sweet and refreshing.
Ripe bananas become the star ingredient in this simple treat.
Cold and smooth, the recipe requires just a few pantry staples.
Whipped cream and condensed milk blend into a dreamy base that captures tropical fruit essence.
Some kitchen magic happens when you mix these ingredients together.
This dessert will become your new go-to summer classic that impresses everyone with minimal effort.
Grab a spoon and get ready to savor pure, cool deliciousness.
Why No Churn Banana Ice Cream Stands Out
Simple Ingredients For No Churn Banana Ice Cream
Creamy Base Ingredients:Whipping Ingredients:Optional Mix-In Ingredients:Seasoning Ingredient:How To Make No Churn Banana Ice Cream
Step 1: Create Banana Base
Grab ripe bananas and slice them into chunks. Toss the banana pieces into a blender or food processor. Pulse and blend until you achieve a silky smooth puree. Pour in sweetened condensed milk, vanilla extract, and a tiny pinch of salt. Blend everything together until the mixture looks creamy and dreamy.
Step 2: Whip Heavenly Cream
Grab a large mixing bowl and pour in cold heavy cream. Using an electric mixer, whip the cream with passion until it forms perfect, fluffy peaks. This usually takes about 3-4 minutes of enthusiastic mixing. The cream should stand up tall and proud when you lift the beaters.
Step 3: Combine Banana and Cream
Gently fold the banana mixture into the whipped cream. Use a spatula and mix with care, ensuring the ingredients blend smoothly without deflating the cream’s beautiful texture.
Step 4: Add Exciting Mix-Ins
Optional but totally recommended! Sprinkle in your favorite goodies like:Fold these delightful additions into the ice cream base with a light touch.
Step 5: Freeze and Set
Pour the entire mixture into a freezer-safe container. Smooth the top with a spatula to create an even surface. Cover tightly with plastic wrap or a lid. Place in the freezer and let it chill for 4-6 hours until it becomes perfectly firm.
Step 6: Serve and Indulge
Remove the ice cream from the freezer and let it sit for 5 minutes to soften slightly. Scoop into bowls and get creative with toppings:Enjoy your homemade banana ice cream paradise!
Helpful Tricks For No Churn Banana Ice Cream
How To Store No Churn Banana Ice Cream
Toppings For No Churn Banana Ice Cream
Ways To Mix Up No Churn Banana Ice Cream
FAQ About No Churn Banana Ice Cream
Ripe bananas provide natural sweetness and create a smoother, creamier texture. They’re easier to blend and have more intense banana flavor compared to green or underripe bananas.
You’ll need an electric mixer to whip the cream properly. Hand whisking won’t create the necessary stiff peaks that give the ice cream its light, creamy texture. A stand mixer or hand mixer works best.
Yes! Replace heavy cream with coconut cream and use dairy-free condensed milk. The result will be a slightly different texture but still deliciously creamy and smooth.
This no-churn banana ice cream stays good in the freezer for up to 2 weeks when stored in an airtight container. After that, ice crystals might start forming and affect the texture.
Print
No Churn Banana Ice Cream Recipe
- Total Time: 6 hours 15 minutes
- Yield: 6 1x
Description
Creamy, dreamy No Churn Banana Ice Cream delivers pure summer bliss with minimal effort. Cool banana sweetness swirls through silky smooth frozen delight that beckons you to savor each delectable spoonful.
Ingredients
Fruits and Base:
- 3 ripe bananas, peeled and sliced
- 1 can (14 ounces / 400 grams) sweetened condensed milk
Dairy and Flavor Enhancers:
- 2 cups (480 milliliters) heavy whipping cream, cold
- 1 teaspoon vanilla extract
- ¼ teaspoon salt (optional)
Toppings and Mix-ins:
- ½ cup chocolate chips or chocolate chunks
- ½ cup crushed cookies (e.g., vanilla wafers or graham crackers)
- ¼ cup chopped nuts (e.g., walnuts, pecans)
- ¼ cup caramel or chocolate sauce, for swirling
Instructions
- Peel and slice ripe bananas, then transform them into a velvety puree using a blender or food processor, ensuring a silky-smooth consistency.
- Incorporate sweetened condensed milk, vanilla extract, and a hint of salt into the banana puree, blending until the mixture achieves a uniform, creamy texture.
- Chill a large mixing bowl and whip the heavy cream using an electric mixer, creating stiff, billowing peaks that hold their shape.
- Delicately fold the banana mixture into the whipped cream, using a gentle technique to maintain the airiness of the cream while fully integrating the flavors.
- For added indulgence, carefully fold in chocolate chips, chopped nuts, or crumbled cookies, distributing them evenly throughout the mixture.
- Consider swirling in caramel or chocolate sauce for an extra layer of decadence, creating mesmerizing patterns within the ice cream base.
- Transfer the luxurious mixture to a freezer-safe container, smoothing the surface with a spatula to create an even layer.
- Seal the container with plastic wrap or an airtight lid, then place in the freezer for 4-6 hours, allowing the ice cream to set and develop its rich, creamy texture.
- When ready to serve, remove the ice cream from the freezer and let it rest at room temperature for 5 minutes, softening slightly for easy scooping.
- Elevate the dessert with garnishes like fresh banana slices, a drizzle of chocolate syrup, a dollop of whipped cream, or a sprinkle of toasted nuts for added crunch and visual appeal.
Notes
- Choose ripe, spotty bananas for maximum sweetness and creaminess, as they’ll blend more smoothly and provide natural sugar.
- Freeze bananas beforehand for an extra creamy texture and intensified banana flavor that elevates the entire dessert.
- Skip the salt for a kid-friendly version, or swap condensed milk with coconut milk for a dairy-free alternative that maintains the rich, smooth consistency.
- Experiment with flavor variations by adding a tablespoon of cocoa powder, a splash of rum, or a sprinkle of cinnamon to transform the basic recipe into a gourmet treat.
- Prep Time: 15 minutes
- Cook Time: 6 hours
- Category: Desserts, Snacks
- Method: Blending
- Cuisine: American
Nutrition
- Serving Size: 6
- Calories: 452
- Sugar: 37 g
- Sodium: 135 mg
- Fat: 28 g
- Saturated Fat: 17 g
- Unsaturated Fat: 11 g
- Trans Fat: 0 g
- Carbohydrates: 52 g
- Fiber: 2 g
- Protein: 6 g
- Cholesterol: 87 mg
Emily Morgan
Food Critic & Kitchen Tips Specialist
Expertise
Global Food Exploration & Critique, Simple Kitchen Hacks & Time-Saving Tips, Presentation & Plating Techniques, Culinary Research & Storytelling.
Education
New York University
Emily Morgan has journeyed across the globe, collecting culinary secrets that turn everyday ingredients into impressive meals.
Based in Seattle and armed with a Journalism degree from NYU, she blends thorough research with a flair for presentation, ensuring every dish looks just as good as it tastes.
Focusing on fresh flavors, simple methods, and a bit of fun, Emily shows home cooks how to elevate their daily cooking without fancy gadgets or complex steps.