
Peanut Butter Oreo Sandwich Cookie Recipe You’ll Love
Crafting these delectable soft homemade peanut butter oreos brings pure childhood magic right into your kitchen.
Memories of classic sandwich cookies dance through my mind whenever I mix these ingredients.
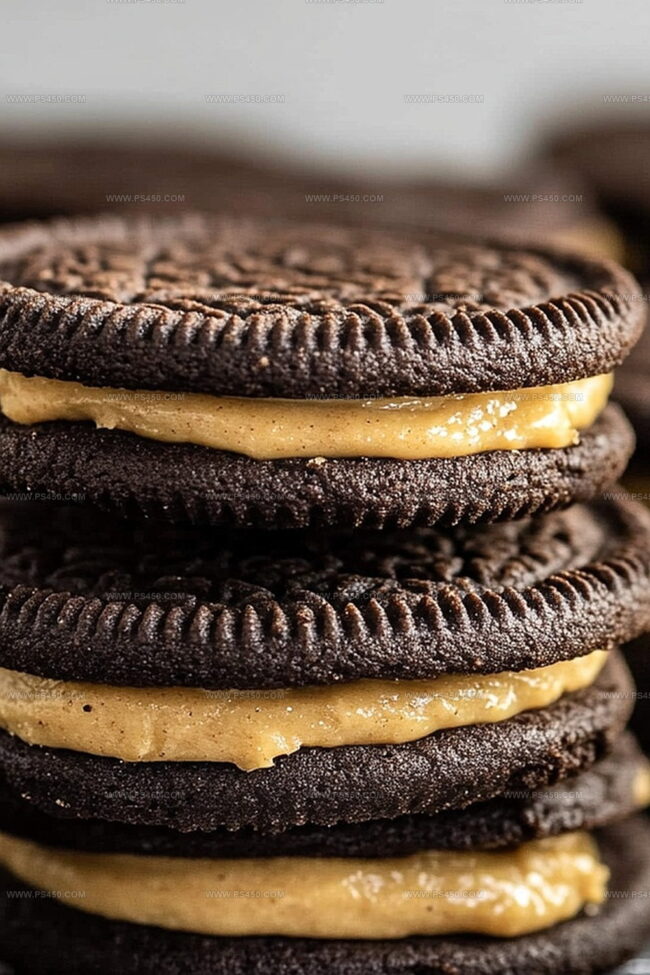
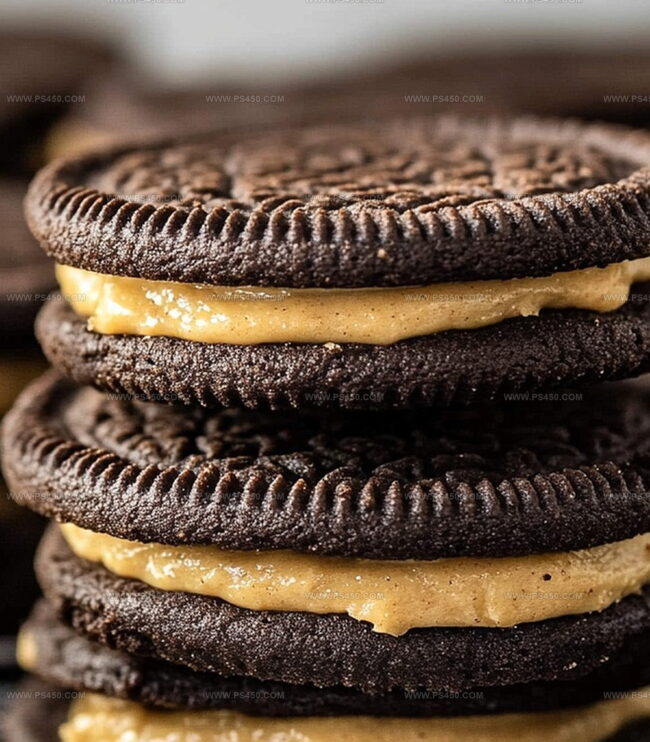
Chocolate wafers sandwiching creamy peanut butter filling create an irresistible treat that beats store-bought versions hands down.
Baking these from scratch means controlling every delicious detail with love and precision.
Home kitchens transform into sweet wonderlands when these cookies start taking shape.
Each bite promises a nostalgic journey through rich, decadent flavors that connect generations.
You’ll definitely want to share these with everyone who walks through your door.
Grab a glass of cold milk and get ready for cookie perfection that will make taste buds sing.
Why Soft Homemade Peanut Butter Oreos Are Melt-In-Your-Mouth Good
What You’ll Need For Soft Homemade Peanut Butter Oreos
Dry Ingredients:Wet Ingredients:Filling Ingredients:Easy Guide To Making Soft Homemade Peanut Butter Oreos
Step 1: Whip Up Chocolate Cookie Dough
Warm up your oven to a cozy 350F (175C) and grab a baking sheet lined with parchment paper. In a spacious mixing bowl, cream together softened butter, brown sugar, and granulated sugar until they transform into a fluffy cloud-like mixture. Crack in the eggs and splash of vanilla extract, stirring until everything looks smooth and dreamy. In a separate bowl, combine your dry ingredients:Gently fold the dry ingredients into the wet mixture, creating a rich chocolate cookie dough that’s ready to become something magical.
Step 2: Bake Your Chocolate Cookies
Scoop out adorable little dough balls onto your prepared baking sheet, leaving some breathing room between each cookie. Pop them into the preheated oven and bake for 8-10 minutes. You’ll know they’re perfect when the edges look set but the centers remain wonderfully soft. Let the cookies rest on the baking sheet for a quick 5-minute cooldown, then transfer them to a wire rack to chill completely.
Step 3: Create Creamy Peanut Butter Filling
Grab your mixing bowl and whip together peanut butter and butter until they’re silky smooth. Gradually introduce powdered sugar, mixing until the filling becomes beautifully fluffy. Add a splash of vanilla extract and a touch of heavy cream if you want an extra creamy texture.
Step 4: Craft Your Peanut Butter Oreo Sandwiches
Time for the fun part! Take a cooled chocolate cookie and spread a generous layer of peanut butter filling on its flat side. Gently press another cookie on top, creating a perfect sandwich. For an extra treat, you can chill these delightful cookies for about 30 minutes to firm up the filling. Get ready to enjoy a homemade version of everyone’s favorite sandwich cookie!
Tips To Nail The Texture Of Soft Homemade Peanut Butter Oreos
Store Soft Homemade Peanut Butter Oreos The Right Way
Perfect Pairings For Soft Homemade Peanut Butter Oreos
Creative Twists On Soft Homemade Peanut Butter Oreos
FAQs For Soft Homemade Peanut Butter Oreos
The combination of brown and granulated sugar creates a perfect texture and depth of flavor. Brown sugar adds moisture and a caramel-like richness, while granulated sugar helps the cookies spread and crisp up beautifully.
Stick with creamy, smooth peanut butter for the best filling consistency. Natural peanut butter might separate or make the filling too runny, so a standard creamy commercial peanut butter works best.
Look for slightly set edges and a soft center. The cookies will look slightly underbaked, but they’ll firm up as they cool. Overbaking will make them too crisp and lose their soft, tender texture.
Yes! You can prepare the cookie dough and filling separately and refrigerate them for 2-3 days before assembling. The cookies and filling can be stored separately, making it easy to prep in advance.
Print
Soft Homemade Peanut Butter Oreos Recipe
- Total Time: 30 minutes
- Yield: 24 1x
Description
Homemade Peanut Butter Oreos bring nostalgic comfort with a gourmet twist. Classic cookies get a rich upgrade through creamy peanut butter centers and dark chocolate-kissed sandwich cookies perfect for sharing.
Ingredients
Soft Homemade Peanut Butter Oreos
Cookies:
- 1 cup (2 sticks / 227 grams) unsalted butter, softened
- 1 cup (200 grams) brown sugar, packed
- ½ cup (100 grams) granulated sugar
- 2 large eggs
- 2 teaspoons vanilla extract
- 2 cups (240 grams) all-purpose flour
- ¾ cup (75 grams) unsweetened cocoa powder
- 1 teaspoon baking soda
- ½ teaspoon salt
Peanut Butter Filling:
- ¾ cup (190 grams) creamy peanut butter
- ½ cup (113 grams) unsalted butter, softened
- 1 ½ cups (180 grams) powdered sugar
- 1 teaspoon vanilla extract
- ½ tablespoon (7.5 milliliters) heavy cream (if needed for consistency)
Instructions
- Craft rich, dark chocolate wafers by creaming softened butter with brown and granulated sugars until they transform into a light, airy mixture.
- Incorporate eggs and vanilla extract, whisking until the batter becomes silky and uniform in texture.
- In a separate vessel, thoroughly combine flour, cocoa powder, baking soda, and salt, creating a deep brown dry mixture.
- Gradually fold the dry ingredients into the wet mixture, blending until a cohesive chocolate dough forms without overmixing.
- Preheat the oven to 350F (175C) and prepare baking sheets with parchment paper for optimal cookie release.
- Portion the chocolate dough into uniform tablespoon-sized orbs, positioning them with ample spacing on the lined baking sheets.
- Bake the chocolate wafers for 8-10 minutes, ensuring edges are set while maintaining a tender, soft center.
- Allow cookies to rest on the baking sheet for five minutes, then transfer to a wire cooling rack to reach room temperature.
- Meanwhile, whip peanut butter and butter together until they create a smooth, glossy foundation for the filling.
- Progressively integrate powdered sugar, mixing until the filling achieves a light, fluffy consistency.
- Enhance the filling with vanilla extract and a touch of heavy cream to reach the perfect spreadable texture.
- Carefully spread or pipe a generous layer of peanut butter filling onto the flat surface of one chocolate wafer.
- Gently sandwich another wafer on top, applying slight pressure to create a harmonious cookie.
- Serve immediately for a soft, decadent treat or chill briefly to develop a firmer, more structured sandwich cookie.
Notes
- Ensure butter is at room temperature for easier mixing and smoother cookie dough texture.
- Use unsweetened cocoa powder for a rich, deep chocolate flavor without added sweetness.
- Sift dry ingredients to prevent lumps and create a more uniform cookie texture.
- Chill dough for 15-30 minutes before baking to prevent excessive spreading and maintain cookie shape.
- Opt for natural peanut butter with no added sugar for a more authentic, less sweet filling.
- Use a cookie scoop for consistent cookie sizes and even baking.
- For gluten-free version, substitute all-purpose flour with a 1:1 gluten-free baking blend.
- Create dairy-free alternatives by using coconut oil instead of butter and plant-based milk in filling.
- Store cookies in an airtight container at room temperature for up to 5 days, or refrigerate for longer shelf life.
- Experiment with different nut butters like almond or cashew for unique flavor variations.
- Prep Time: 10 minutes
- Cook Time: 20 minutes
- Category: Desserts, Snacks
- Method: Baking
- Cuisine: American
Nutrition
- Serving Size: 24
- Calories: 260
- Sugar: 18 g
- Sodium: 150 mg
- Fat: 12 g
- Saturated Fat: 6 g
- Unsaturated Fat: 4 g
- Trans Fat: 0 g
- Carbohydrates: 36 g
- Fiber: 1 g
- Protein: 4 g
- Cholesterol: 25 mg
Emily Morgan
Food Critic & Kitchen Tips Specialist
Expertise
Global Food Exploration & Critique, Simple Kitchen Hacks & Time-Saving Tips, Presentation & Plating Techniques, Culinary Research & Storytelling.
Education
New York University
Emily Morgan has journeyed across the globe, collecting culinary secrets that turn everyday ingredients into impressive meals.
Based in Seattle and armed with a Journalism degree from NYU, she blends thorough research with a flair for presentation, ensuring every dish looks just as good as it tastes.
Focusing on fresh flavors, simple methods, and a bit of fun, Emily shows home cooks how to elevate their daily cooking without fancy gadgets or complex steps.