
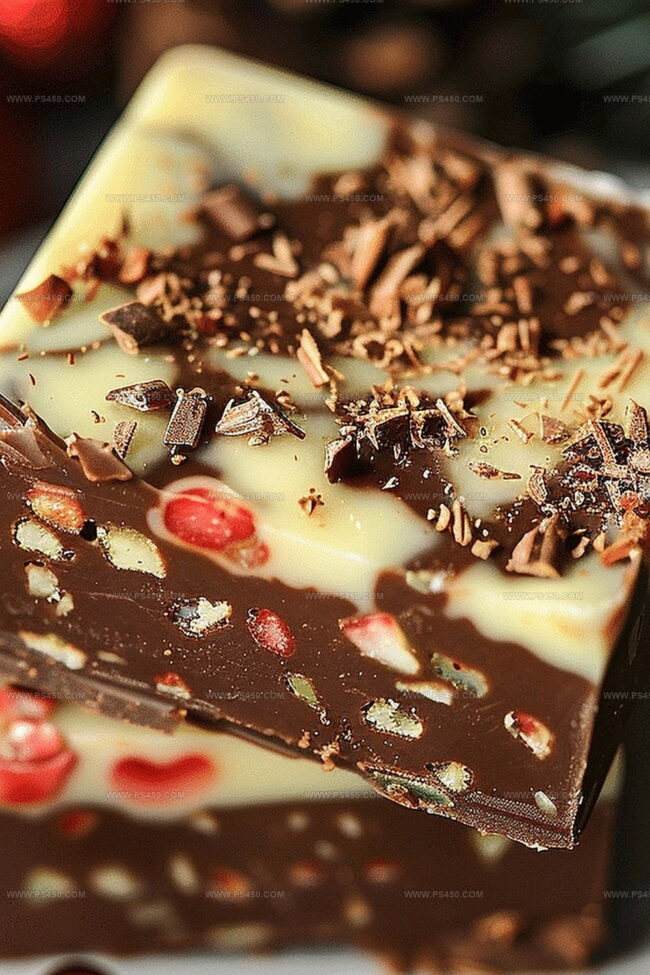
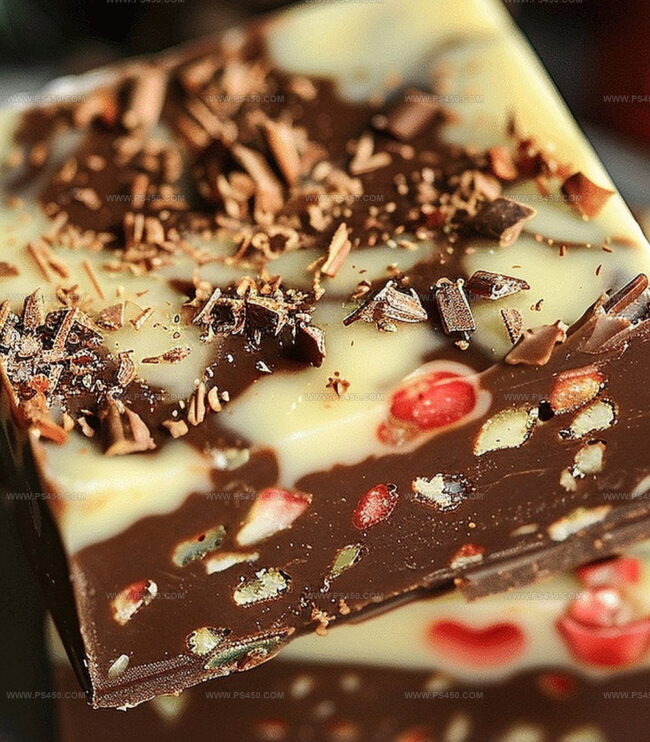
Christmas Fudge Recipe That’s Smooth, Sweet, and Classic
Chocolate lovers find pure bliss in this creamy Christmas fudge recipe that melts hearts faster than snowflakes in December.
Rich flavors dance across your palate with each decadent bite.
The smooth texture whispers holiday memories of cozy gatherings and sweet traditions.
Delicate marshmallow and deep chocolate notes create a symphony of indulgence.
Memories of festive celebrations come alive through this simple yet luxurious treat.
This recipe connects generations through a single, sublime square of happiness.
You’ll want to share every delightful morsel with those closest to you.
Quick Recipe Overview
Ingredients That Bring Christmas Fudge to Life
For Base Ingredients:For Flavor Enhancers:For Festive Toppings:Tools to Melt, Mix, and Pour Christmas Fudge Smoothly
How to Make Rich and Festive Christmas Fudge
Get your baking dish ready by lining it with parchment paper. Let the edges hang over so you can easily lift out the fudge later. Give the paper a quick spray of cooking oil to help things slide.
Toss chocolate chips, sweetened condensed milk, and butter into a heavy saucepan. Cook on super low heat, stirring like crazy until everything becomes a silky smooth chocolate dream. Watch the temperature – no burning allowed!
Pull the pan off the heat and stir in vanilla and a tiny pinch of salt. This transforms your chocolate from good to absolutely mind-blowing.
Pour the chocolate mixture into your prepared pan. Smooth it out with a spatula like you’re painting a delicious canvas. While it’s still warm, sprinkle on fun toppings – think crushed peppermint, colorful sprinkles, or crunchy nuts.
Pop the pan in the refrigerator for a couple hours until the fudge sets solid. Once it’s firm, lift it out using the parchment paper edges and slice into bite-sized squares of pure joy.
Flavor Variations to Brighten Your Christmas Fudge
Serve Christmas Fudge in Boxes, Platters, or Stockings
Store Christmas Fudge for Fresh Bites All Week
FAQs
Use high-quality chocolate and sweetened condensed milk. Stir constantly while melting and avoid high heat. Make sure all ingredients are fully incorporated and smooth before pouring into the pan.
Yes, this recipe doesn’t require a candy thermometer. Use low heat and stir continuously until chocolate melts completely. The condensed milk helps create a smooth texture without needing precise temperature monitoring.
This can happen if you didn’t chill the fudge long enough or used incorrect measurements. Ensure you refrigerate for at least 2 hours and follow the recipe measurements exactly. Cold temperature helps the fudge set and become firm.
Absolutely! You can prepare the fudge up to a week in advance. Store it in an airtight container in the refrigerator. The fudge actually develops a better texture after spending some time chilling, making it perfect for holiday preparation.
Print
Crispy Blackstone Pizza Recipe
- Total Time: 18 minutes
- Yield: 5 1x
Description
Blackstone griddle pizza delights with crispy crust and melted cheese. Homemade dough, fresh toppings, and outdoor cooking create a memorable meal you’ll crave again and again.
Ingredients
- 1 lb (454 g) pizza dough (store-bought or homemade)
- 1 ½ cups (340 g) shredded mozzarella cheese
- ½ cup (120 ml) pizza sauce
- 1 tbsp (15 g) grated Parmesan cheese
- 1 tsp (2 g) Italian seasoning
- Favorite toppings (pepperoni, sausage, mushrooms, peppers, onions, etc.)
- Fresh basil or crushed red pepper for garnish
- 1 tbsp (15 ml) olive oil (for the griddle)
Instructions
- Surface Preparation: Ignite the Blackstone griddle to a mild medium-low warmth, delicately brushing the surface with oil to prevent sticking and promote perfect caramelization.
- Dough Crafting: On a flour-dusted workspace, transform the pizza dough into a thin, elegant circle or rectangle, stretching and rolling to achieve uniform thickness and delicate texture.
- Initial Griddle Cooking: Slide the raw dough onto the heated griddle, allowing it to sizzle for 2-3 minutes until a golden-bronze foundation emerges with characteristic bubbling across its surface.
- Topping Composition: Flip the partially cooked crust, swiftly layering a vibrant tomato sauce, scattering mozzarella, and artfully distributing selected toppings like pepperoni, vegetables, or herbs.
- Finishing Technique: Reduce griddle temperature, create a steam-filled environment by covering with a dome lid, enabling cheese to melt luxuriously and crust to achieve a crisp, caramelized finish over 4-6 minutes.
- Presentation Finale: Embellish the pizza with a delicate sprinkle of Parmesan, Italian seasoning, then slice into elegant wedges, garnishing with fresh basil or chili flakes for a sophisticated flavor profile.
Notes
- Control Griddle Temperature: Maintain a medium-low heat to prevent burning and ensure even cooking, which helps achieve a perfectly crispy yet not charred crust.
- Flour Surface Generously: Use ample flour when stretching dough to prevent sticking and create a smooth, easily manageable pizza base that won’t tear.
- Watch for Bubble Formation: Look for small bubbles on the dough’s surface as a key indicator of proper cooking and readiness to flip, ensuring a light, airy texture.
- Use Lid Technique: Cover the pizza with a dome lid or metal bowl to create a mini-oven effect, helping cheese melt evenly and trapping heat for thorough cooking.
- Prep Time: 10 minutes
- Cook Time: 8 minutes
- Category: Lunch, Dinner, Snacks
- Method: Grilling
- Cuisine: Italian
Nutrition
- Serving Size: 5
- Calories: 400
- Sugar: 3 g
- Sodium: 800 mg
- Fat: 18 g
- Saturated Fat: 8 g
- Unsaturated Fat: 9 g
- Trans Fat: 0 g
- Carbohydrates: 42 g
- Fiber: 2 g
- Protein: 20 g
- Cholesterol: 30 mg
John Nicholson
Lead Writer & Recipe Developer
Expertise
Recipe Testing and Development, Kitchen Hacks and Time-Saving Tips, Flavor Pairing and Ingredient Selection, Engaging Food Writing and Storytelling
Education
Johnson & Wales University
John Nicholson honed his skills at Johnson & Wales University, learning how to use fresh, local ingredients and down-to-earth techniques to make cooking simple and satisfying.
His recipes blend Southern comfort flavors with a modern touch, inviting everyone to cook with ease and confidence.
Living in Charleston, John takes cues from the city’s lively food scene, local markets, and seasonal produce. He’s all about making meals stress-free through easy tips, flavor pairings, and fun experiments in the kitchen